Moving emails from your personal inbox to Shared Inboxes
Customers often contact team members directly (for example, ryan@acme.com) instead of using shared or team addresses (like support@acme.com).
While this is natural, especially when customers have a relationship with a specific team member, it creates visibility and workflow challenges:
- Other team members and admins don’t have visibility
- Hiver features such as SLAs, Tags, Analytics, and more don’t apply
- Manual forwarding is prone to errors and often leads to missed conversations
- Context is lost if a team member is away
To solve this, Hiver lets you create Automation rules that automatically move emails from individual inboxes to a Shared Inbox, based on the sender's email address, domain, or keywords in the subject line. The team can then collaborate, apply SLAs, and track these conversations like any other email in a Shared Inbox.
Prerequisites
To create an Individual Inbox Automation,
- You must be an Admin of the Shared Inbox.
- You must be on the Elite plan.
Why use this automation
Here are two key reasons why using this Automation in Hiver can benefit your business:
1. Maintain visibility and accountability
Let’s say Sara from your Customer Success team manages Acme Corp. Customers at Acme Corp often write directly to her instead of using the team’s shared support email. These emails land in Sara’s Individual Inbox and stay hidden from the rest of the team.
Sara had to manually forward/add these emails to the Shared Inbox so others could collaborate, track SLAs, or take over if she was away. This manual process is easy to miss and doesn’t scale.
With this Automation, any email from Acme’s domain (e.g., @acmecorp.com) automatically moves to the Shared Inbox. You can apply this rule to all members or only specific teammates. This eliminates the need for manual forwarding, everyone stays in the loop from the start, and your workflows remain unaffected.
2. Avoid fragmented conversations
Say Acme Corp has a pending feature request. Sara discusses it with them in a few emails in her inbox. At the same time, the rest of the team continues to talk to Acme through the Shared Inbox, without visibility into what Sara has already covered.
This often leads to duplicate replies, missed context, and a poor customer experience.
With this Automation, every email from Acme to Sara will land in the Shared Inbox. The team will see all history, context, and follow-ups, ensuring smooth collaboration and a unified customer experience.
How do Individual Inbox Automations work
Individual Inbox Automations are created inside a Shared Inbox but act on emails that land in its members’ individual inboxes.
For example, consider Adam, who is part of the Customer Success Shared Inbox. A customer emails him directly at adam@company.com instead of the team’s shared address. Usually, this email would stay in Adam’s personal/individual inbox, hidden from the rest of the team and outside of Hiver’s workflows.
With this Automation in place, Hiver automatically brings such emails into the Shared Inbox so that the entire team can view, assign, and track them like any other conversation.
Here’s how the Automation is structured:
- Trigger: A new email lands in Adam’s Individual Inbox.
- Condition: You can match on the sender's email address or domain (for example, vip@acmecorp.com or @acmecorp.com), or on keywords in the subject line (for example, invoice or contract).
- Action: The conversation is automatically moved to the Shared Inbox where the Automation was created.
As an admin, you can choose if the rule should apply to all members of the Shared Inbox or only specific teammates. You can also choose to move:
- All emails from specific email addresses or domains. For example, automatically move all emails from @customer.com to a dedicated Shared Inbox.
- All emails except those from a few email addresses or domains. For example, move all emails except internal emails sent from @yourcompany.com.
Tip: Use a Custom Object to manage and update these mappings dynamically.
Note: The Subject condition and the conditional operators is not and is not present in are currently part of an early access program. To enable them for your account, reach out to us at support@hiverhq.com.
How to set up this automation
1. Go to Hiver settings → Admin Panel → Shared Inboxes.
2. Select the Shared Inbox where conversations should be routed to.
3. Go to Automations → Individual Inbox, then click Create Individual Inbox Automation.
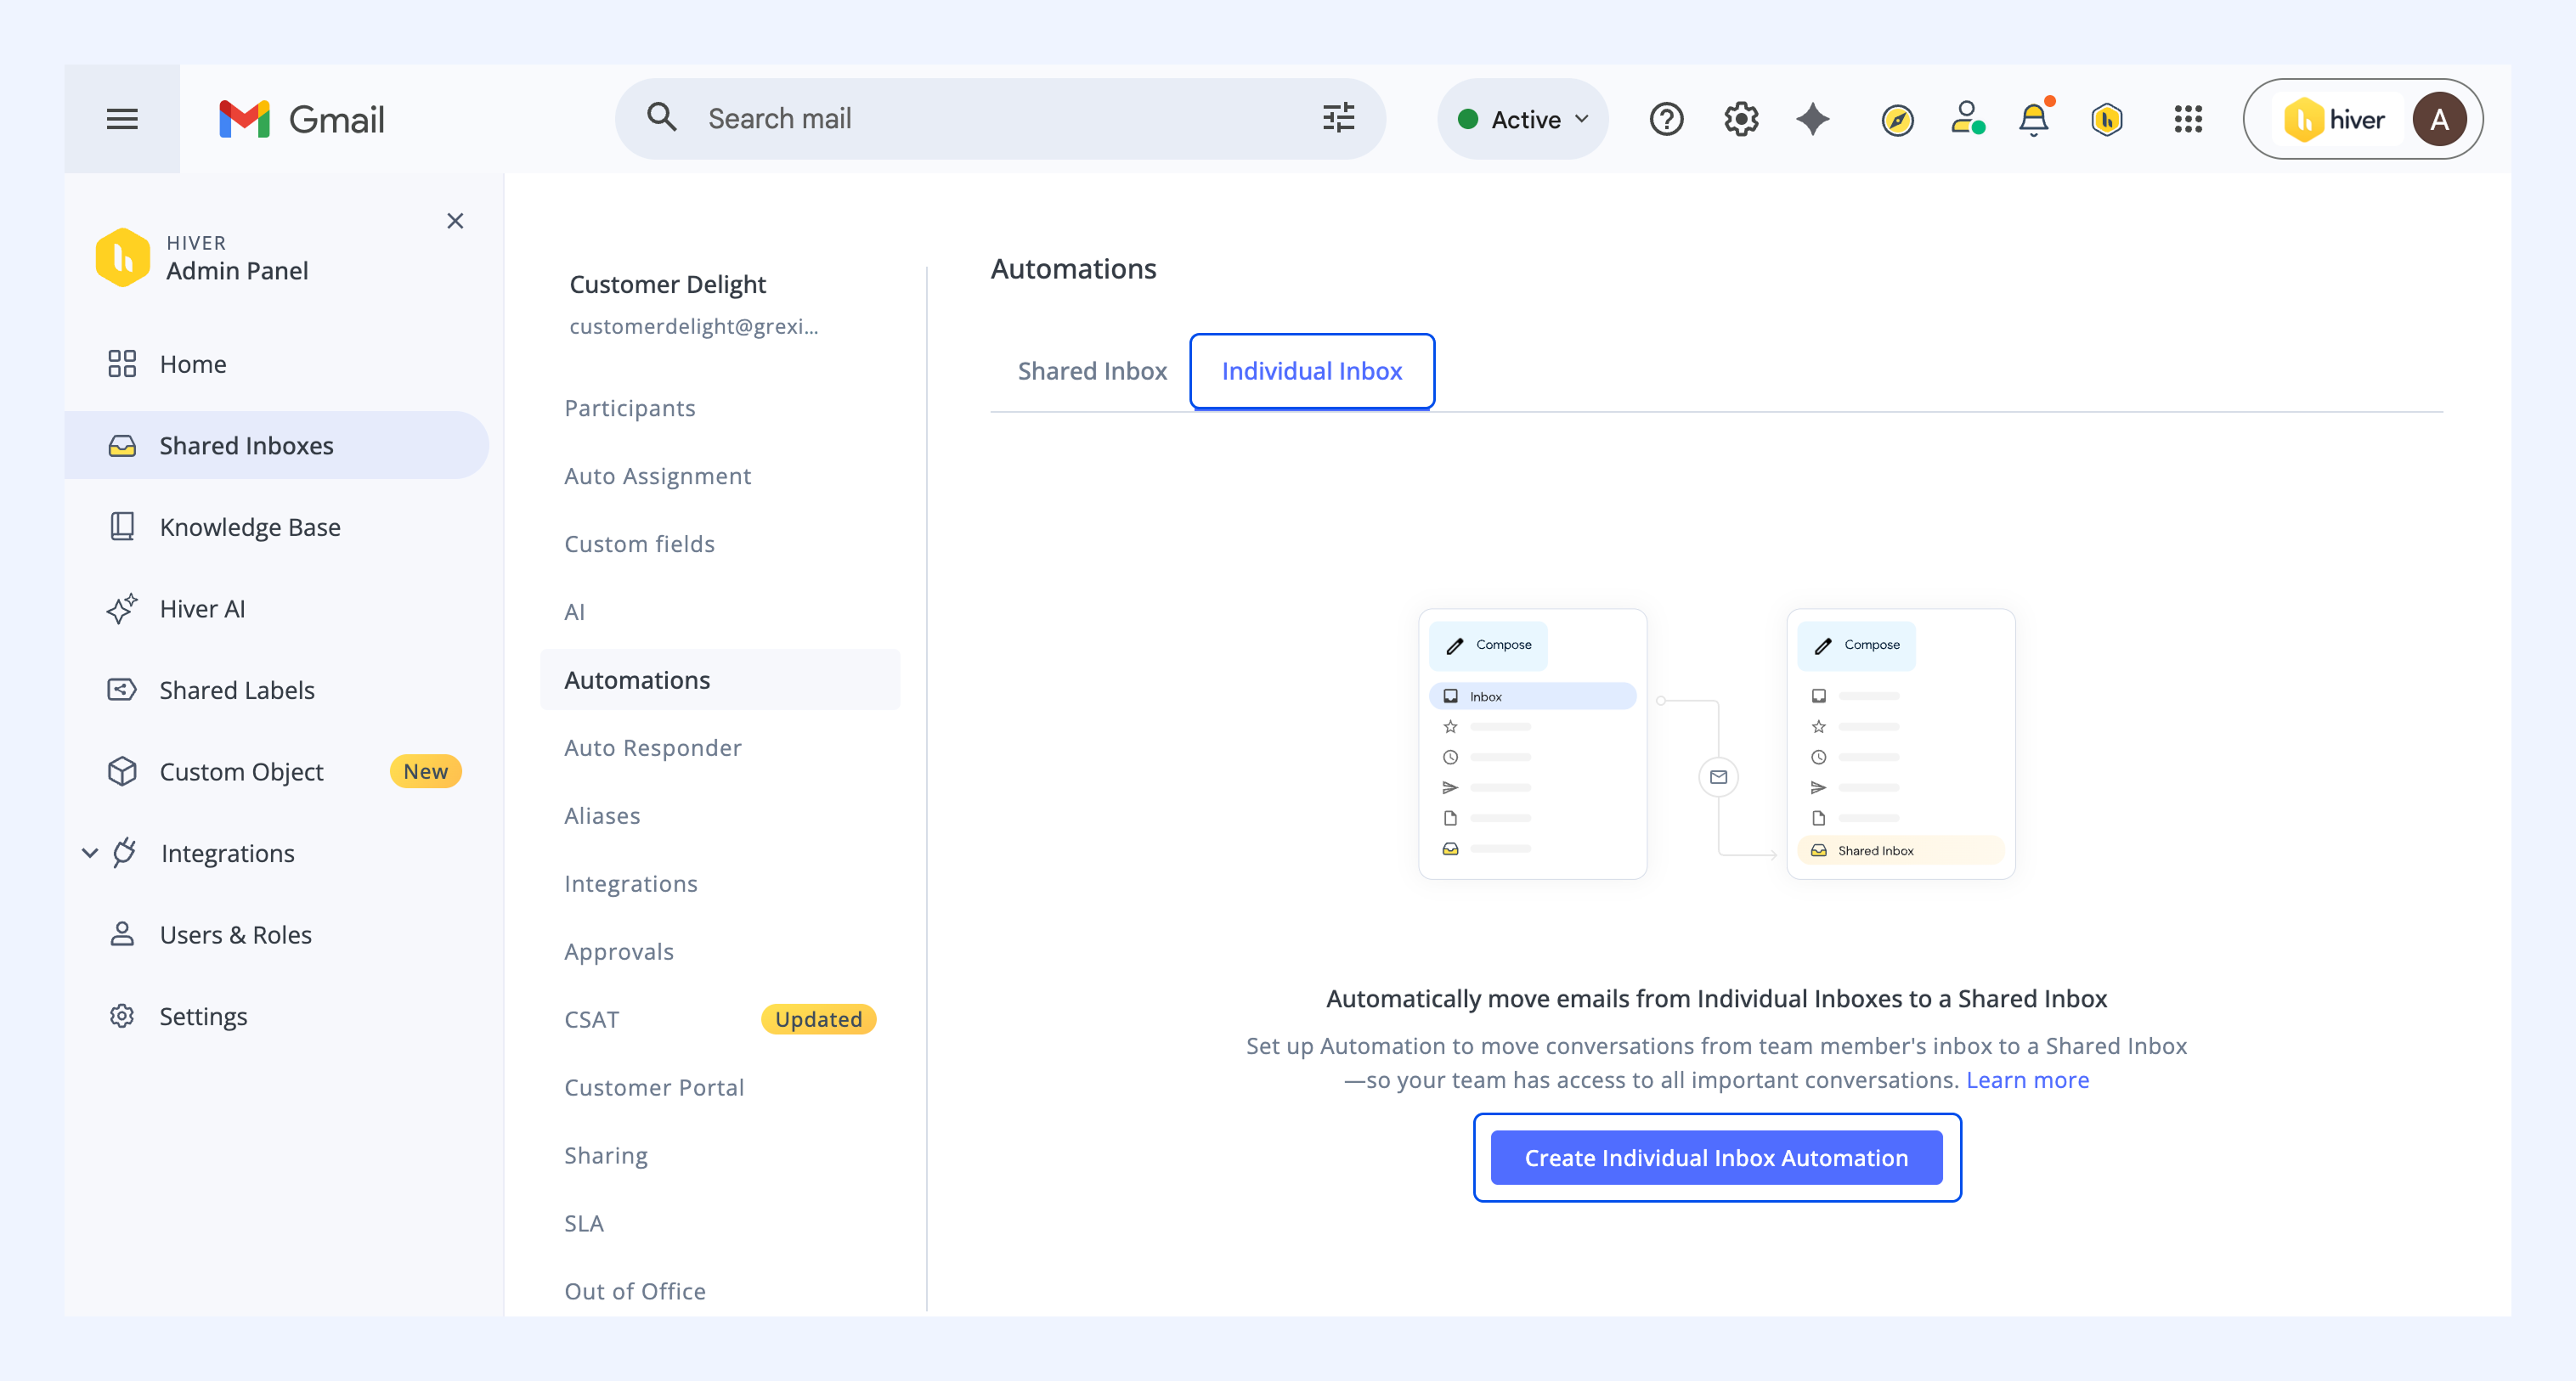
4. Give your Automation a name.
5. The Trigger, New conversation (inbound) is received in a member’s email inbox is selected by default.
Select the members you want the rule to apply to. By default, all members are chosen.
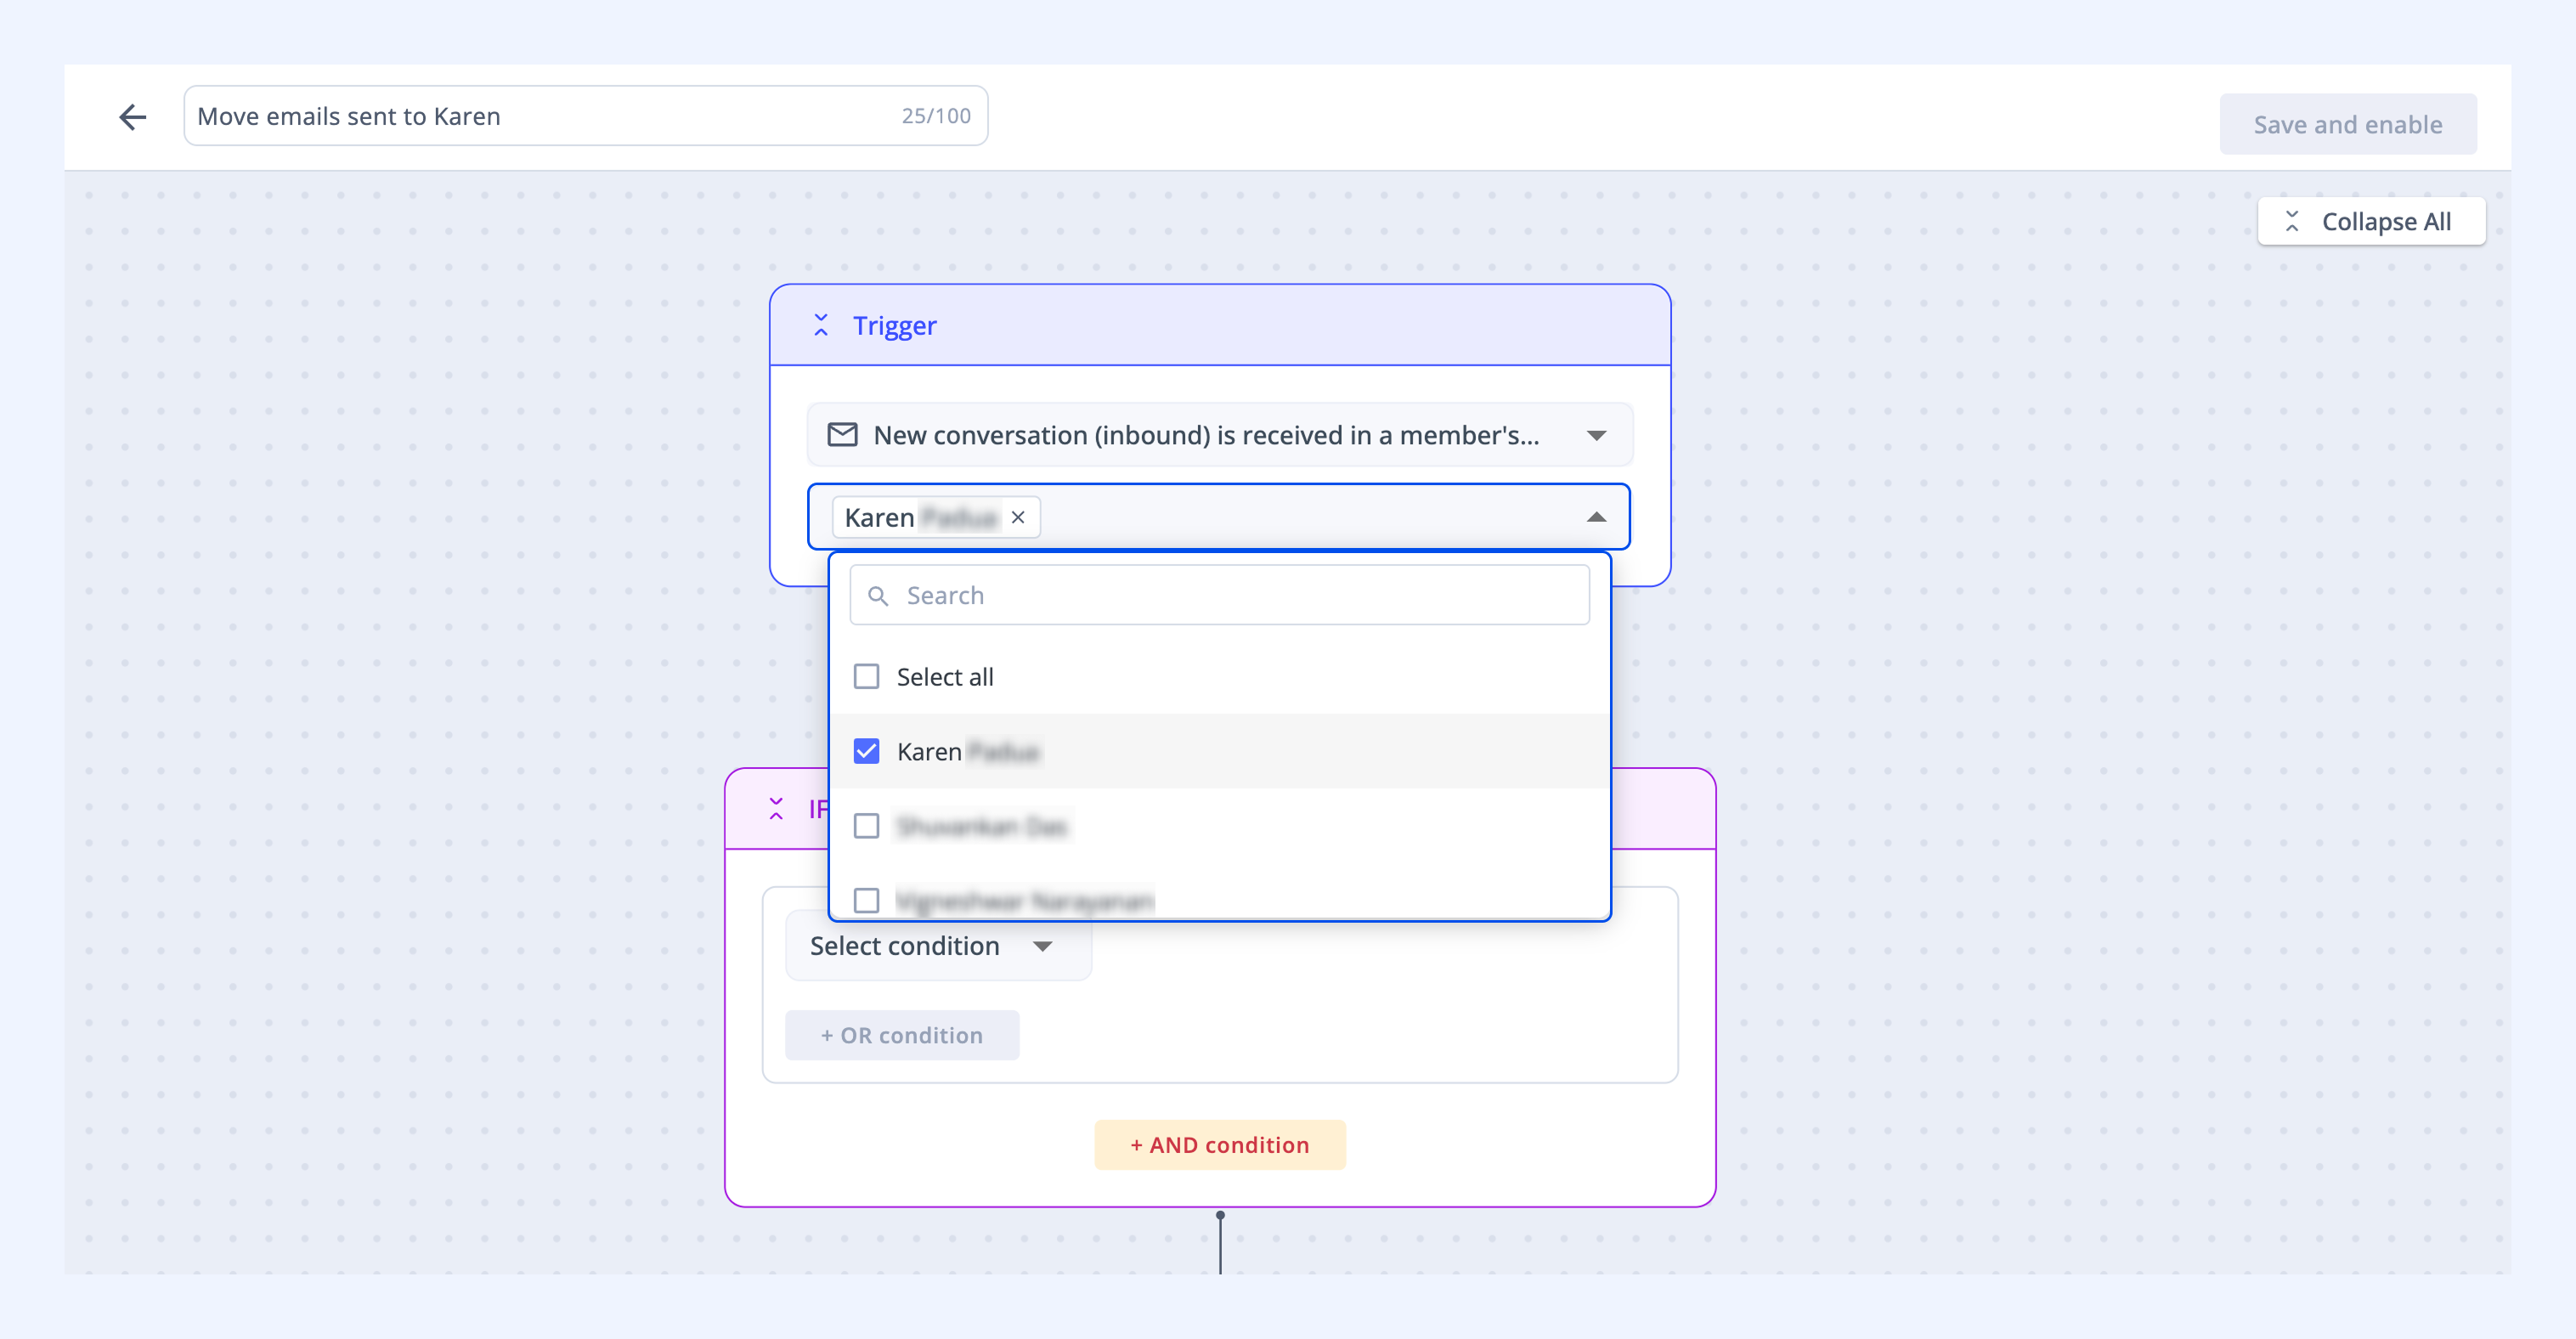
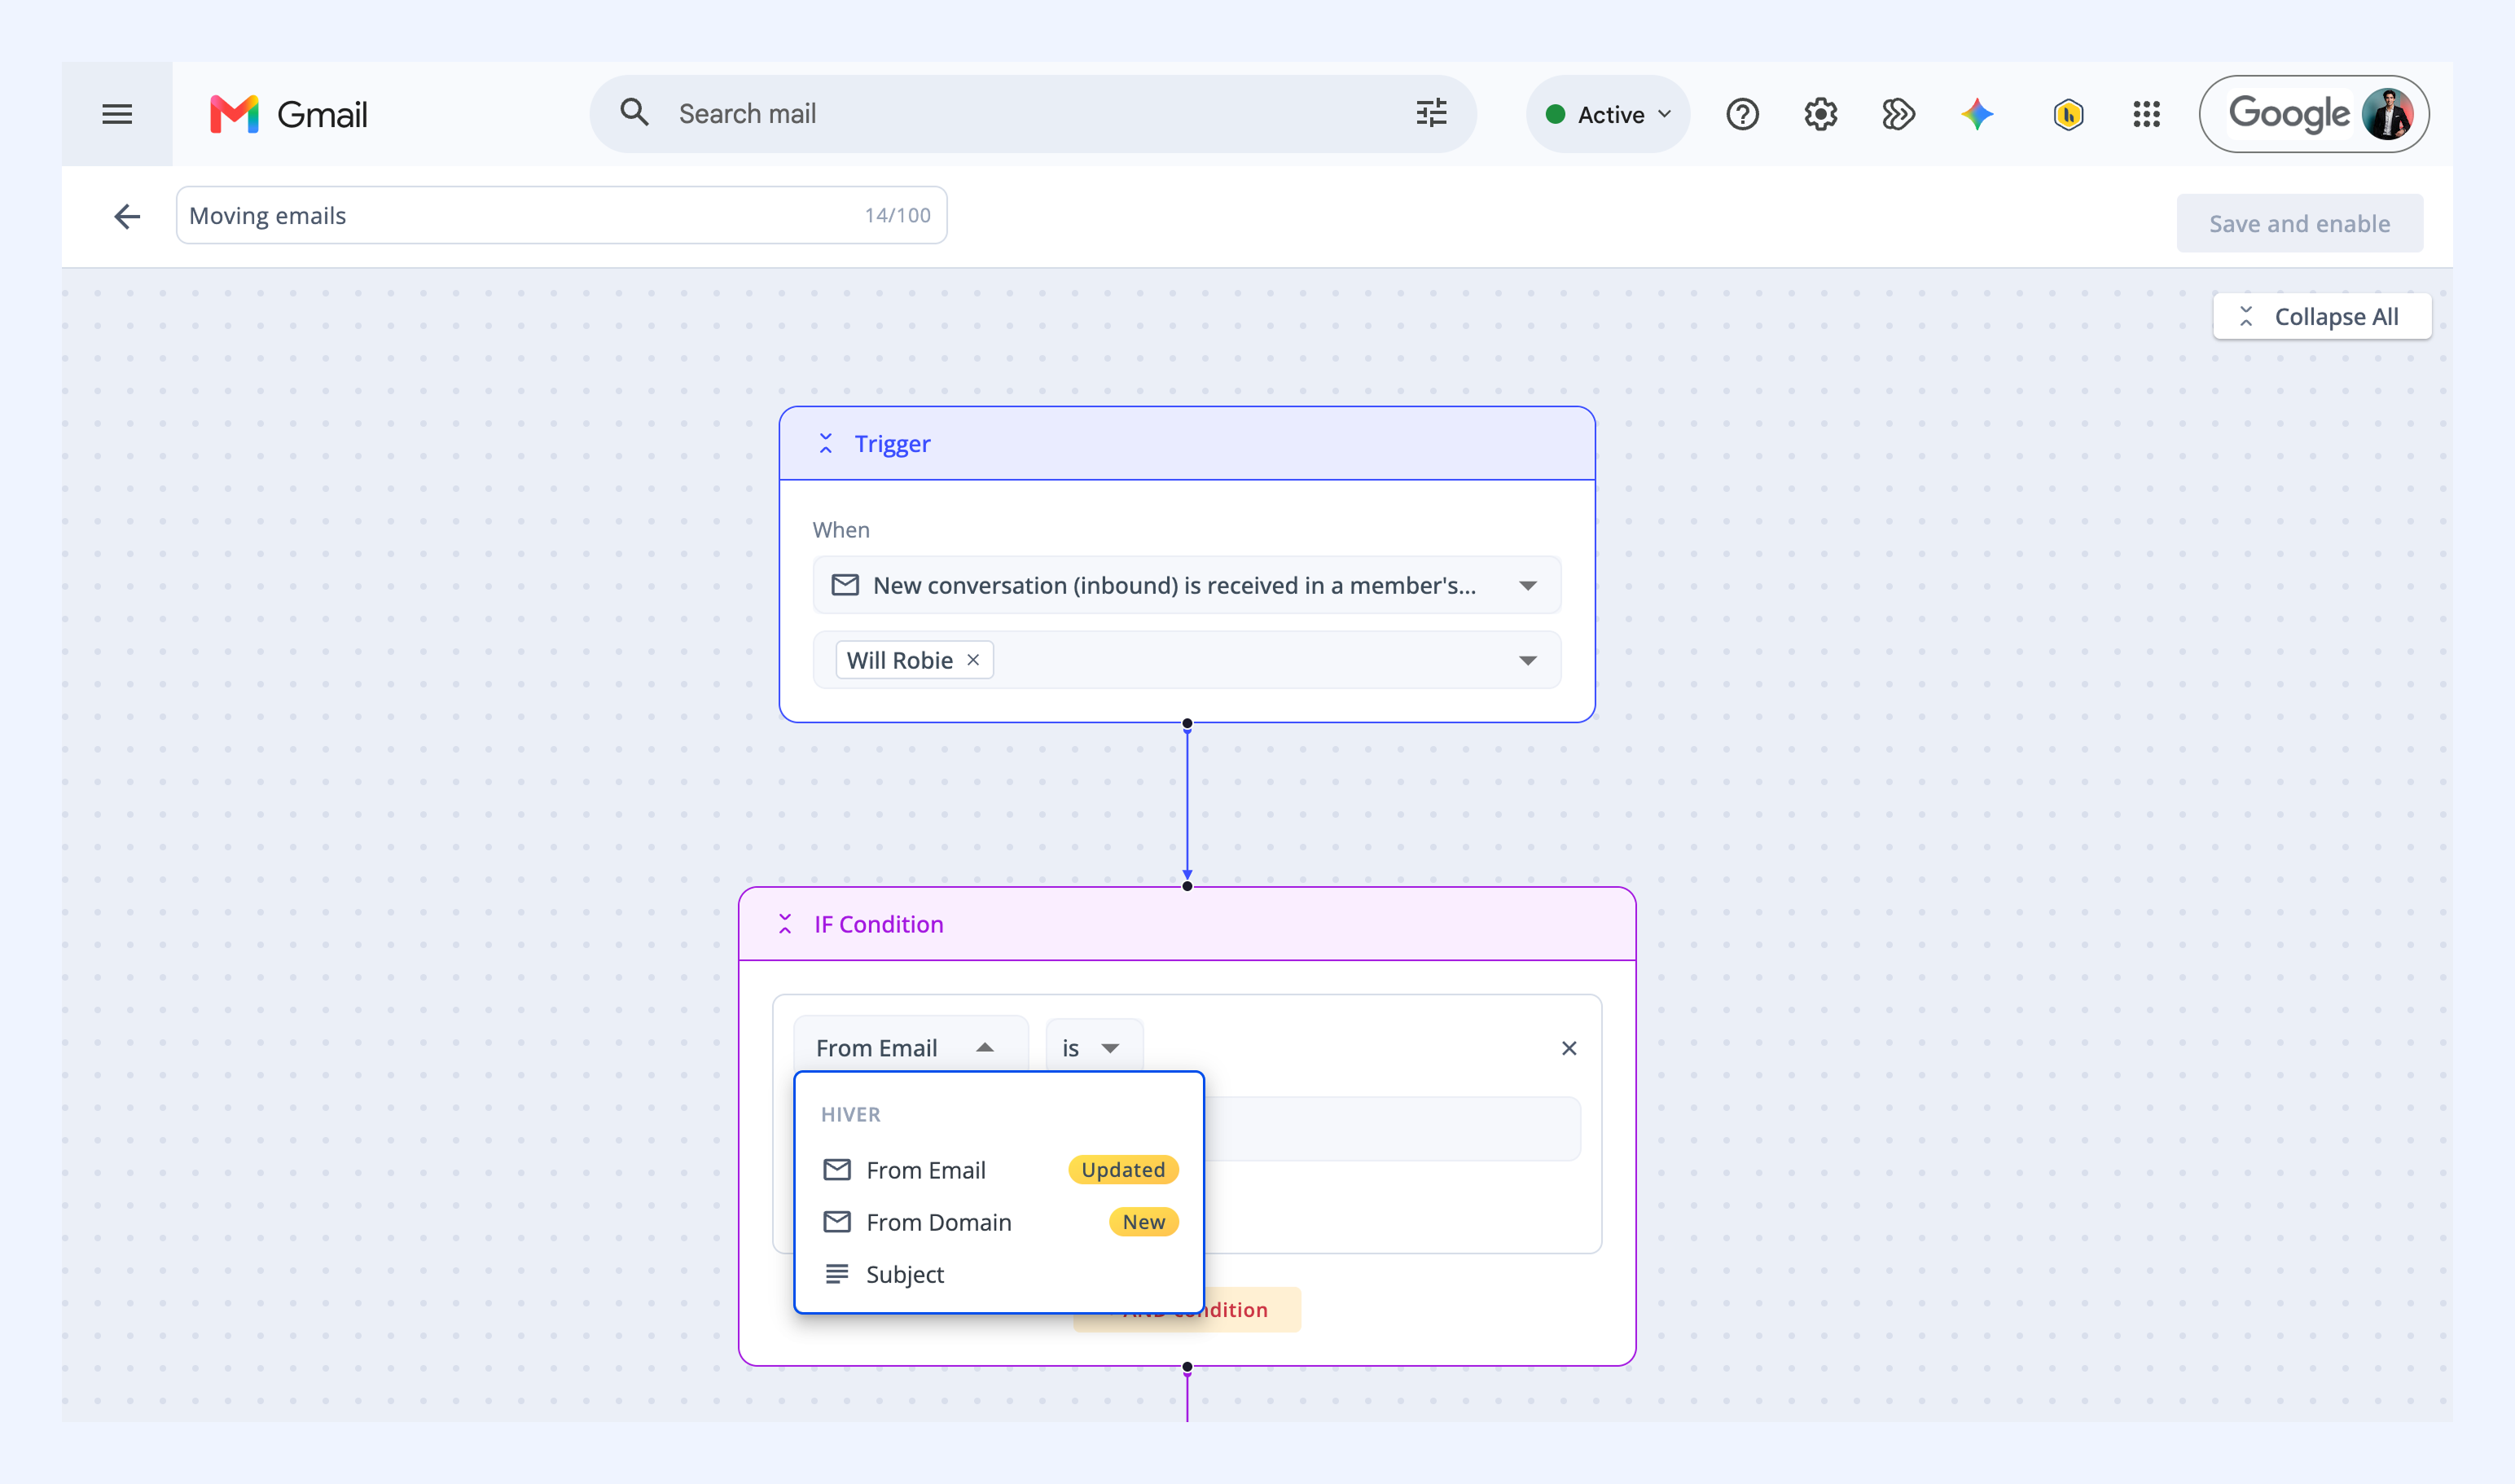
6. In the IF Condition block, choose between:
- From email to match specific email addresses
- From domain to match any sender from a particular domain
- Subject to match keywords in the email's subject line
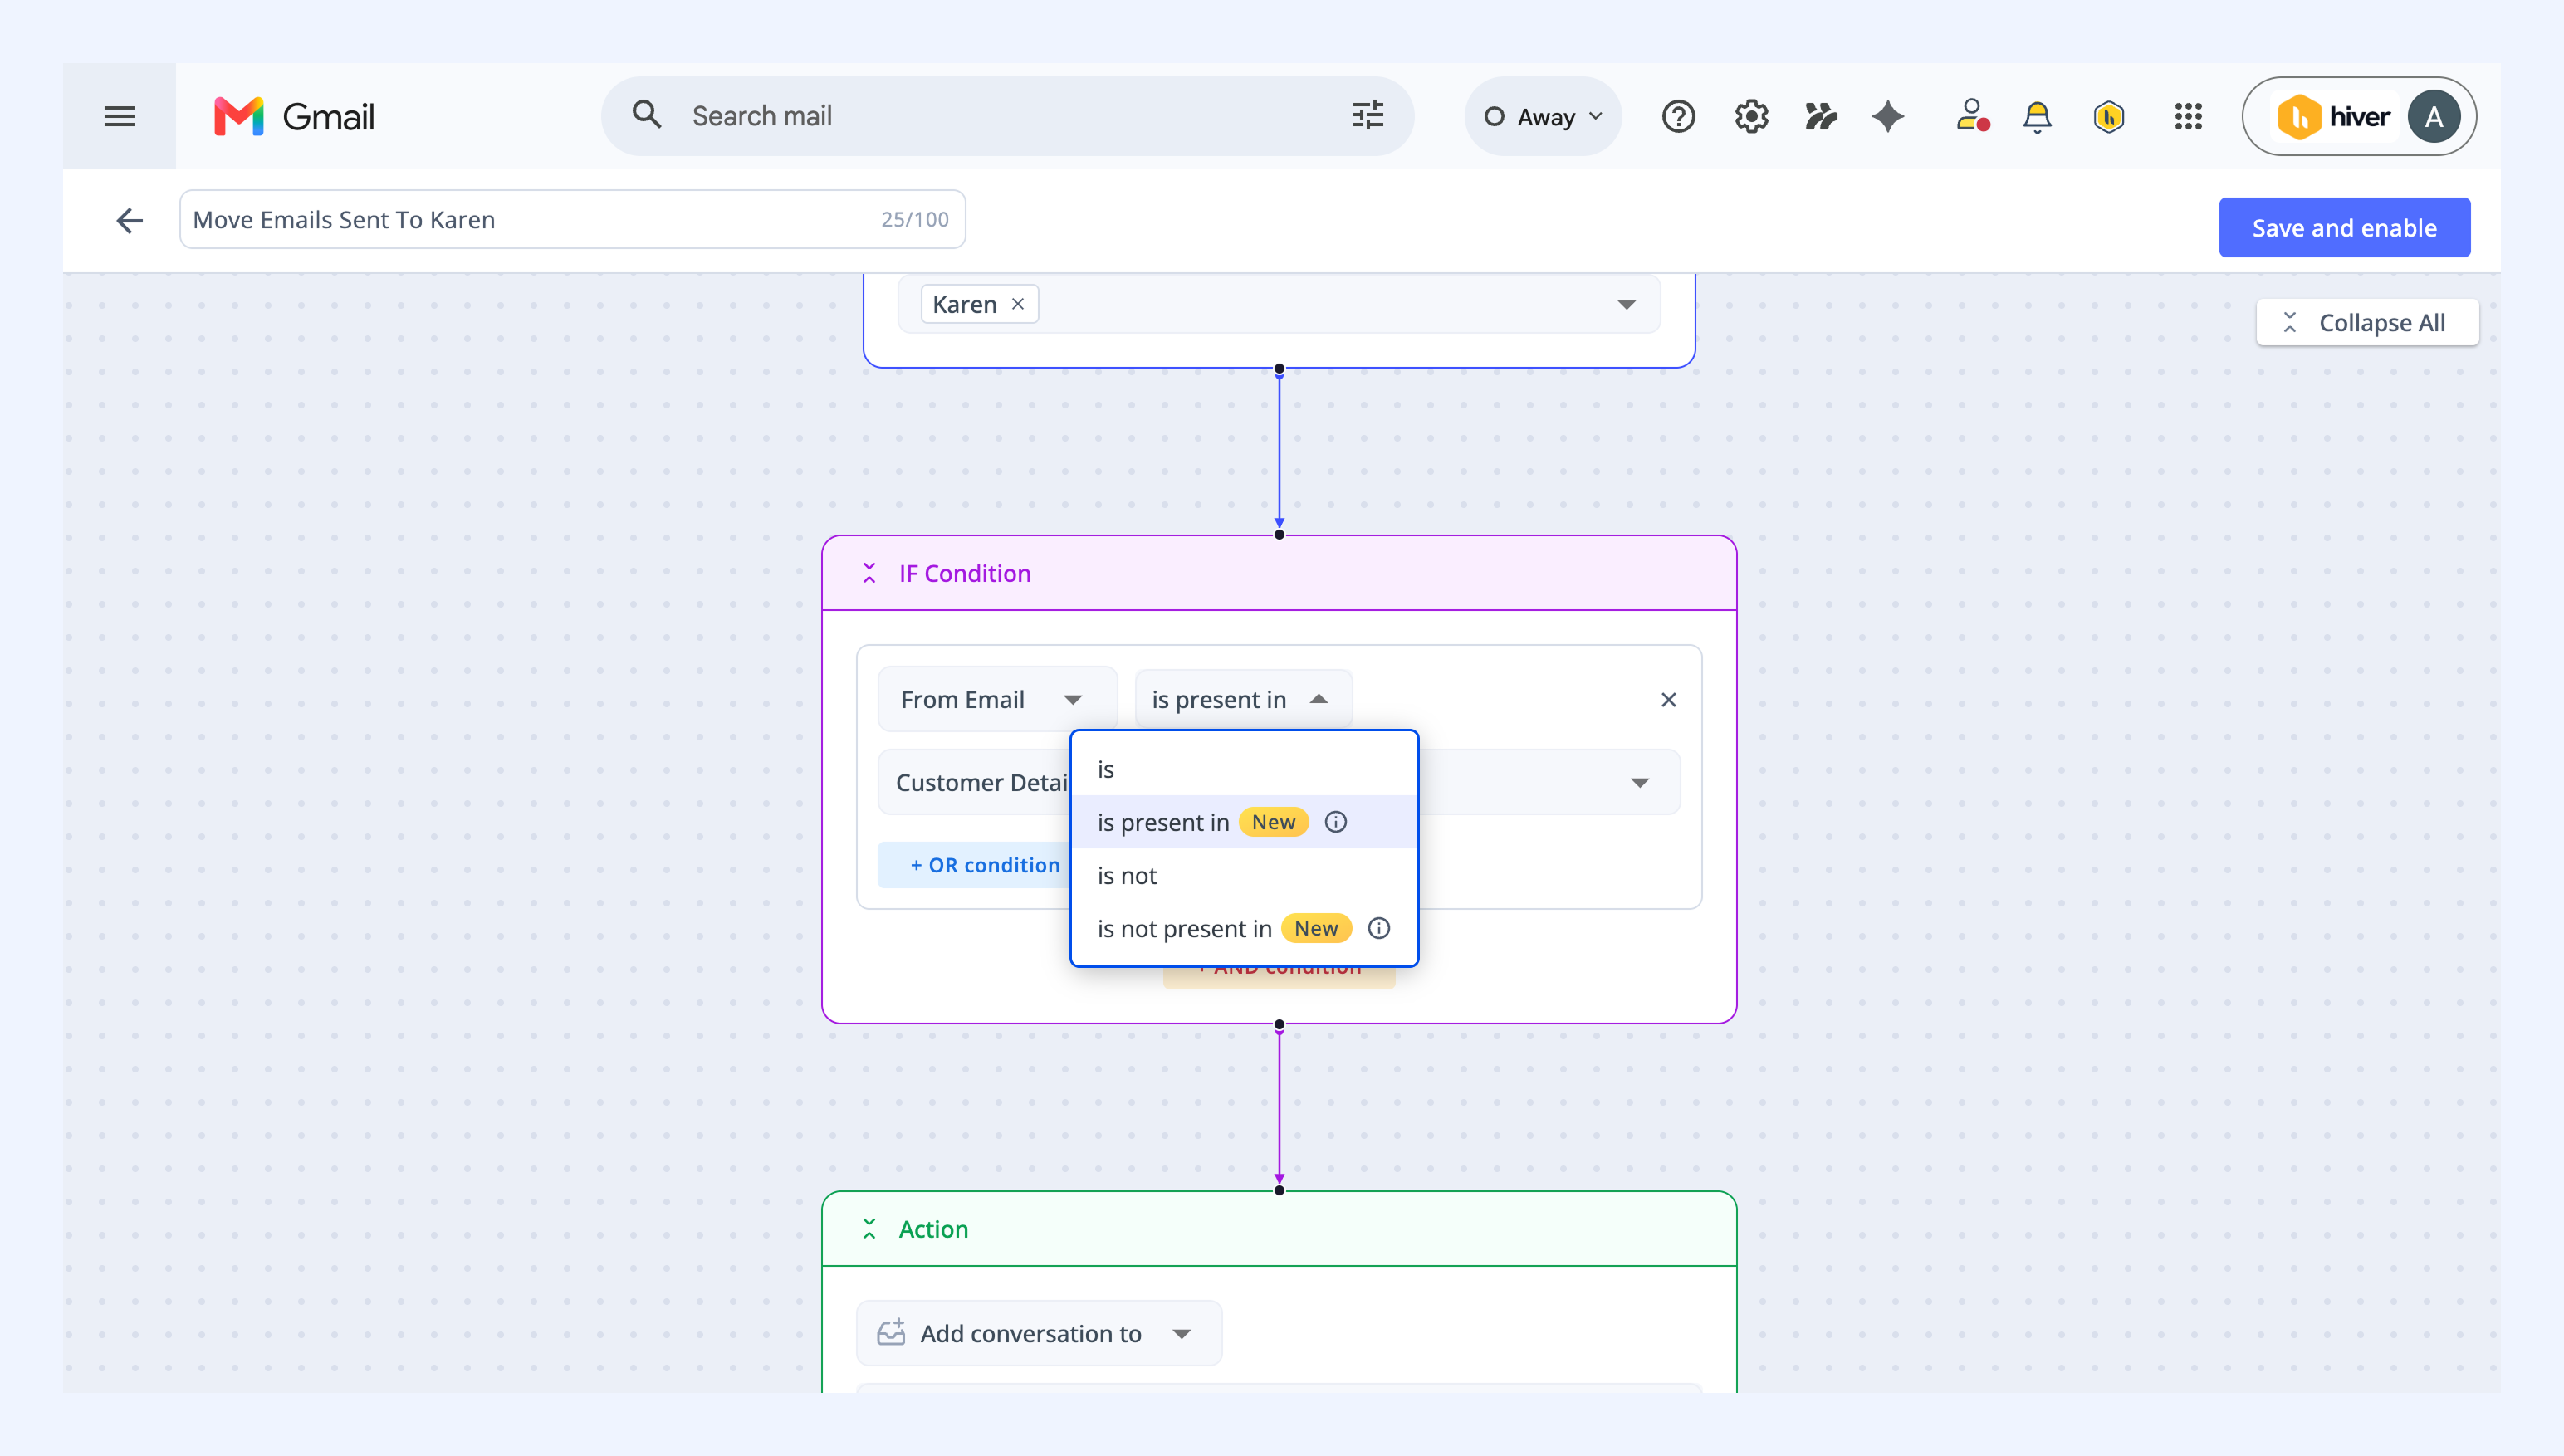
7. Next, choose an operator based on whether you want to include or exclude senders:
- is: Include emails or domains you enter manually
- is present in: Include emails or domains from a Custom Object
- is not: Exclude emails or domains you enter manually
- is not present in: Exclude emails or domains from a Custom Object
For Subject, enter your keywords in the Enter keyword box and choose one of:
- is: Match when the subject is exactly the keyword you enter
- is not: Match when the subject is anything other than the keyword you enter
- contains any of: Match when the subject includes any of the keywords you enter
- does not contain: Match when the subject includes none of the keywords you enter
- contains any value from: Match when the subject includes any keyword from a Custom Object
- matches: Match the subject against an expression you enter
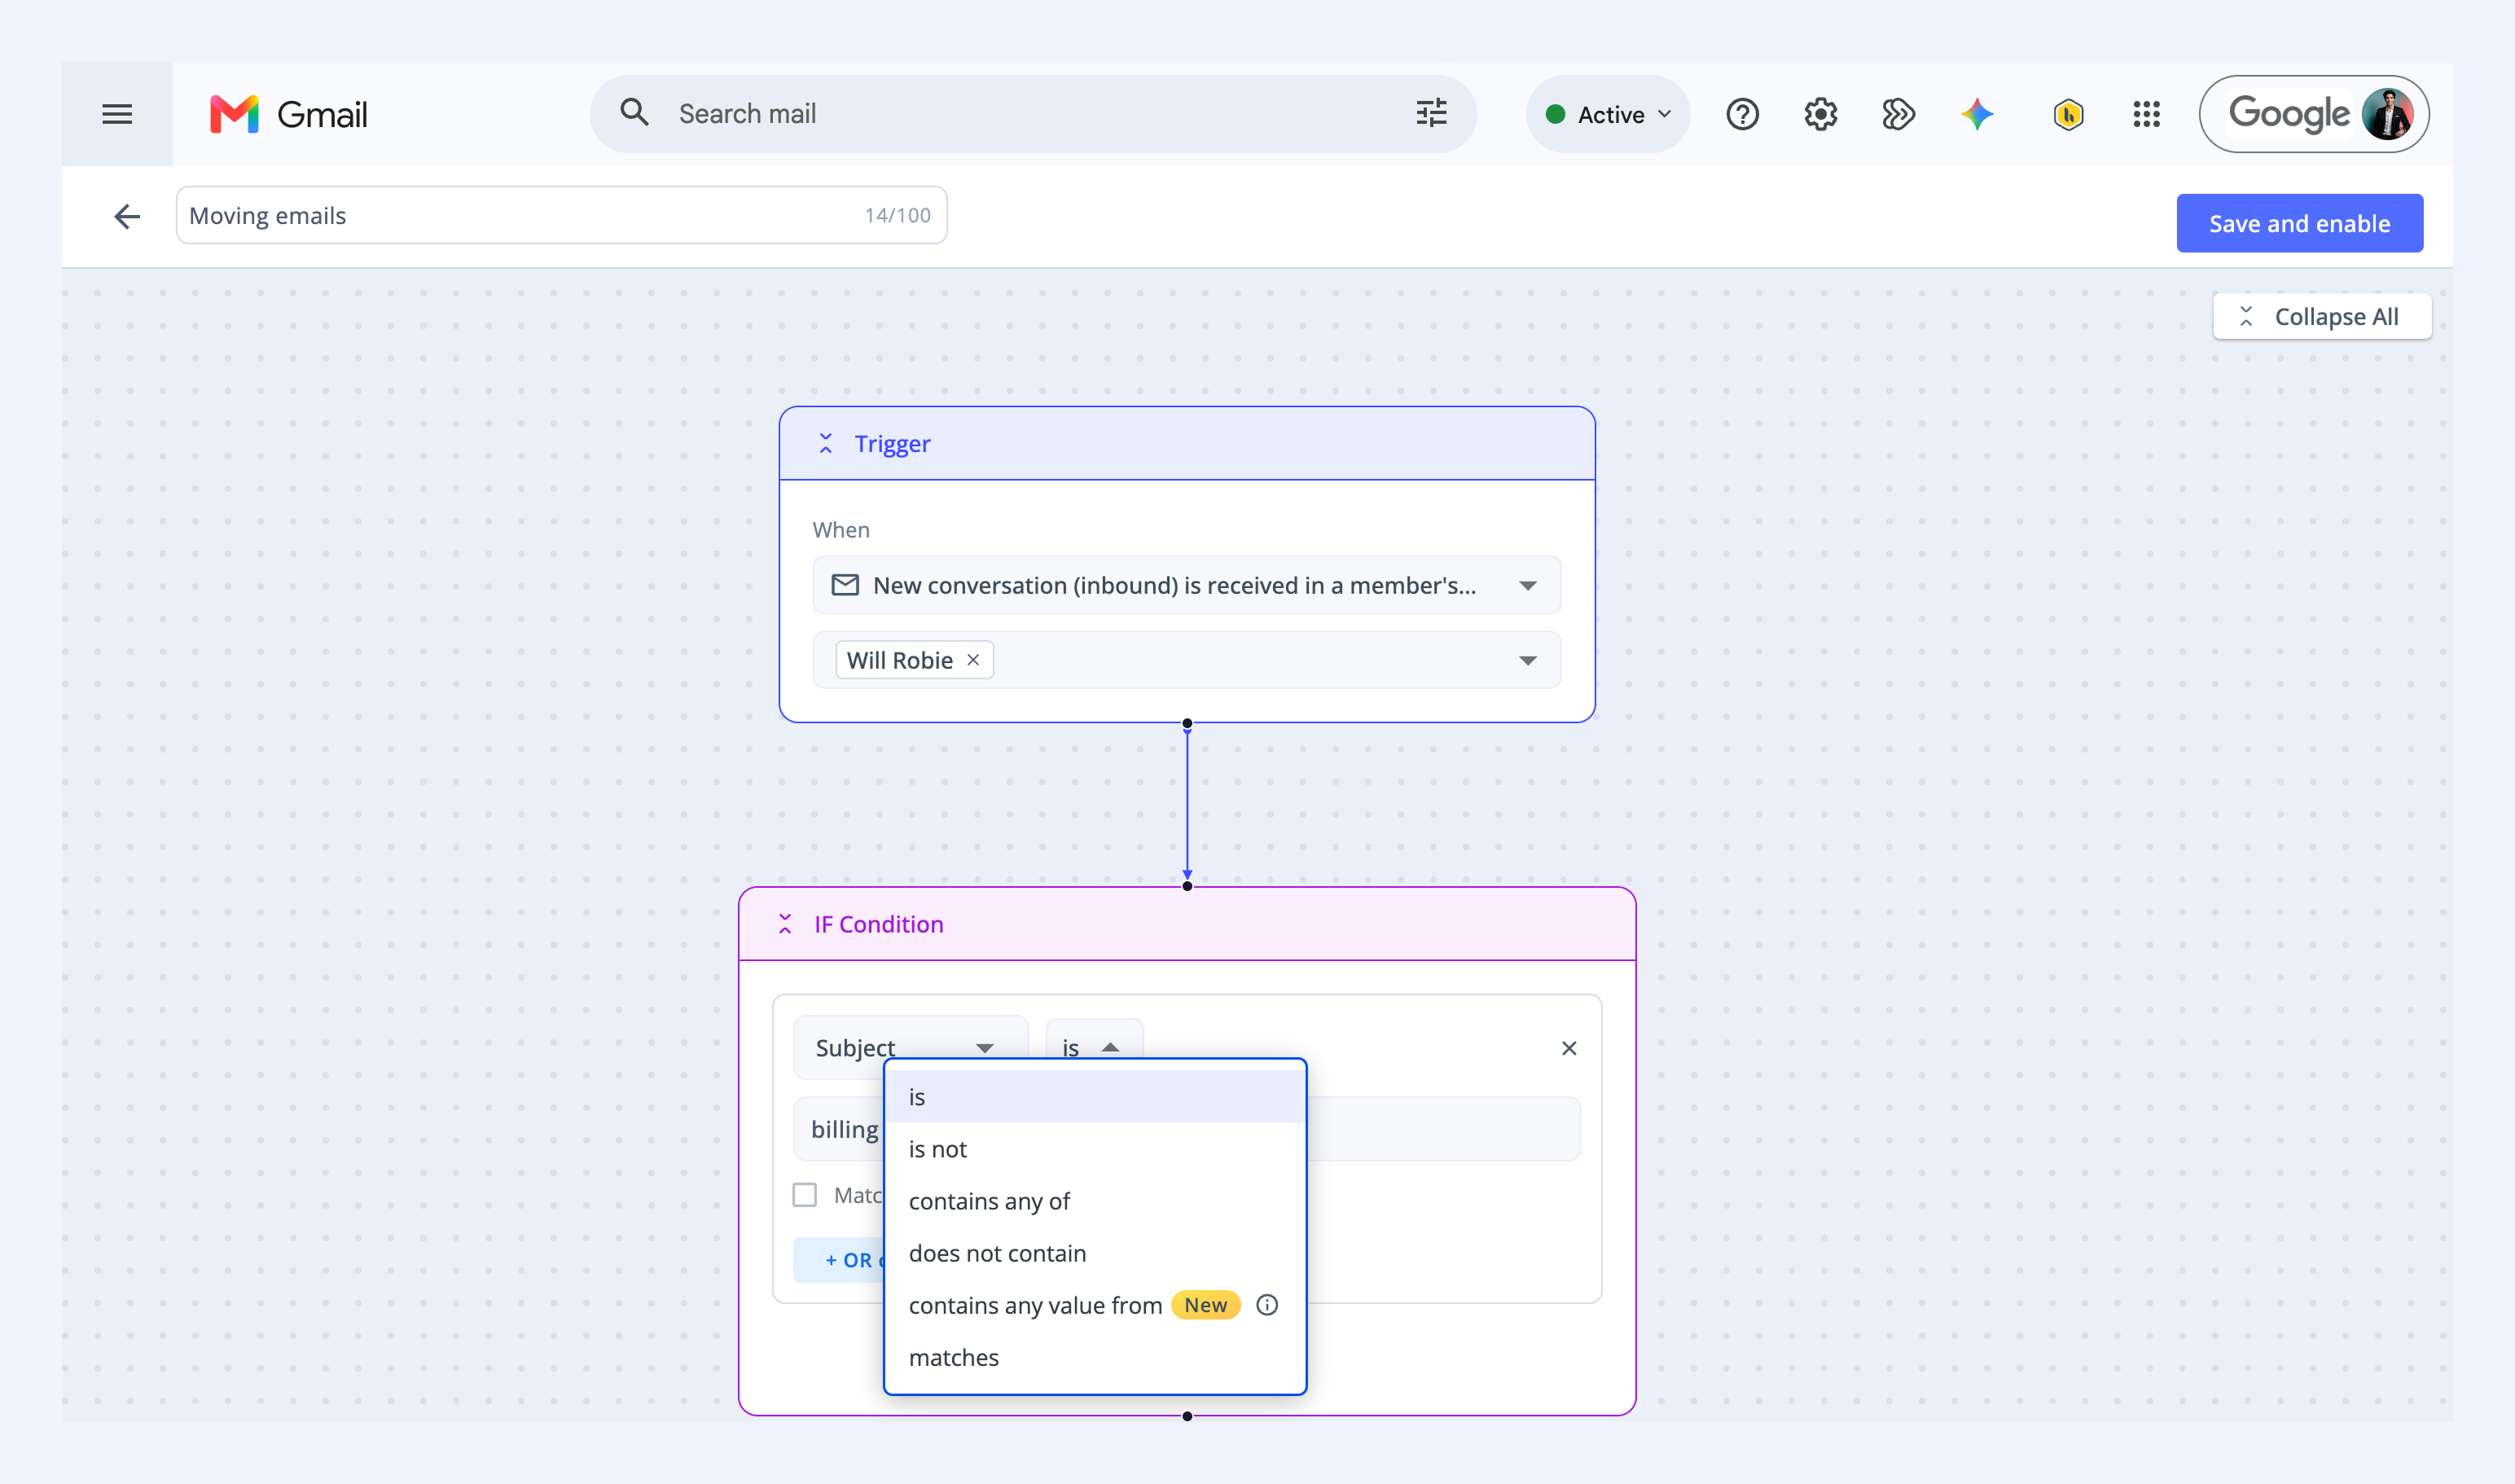
Tip: Use + OR condition or + AND condition to combine conditions in one rule.
8. Click Add step → Action. The Action is fixed to Add conversation to, and the Shared Inbox you’re in will be preselected.
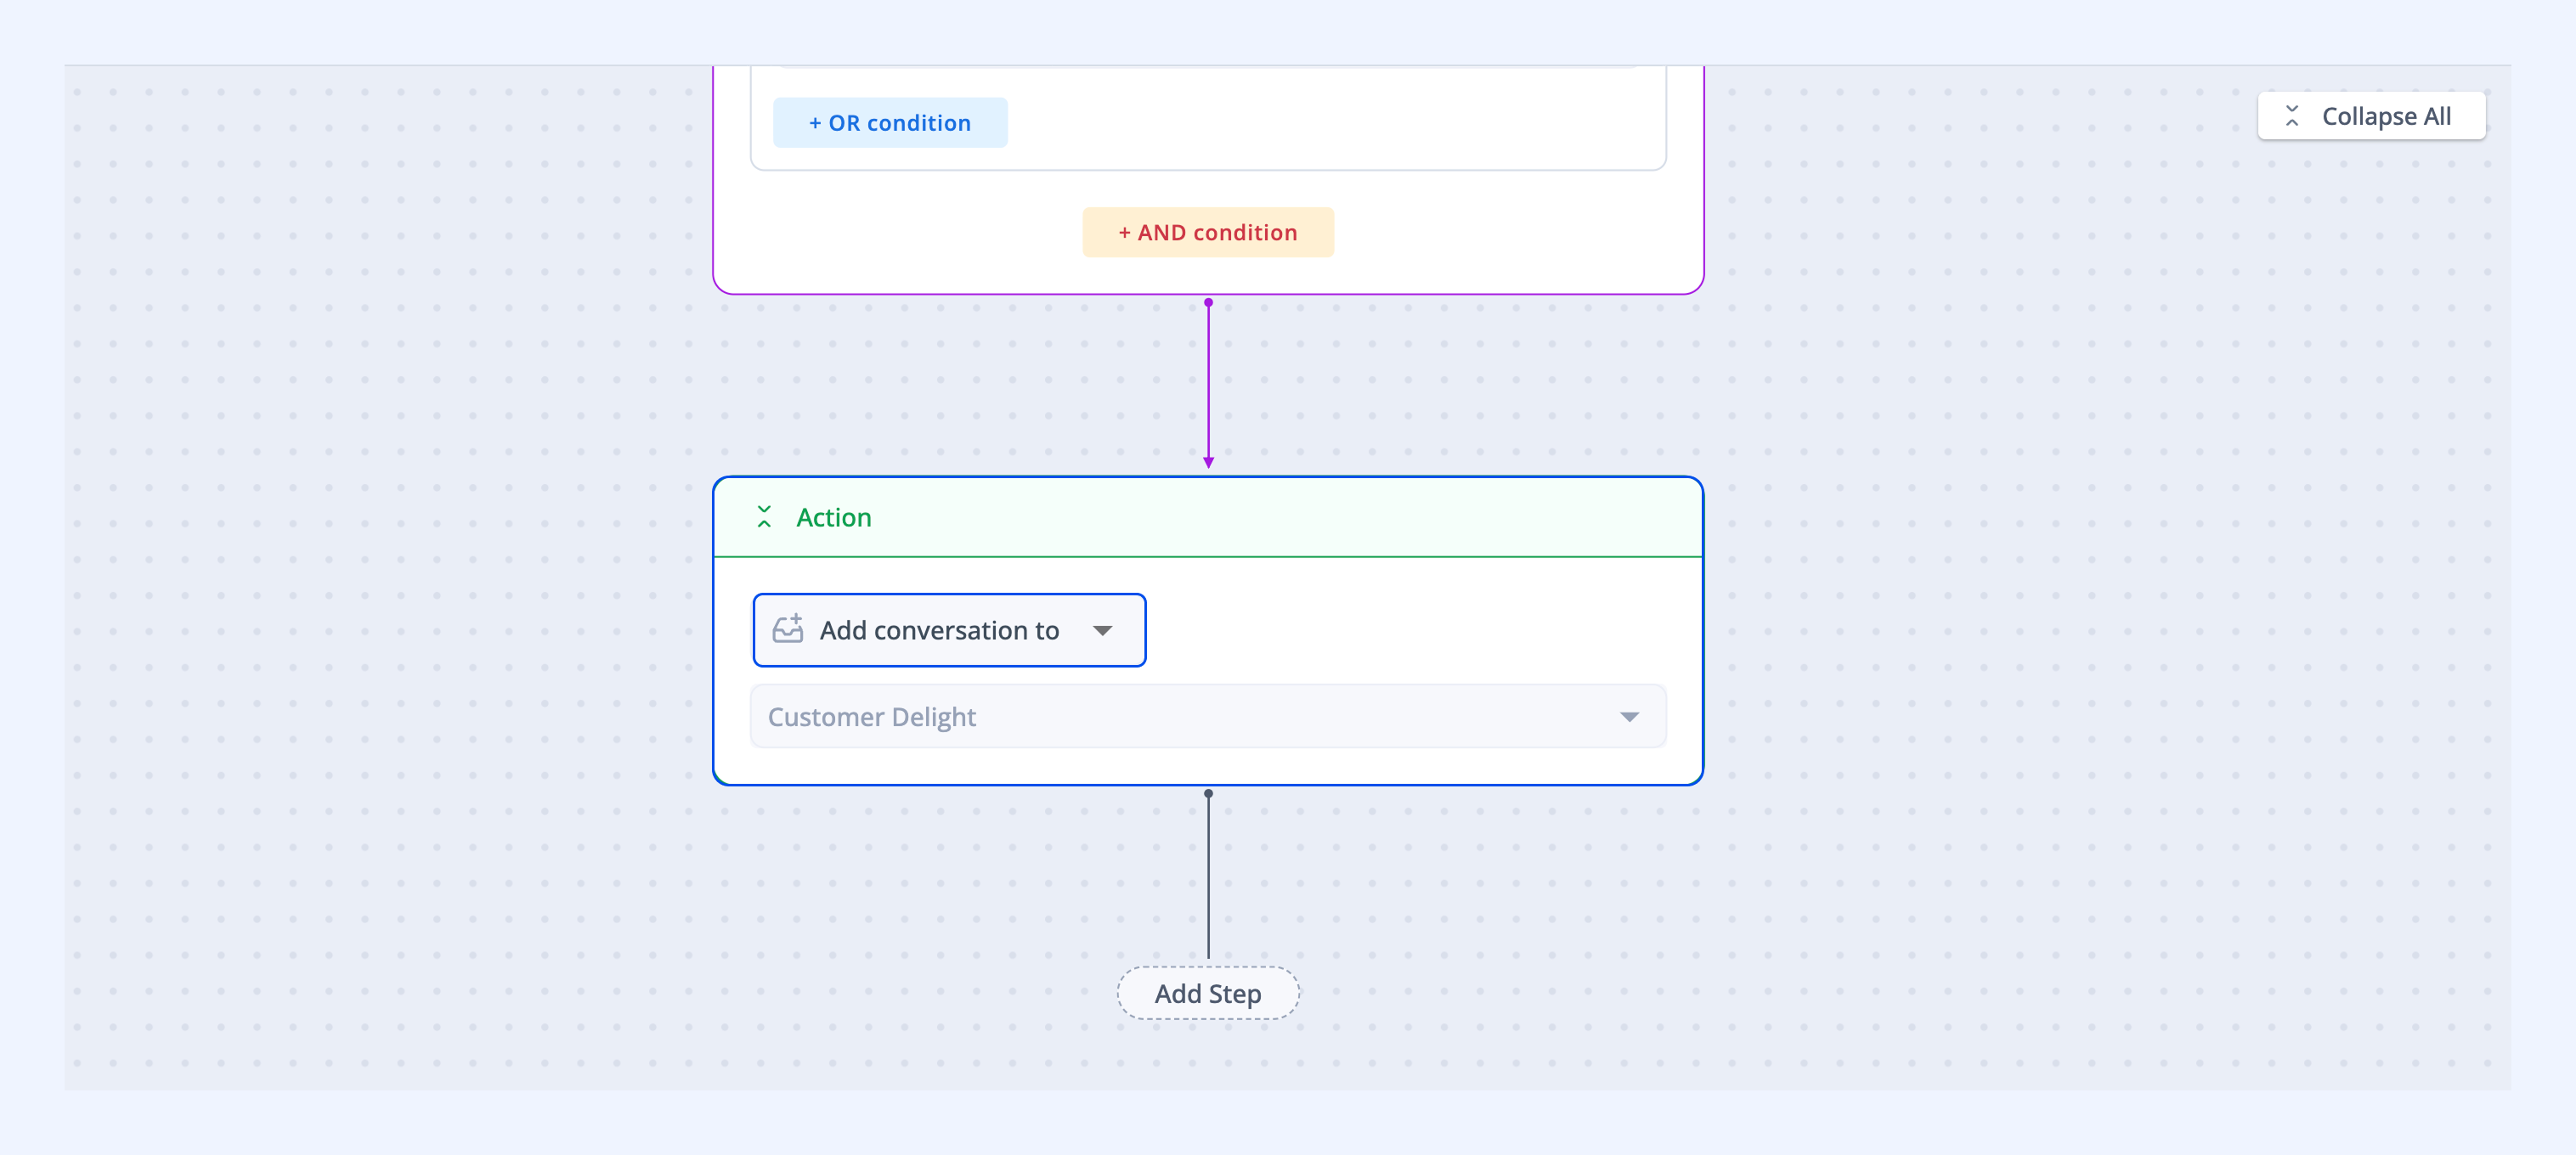
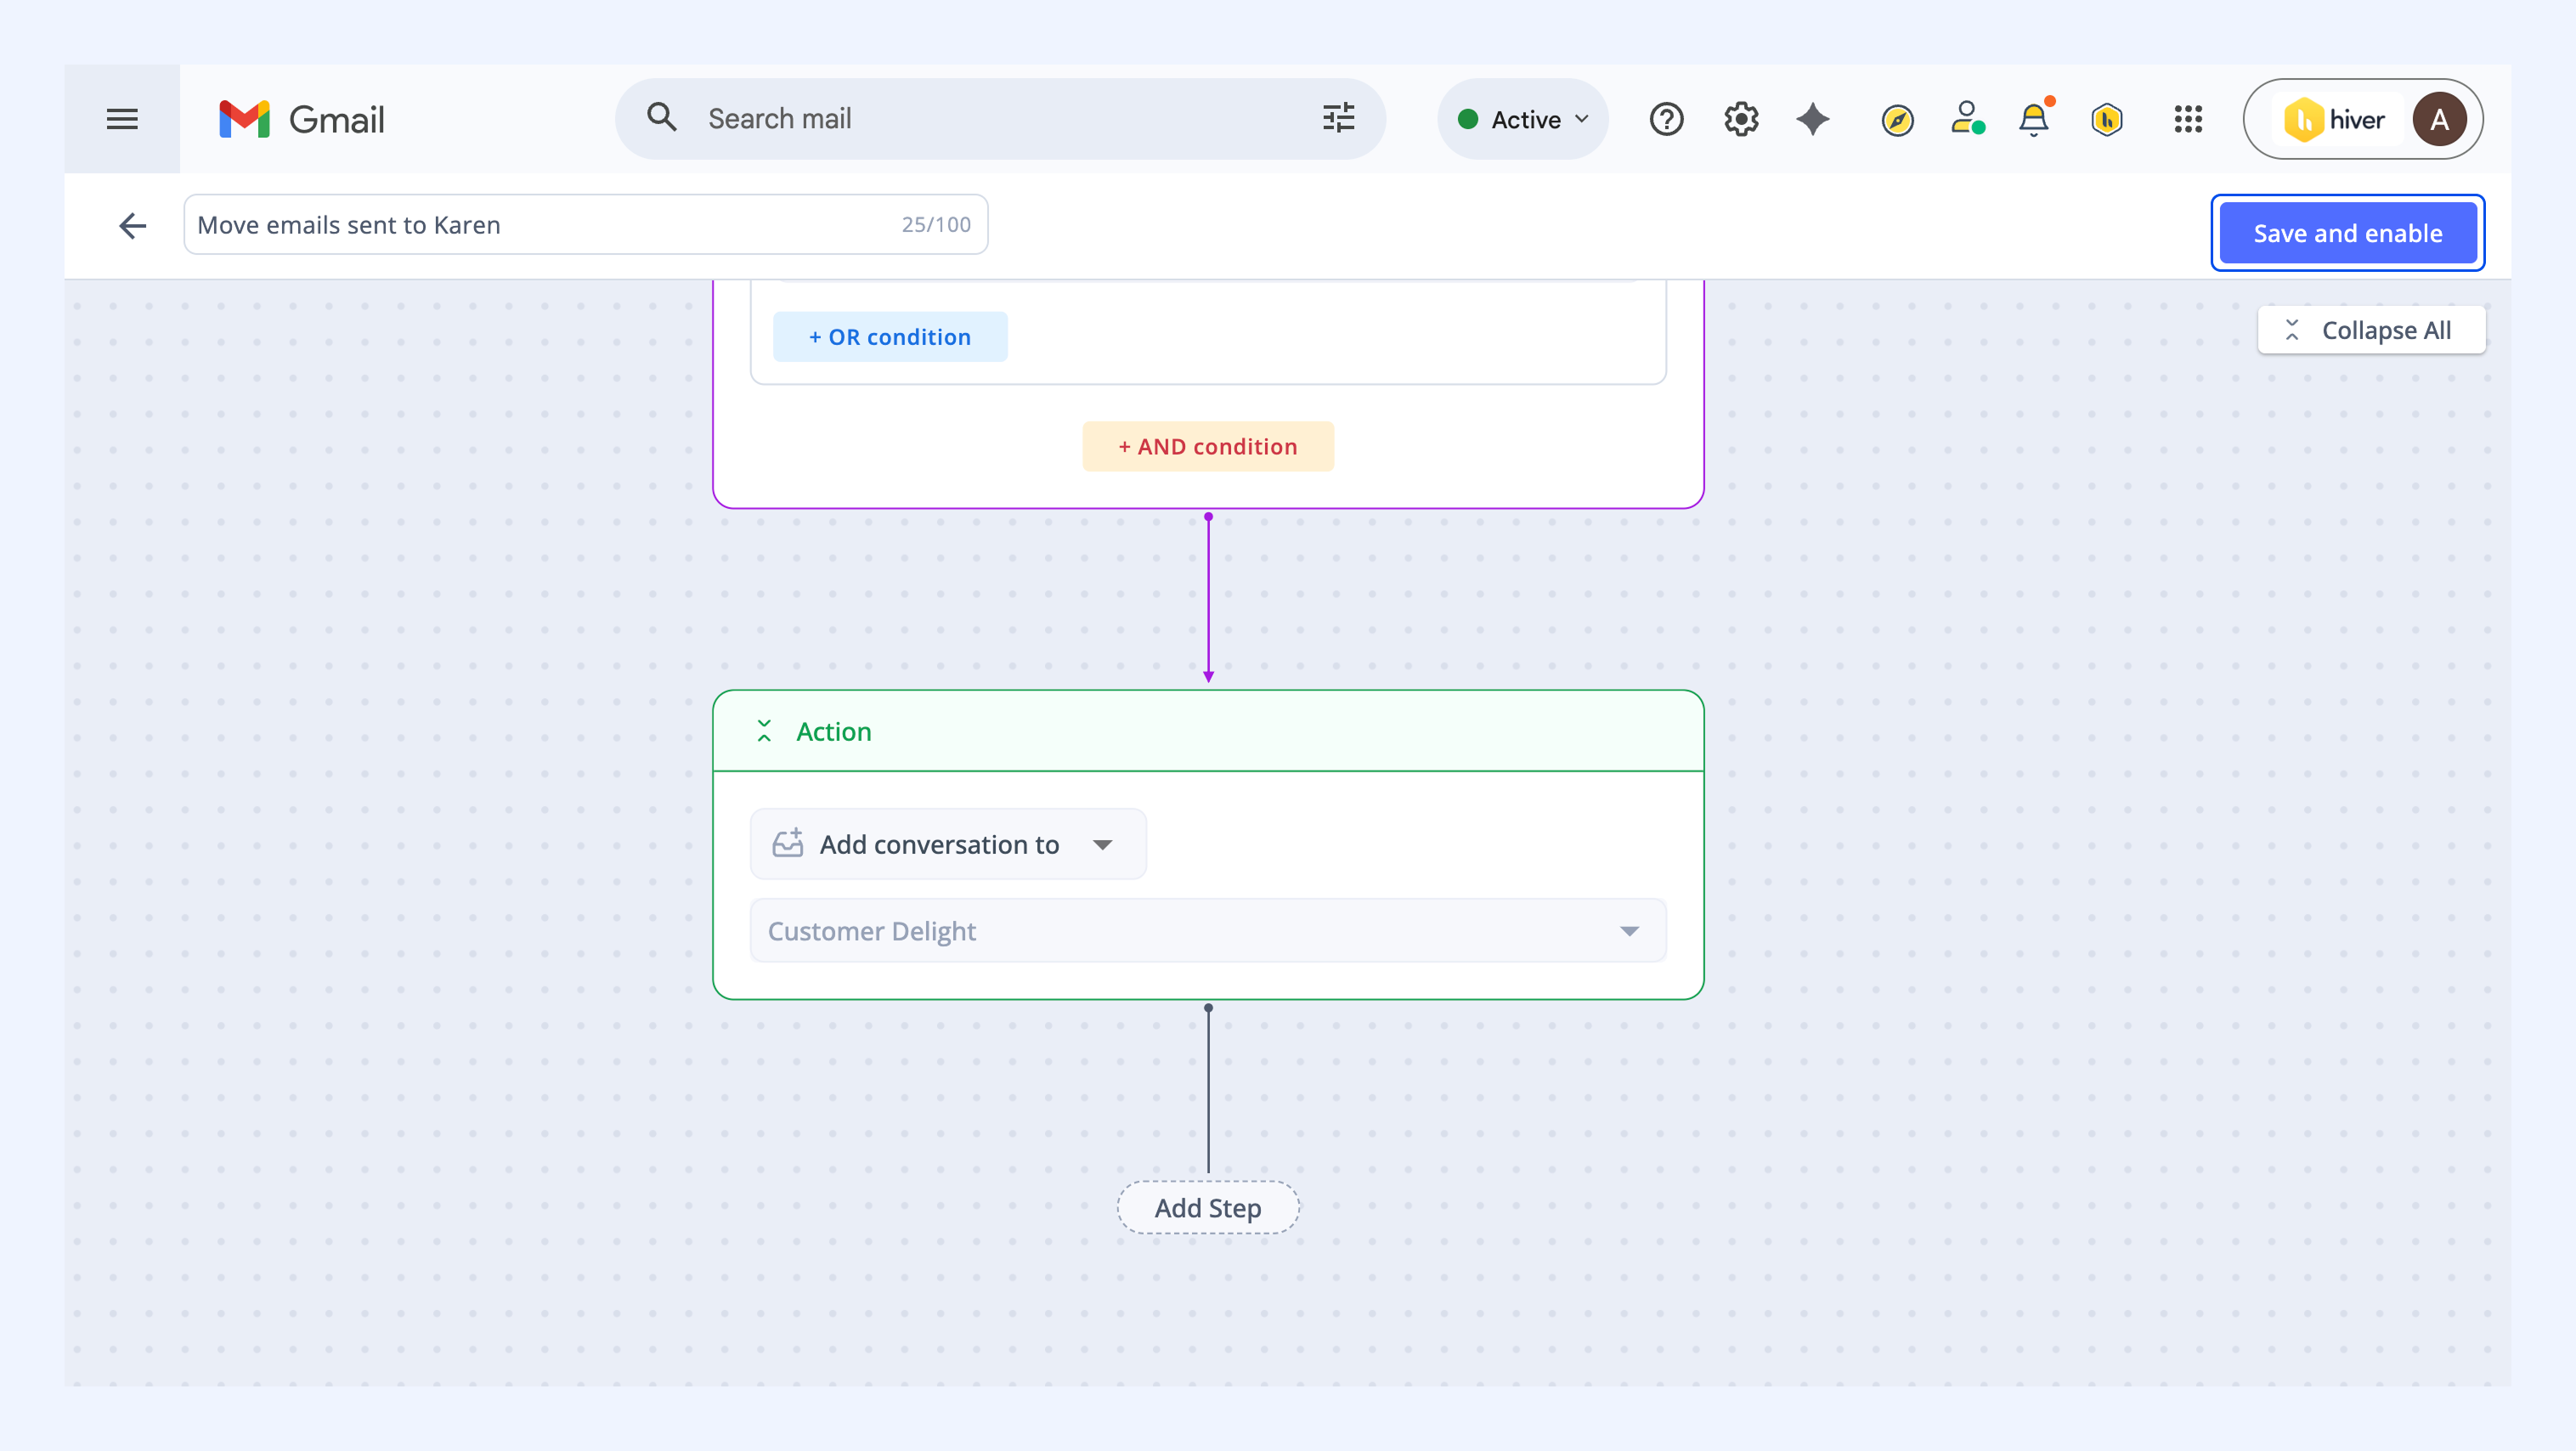
9. Click Save and Enable.
10. You’ll see a pop-up stating that approval is required to enable the automation. Click Send approval requests.
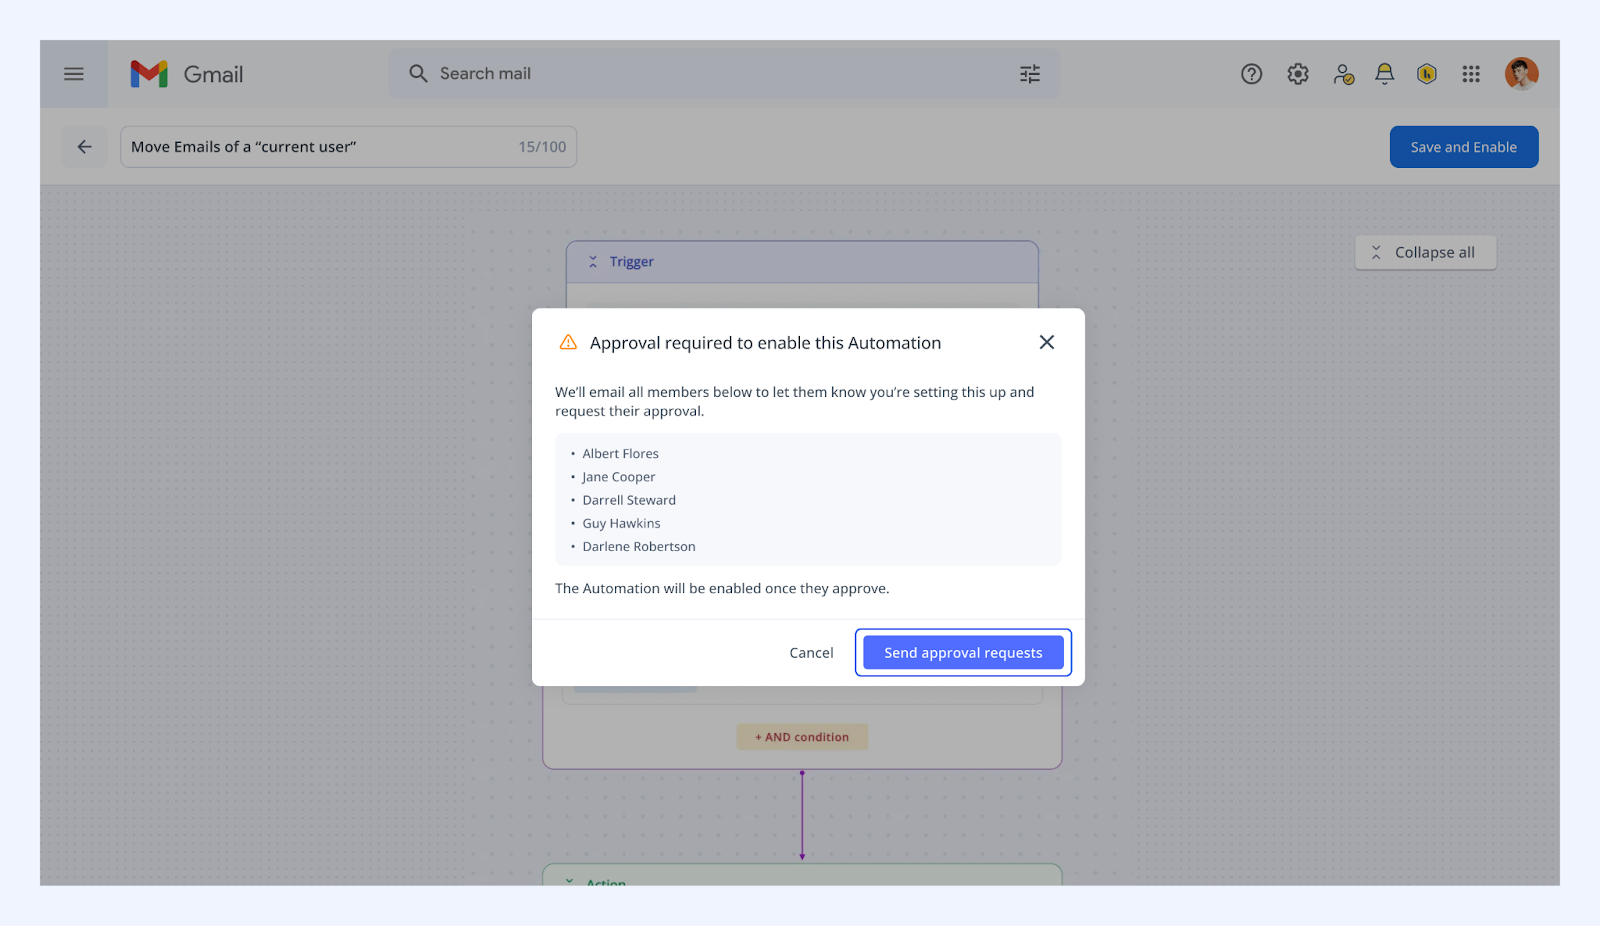
This sends an email to all members included in the Automation, asking them to approve adding emails sent to them to the Shared Inbox.
Note: All included team members must approve for the Automation to be enabled. You can track approval status from the Automations list, which shows you the number of pending approvals. Click it to see who has approved and who hasn’t.
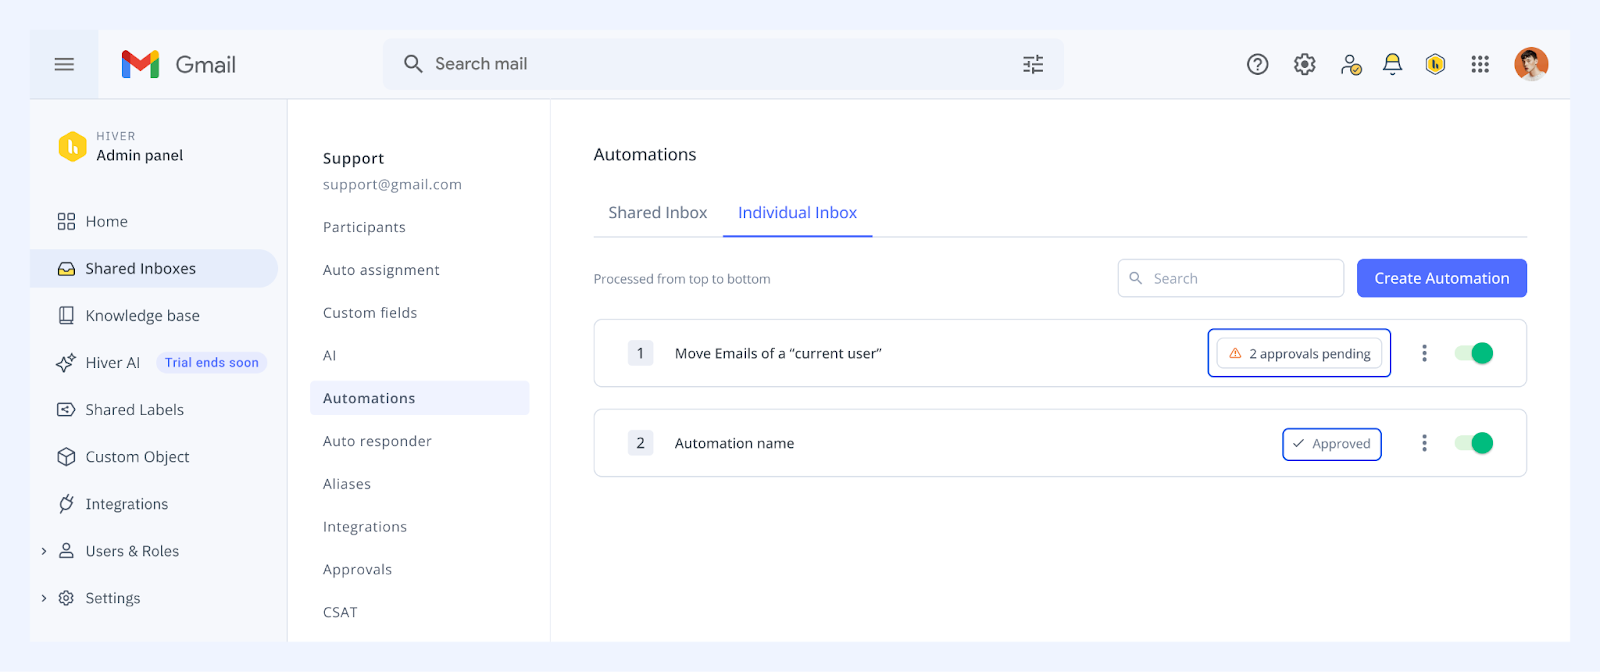
Once everyone approves, conversations from the specified customers that land in a member’s personal inbox will automatically be routed to the correct Shared Inbox, ensuring nothing falls through the cracks.
Note: When the Automation moves an email into the Shared Inbox, Hiver adds an entry to Activity & notes in the right panel. Expand the section to see which Shared Inbox the conversation was added to and when it arrived.
FAQs
Q: Will this Automation move emails already in team members’ inboxes?
No, the Automation only applies to new incoming emails after the rule is activated.
Q. Can I edit or disable Automation?
Yes, you can edit or disable Automations without deleting them.
Q. What will happen if a Custom Object is deleted in this Automation?
Hiver will alert you to the number of Automations affected before deletion, allowing you to update or remove them to avoid interruptions.
Q: Will the email permanently be moved to the Shared Inbox?
Yes, the email will permanently move from the team member’s individual Inbox to the Shared Inbox.
Q. What happens if an email from a whitelisted address (an approved email address or domain) is already part of a Shared Inbox?
If the conversation is already in a Shared Inbox, the Automation will not move it again, even if the Individual Inbox to Shared Inbox rule is active for that user.
Q. Can the same conversation be added to more than one Shared Inbox?
Yes. If a user is part of two Shared Inboxes and both have the Individual Inbox to Shared Inbox Automation enabled, the conversation will be added to both.
Q. Will a conversation be added to a Shared Inbox if a user from that Shared Inbox is only CC'ed in a follow-up email?
No. If a user from a Shared Inbox is CC'ed (and not the direct recipient), the conversation will not be added to that Shared Inbox even if the Individual Inbox to Shared Inbox Automation is enabled.
Q. Where will the conversation go if a user is part of two Shared Inboxes but the Automation is enabled on only one?
The conversation will be added only to the Shared Inbox where the Automation is enabled.
Q. When should I use is not vs. is not present in operators?
Use is not to type the list of senders directly into the Automation. Use is not present in if the list lives in a Custom Object. With a Custom Object, the Automation reflects any changes to the list automatically.
Q. If I exclude a domain, are its subdomains also excluded?
No. To exclude subdomains, add them to the list separately, or maintain them in a Custom Object and reference it with is not or is not present in operator.
Q. What happens if the Custom Object referenced in the is not present in operator is empty or deleted?
If the Custom Object is empty, all emails that fit the rest of the rule will move to the Shared Inbox. The same happens if you delete the Custom Object. Hiver warns you first so you can update the Automation.