Setting up a customer portal
Hiver lets you create a Customer Portal, a web-based self-service space that your customers can use to submit requests and track their progress in real time.
Your customers can securely log in, raise new requests, and check updates anytime, giving them complete visibility into their queries while reducing your team’s load.
Each Shared Inbox has its own dedicated portal, so requests are automatically routed to the right team.
Why create a Customer Portal
Here are the benefits of creating a Customer Portal:
- Round-the-clock access: Your customers can submit and track requests anytime without sending emails or making phone calls.
- Organized communication history: All support communication stays in one place, creating a clear record for every request.
- Reduced support workload: Customers can check their request status independently, freeing up your team to handle more complex issues.
- Faster query resolution: Real-time visibility into progress means fewer follow-up emails asking for updates.
Availability and prerequisites
For the Customer Portal
Before you create a portal, make sure you have:
- An active Hiver Shared Inbox
- Admin access
For the customer domain
- Custom domains are available only on Pro and Elite plans.
- Hiver provides complete CNAME values, including your domain (like .subdomain.domain.com). Check if your DNS settings already include the domain. If so, remove it from the CNAME value before saving the record.
Setting up the Customer Portal
1. Go to Hiver Settings → Admin panel → Shared Inboxes and select an inbox.
2. Select Customer Portal and click Setup Customer Portal.
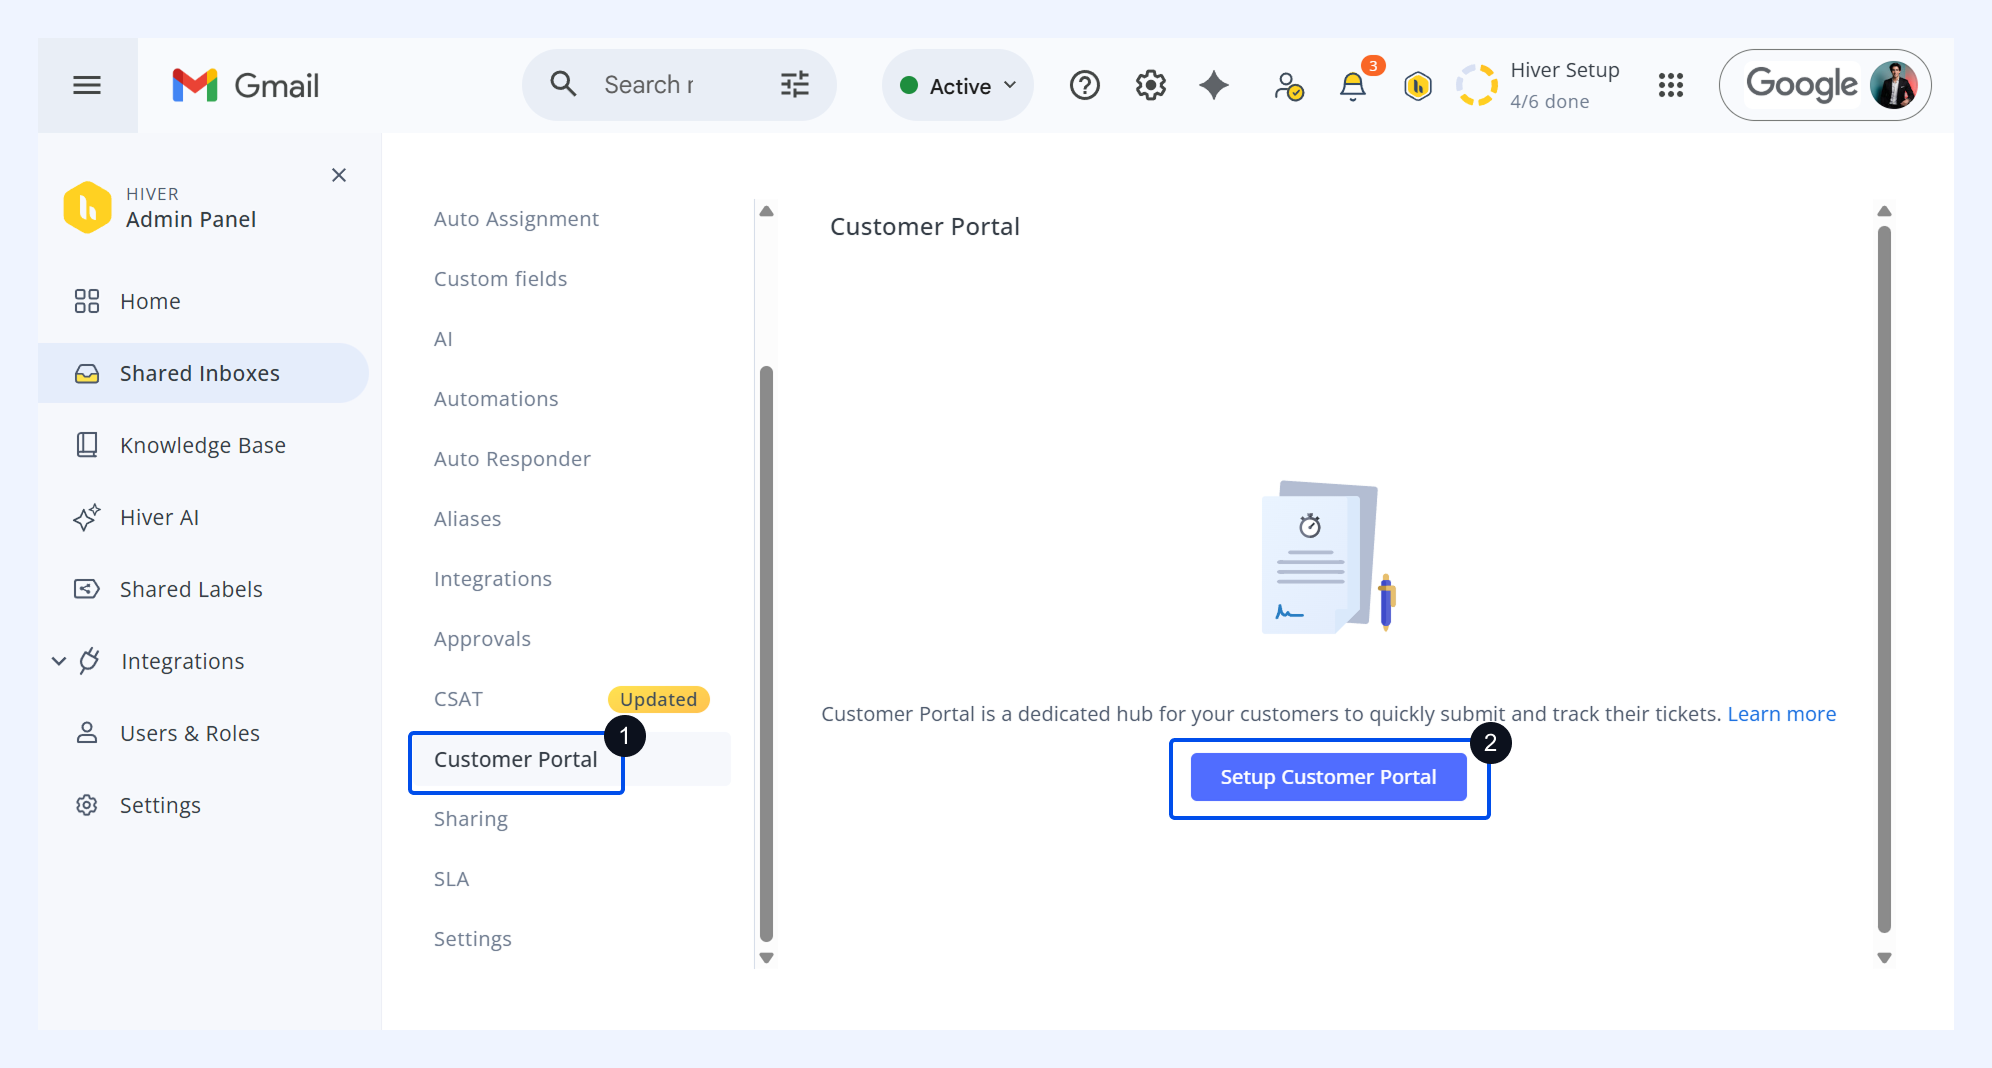
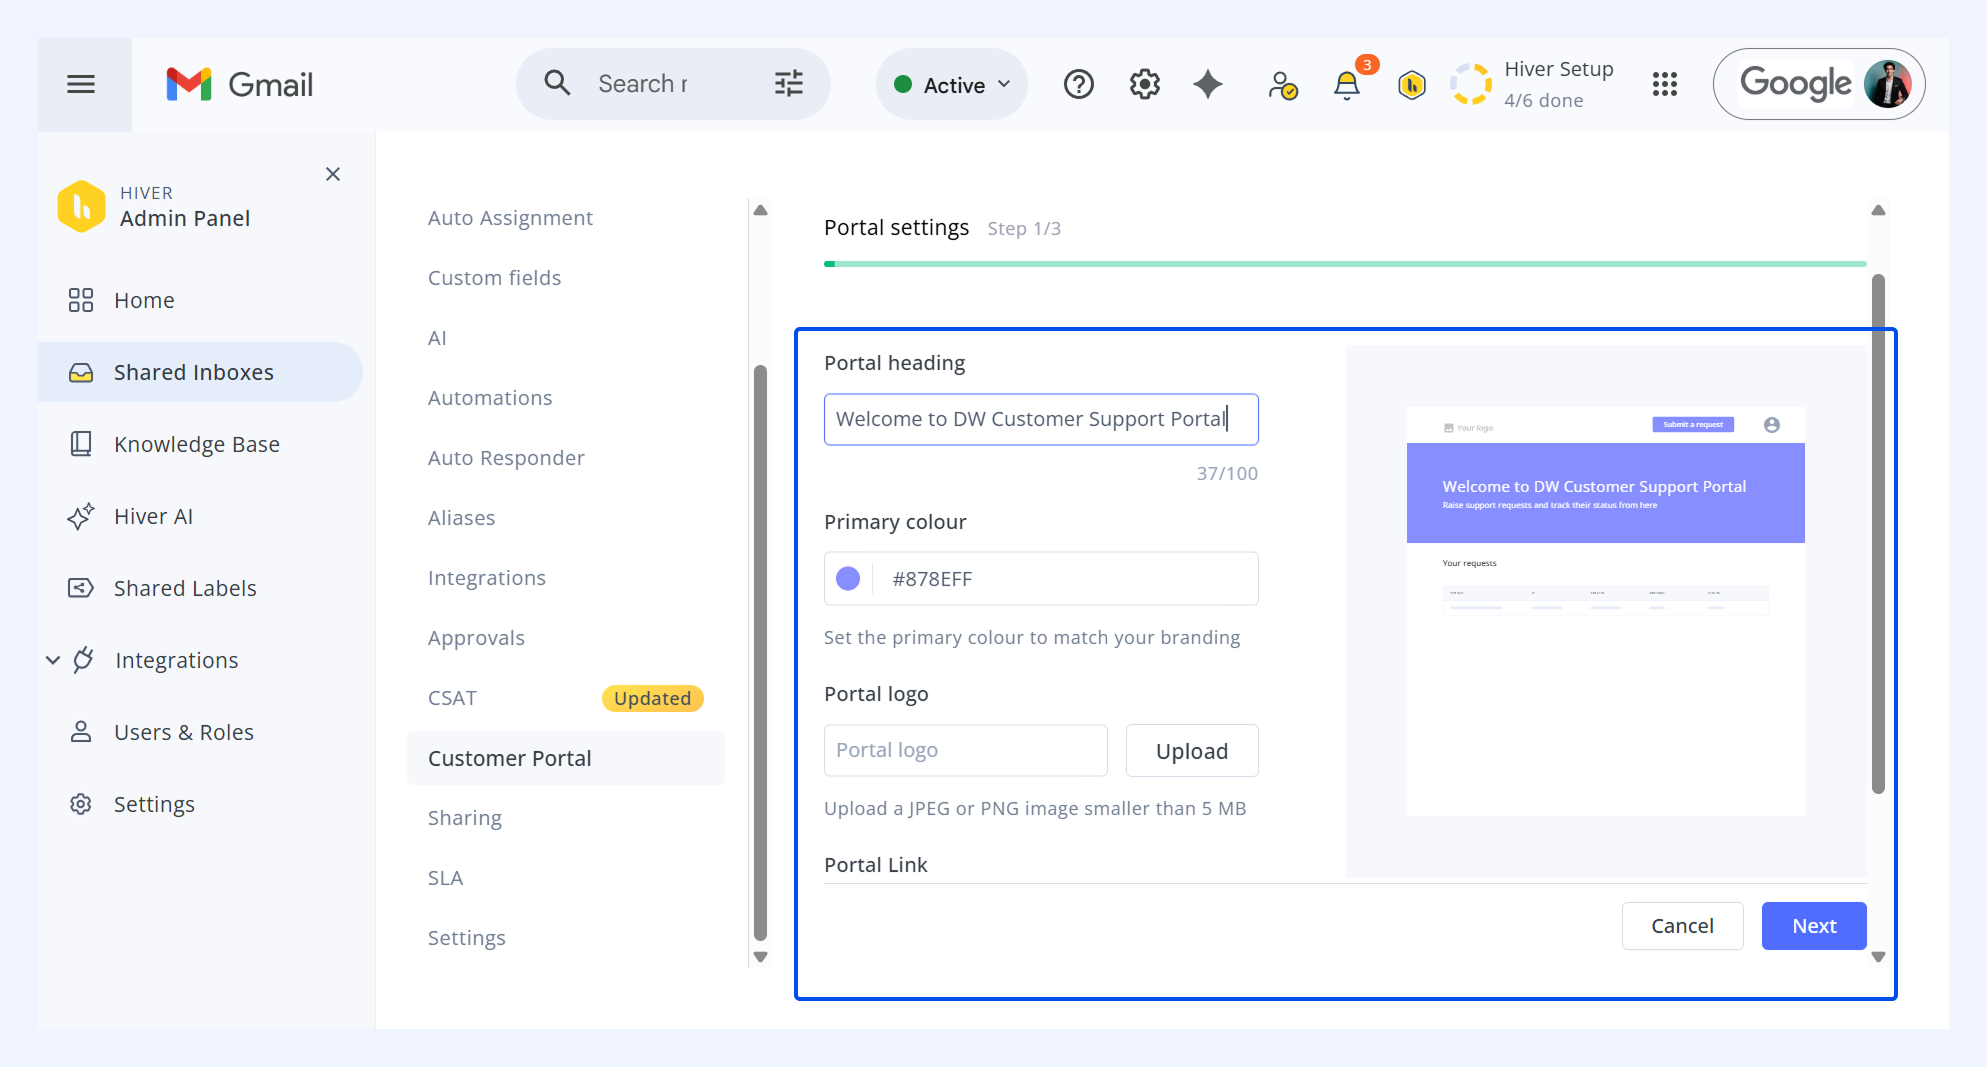
3. Add the portal heading, upload your company logo, and choose your brand color. Customize the portal URL and click Next.
Note: You can only customize the portal URL during the setup. Once saved, you cannot edit it later.
4. Create the request submission form that customers will use to submit their queries. You can:
- Customize the header, subject line, and placeholder text.
- Toggle attachments on or off as needed.
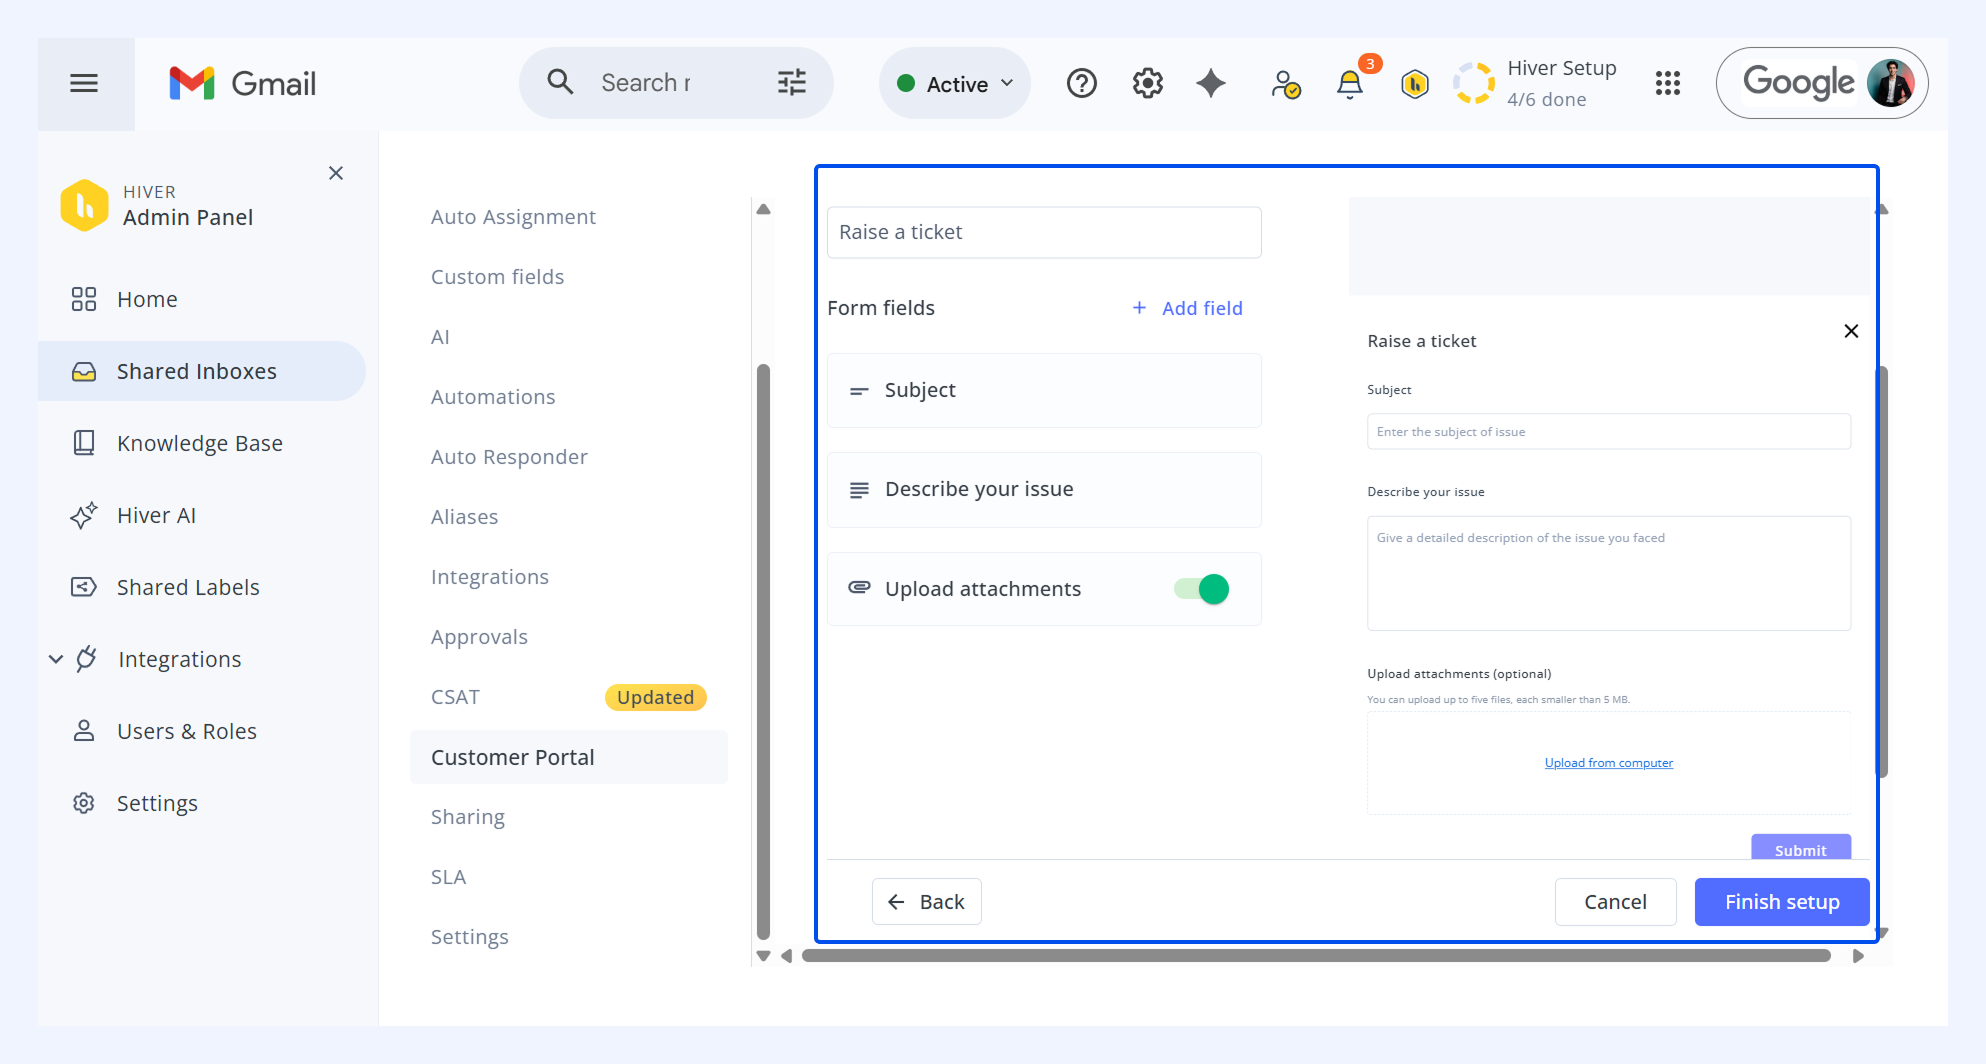
Note: You can also add Custom Fields to collect specific customer information. Choose from short answers, paragraphs, or dropdown fields. Add placeholder text for guidance and mark fields as required to ensure complete submissions.
6. Set up visibility settings
Once your customer portal is active, go to Visibility settings to control what users can see in the portal. You can allow users to view:
- Requests they raised (default)
- Requests they’re mentioned in (tagged or CC’d)
- All requests from their organization (users must sign in with their company email domain)
.png)
Custom domains
Custom domains let you host your Customer Portal on your own domain instead of hiver-portal.com. This helps your support portal look professional and consistent with your company’s identity.
Setting up a custom domain
- In Portal Settings, enter your domain or subdomain in the Custom domain field and click Connect.
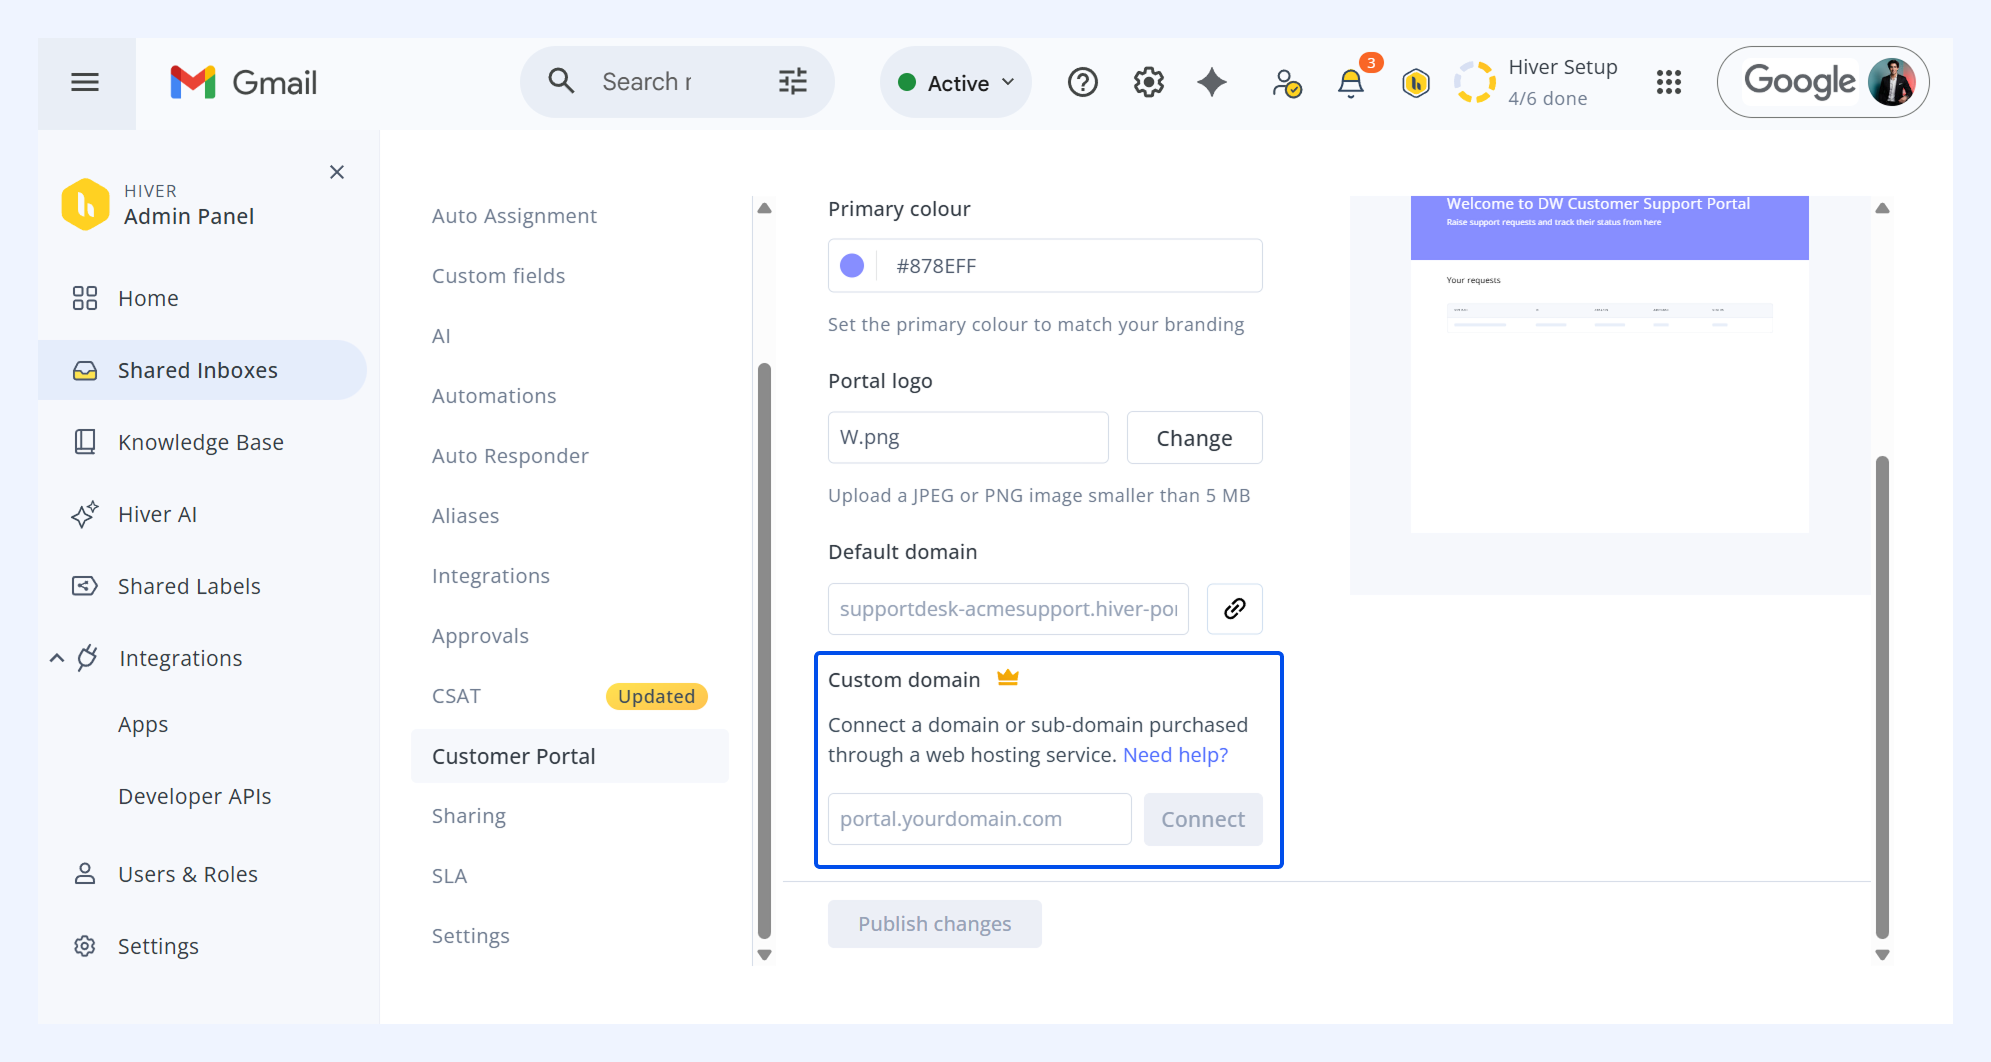
- Hiver provides a CNAME key-value pair. Add this to your domain provider's DNS records to complete the configuration.
Set up DNS records for your domain
Follow these steps to configure your DNS settings. Please note that specific steps may vary depending on your DNS provider.
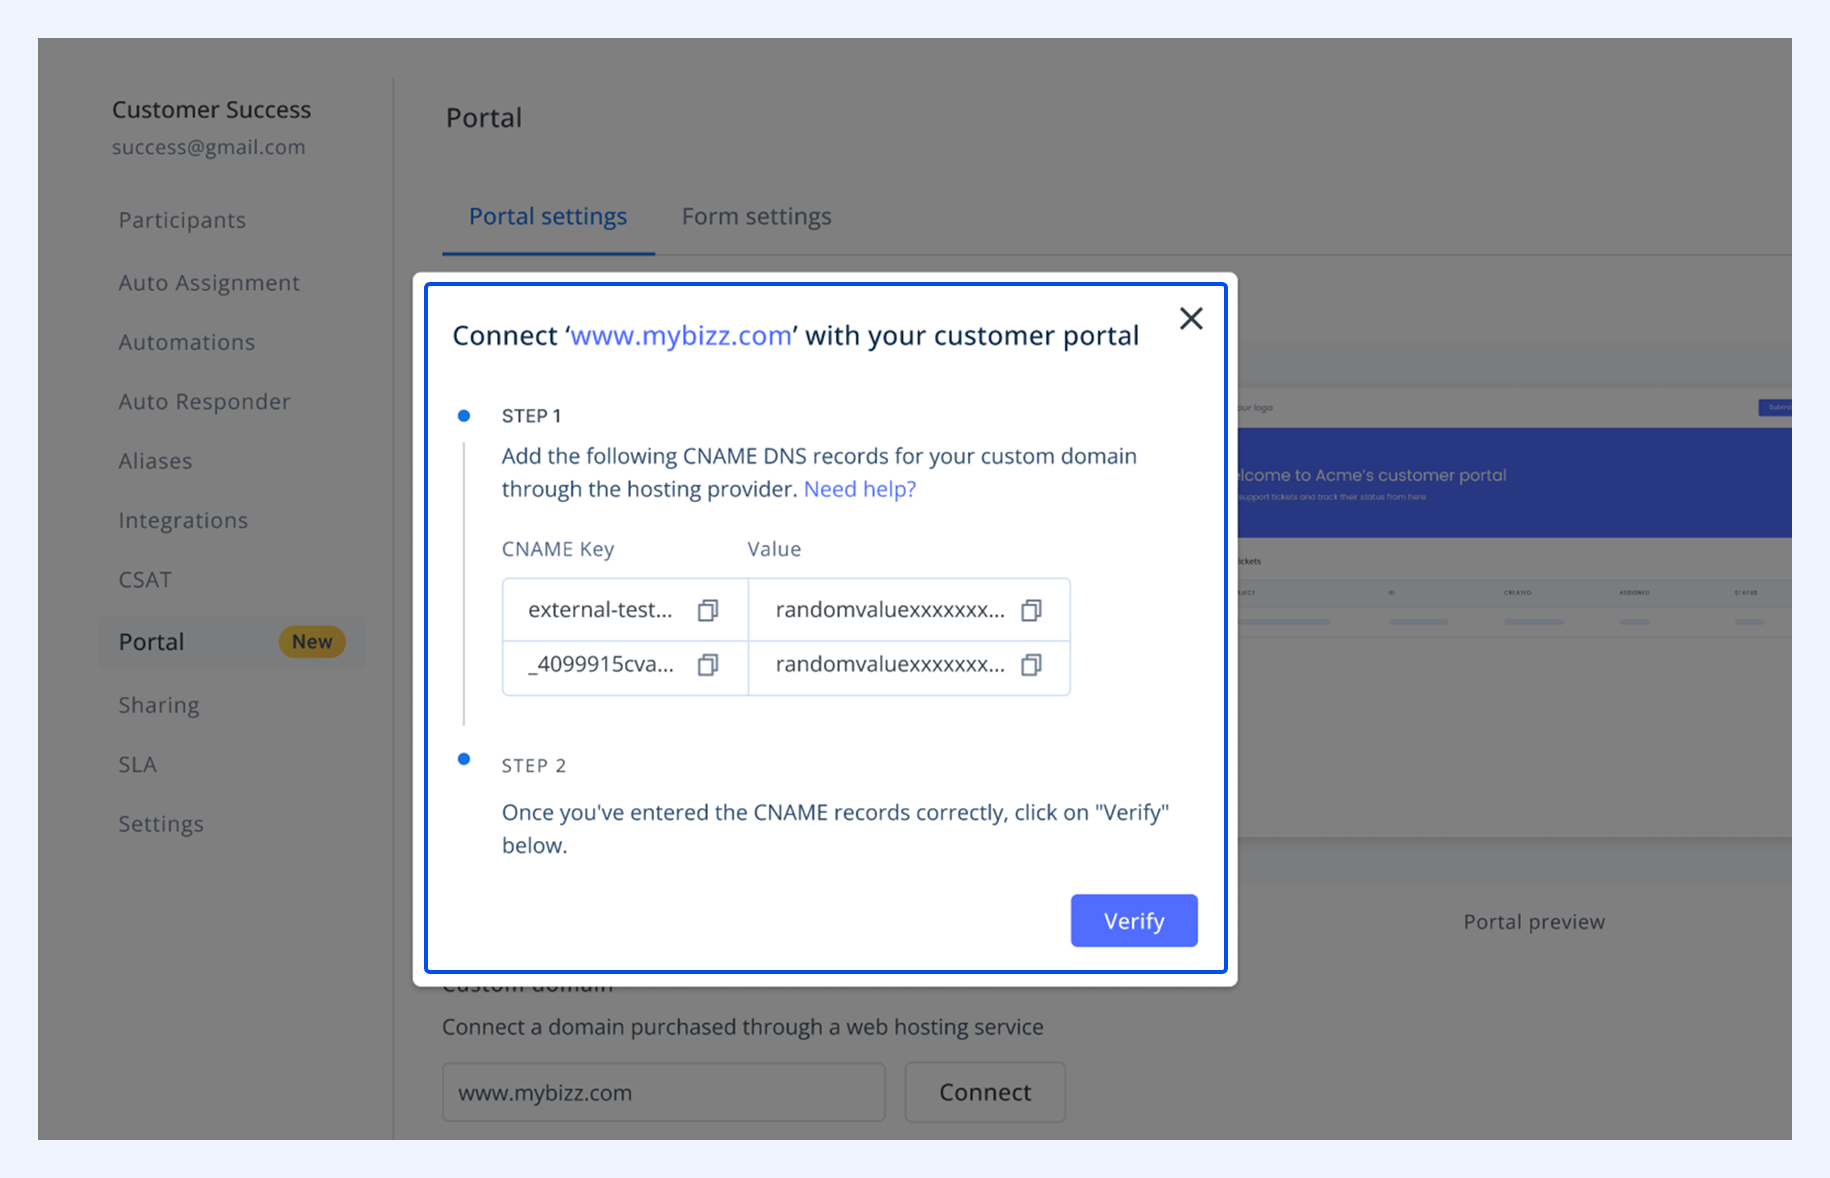
- Create two CNAME records in your domain's DNS settings.
- The first configures CDN.
- The second handles SSL.
- Enter the keys and values provided by Hiver for each record.
Learn how to set up a CNAME in Google DNS settings. You can follow similar steps for other cloud providers.
- Add a CAA record for your cloud provider:
- Once verified, your hiver-portal.com URL will automatically redirect to your custom domain.
Note:
- If you use a different cloud provider, contact them to set up the CAA record.
- Both hiver-portal.com and your custom domain URLs work simultaneously.
- Portal links automatically update to use your custom domain.
Troubleshooting custom domain verification issues
If your custom domain remains stuck in “verifying” status, your DNS provider may not have issued the SSL certificate yet.
To fix this:
- Log in to your DNS provider and open the DNS management console.
- Create a new CAA record for amazon.com or modify existing ones to include amazon.com.
- Save your changes and wait for propagation.
- If the problem persists for more than 24 hours, please get in touch with support at support@hiverhq.com.
Sharing the Customer Portal with end customers
Your team can insert the portal link while drafting a reply by clicking the globe icon in the reply editor. Customers can log in using their credentials or authenticate through Google SSO for faster access.
Note: Your Customer Portal link can only be added using this method when replying to an email and not when composing new emails.
Using the Customer Portal
The Customer Portal gives your end customers full control over their queries. They can quickly search, filter, and sort requests, without digging through email threads.
By default, the portal has a My requests tab that customers can use to view and track requests they’ve raised.
When you enable the option to Allow users to see all requests raised from their organization, the portal will have an Organization requests tab.
.png)
Searching for conversations
Customers can type a keyword or phrase from the subject line into the search bar. The portal instantly shows all matching conversations. This helps when they need to revisit a specific request or check an older request without scrolling through everything.
Filtering conversations
Customers can narrow results using these filters:
- Status: Filter by Open, Pending, or Closed to track ongoing, unresolved, or past issues
- Assignee: View conversations assigned to specific team members, useful when working with a known support rep
- Request type: Narrow down requests by those by you and those involving you
- Created date: Filter by when a conversation started, ideal for checking recent queries or activity within a timeframe
Sorting conversations
Customers can sort requests by newest or oldest first. This lets them prioritize recent updates or review older queries in creation order.
Disable the Customer Portal and remove the custom domain
You can deactivate your Customer Portal or remove a custom domain anytime. Deactivating the portal makes it inaccessible to customers, while removing a domain switches the portal back to the default hiver-portal.com URL.
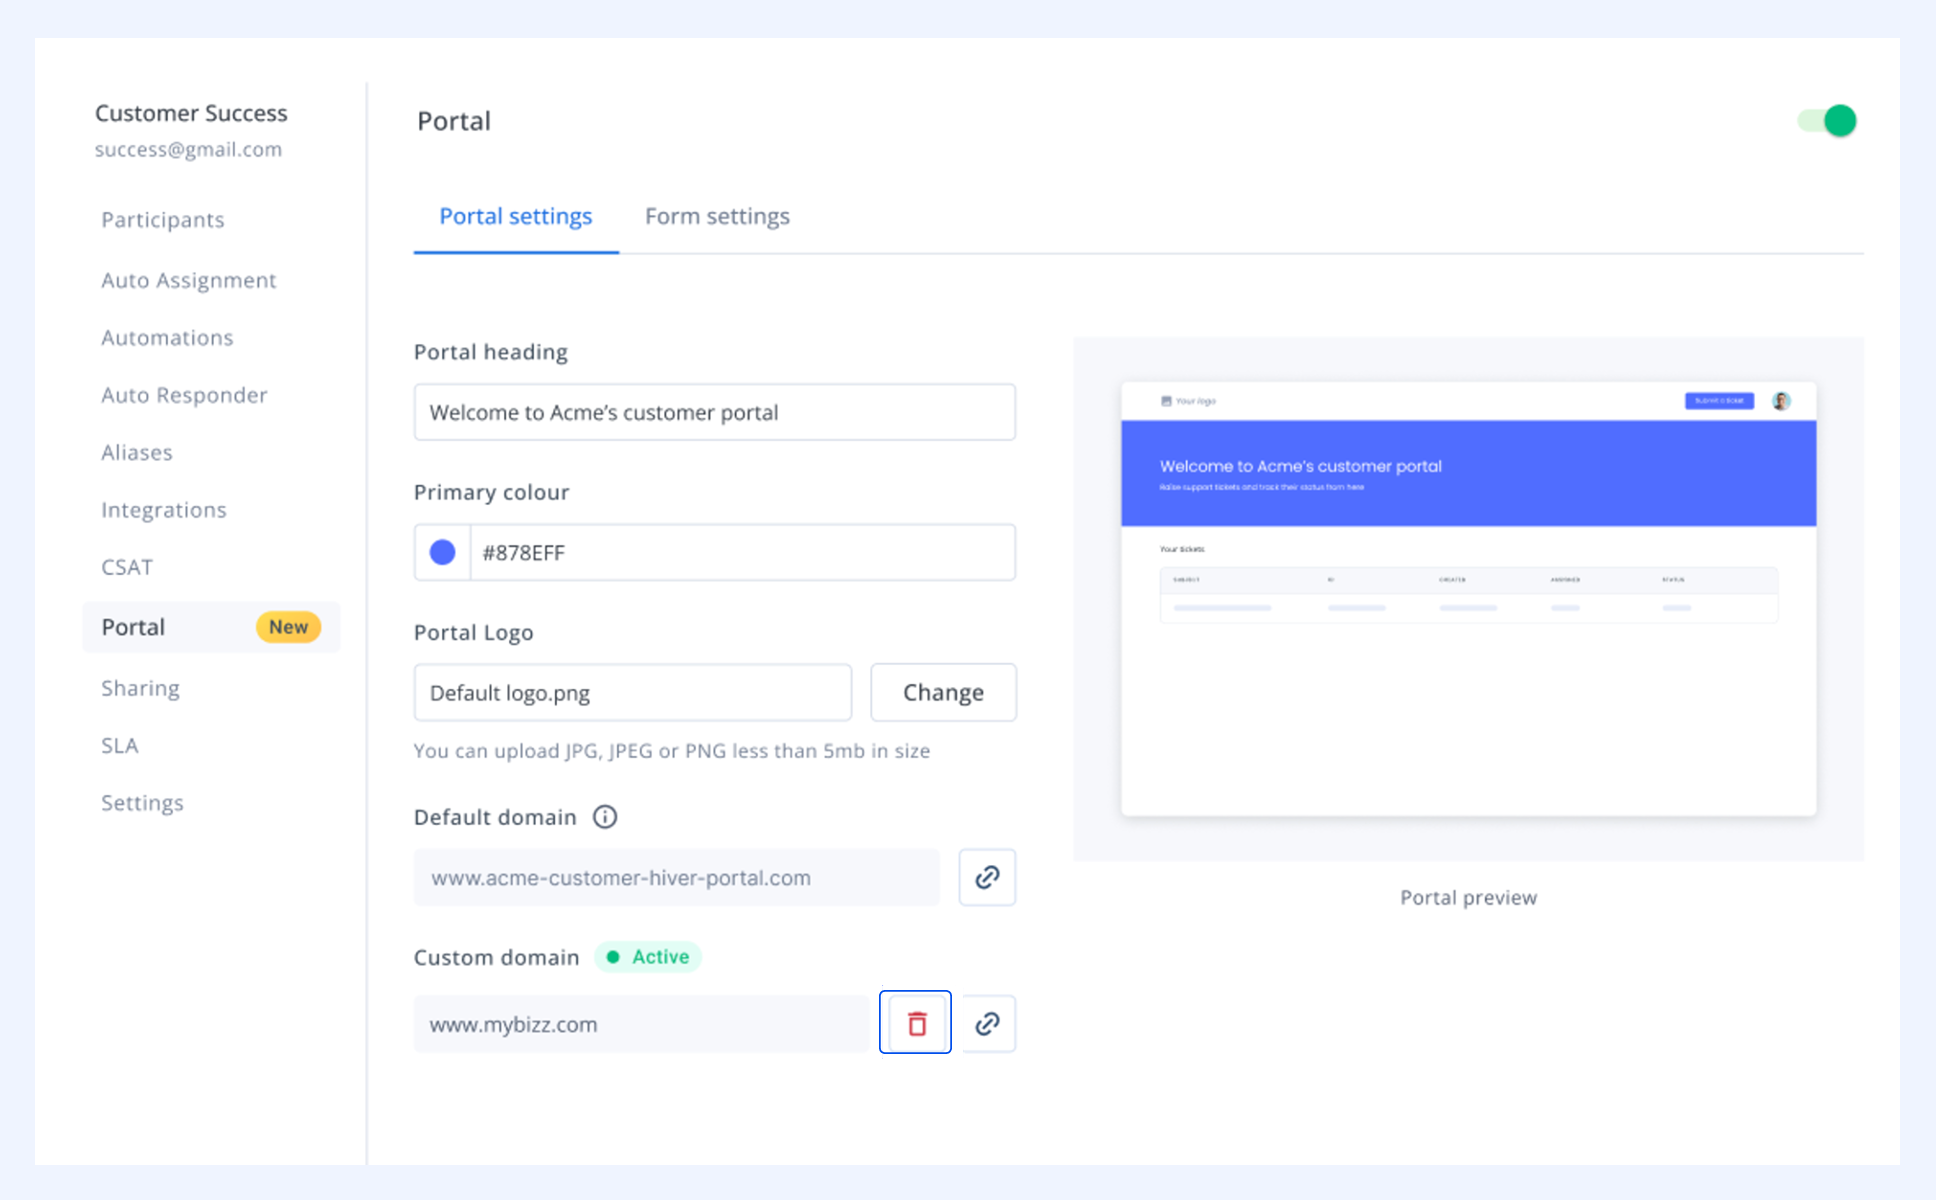
- To disable the portal, turn the toggle Off on the portal settings page. Once deactivated, the URL becomes inactive and customers can no longer access it.
- To remove a custom domain, click the delete icon beside the domain bar, follow the prompts, and confirm by clicking Remove.
FAQs
1. What happens to requests if emails are trashed, deleted, or removed from the Shared Inbox?
The corresponding request gets deleted when you trash, delete, or remove its email from the Shared Inbox.
2. What happens to the portal if the Shared Inbox is deleted?
The portal link is no longer functional and displays a 404 error.
3. What displays on the portal if an assignee is removed from the Shared Inbox?
The request status changes to ‘None’ for that conversation.
4. What happens to requests when the portal is disabled and then enabled again?
When you reactivate the portal, requests from the disabled period sync and appear. Activity tracking resumes from when you enable the portal again.