Salesforce Integration with Hiver
Salesforce is one of the most popular CRMs, helping businesses manage relationships, track pipelines, and store customer data. But most customer communication still happens over email. That’s where Hiver fits in.
By connecting Salesforce to Hiver, you see CRM data right inside Gmail. No tab switching, no digging through Salesforce. Just faster responses, fewer mistakes, and more personal customer interactions — all from your inbox.
Why integrate Salesforce with Hiver
With Salesforce integrated into Hiver, you can:
- Automate routine work: Automatically create leads, cases, assign emails, or log emails in Salesforce.
- Access full CRM context: View, create, and update Salesforce records such as Contacts, Accounts, Leads, Opportunities, and Cases, directly from Gmail.
- Search and link records: Find and connect the right Salesforce records quickly, with smart suggestions based on email content.
- Stay focused: Work entirely in Gmail with all relevant Salesforce data at hand.
- Keep data accurate: Any update in Hiver reflects instantly in Salesforce.
- Sync conversations: Log entire email threads from Hiver to Salesforce records to maintain a complete communication history and ensure visibility across teams.
Prerequisites
- Administrative access in both Hiver and Salesforce
- Authorization to create connected apps in Salesforce
- Access to the email associated with your Salesforce admin account
Setting up the Hiver and Salesforce integration
- Go to Hiver settings → Admin Panel → Integrations → Apps → Salesforce.
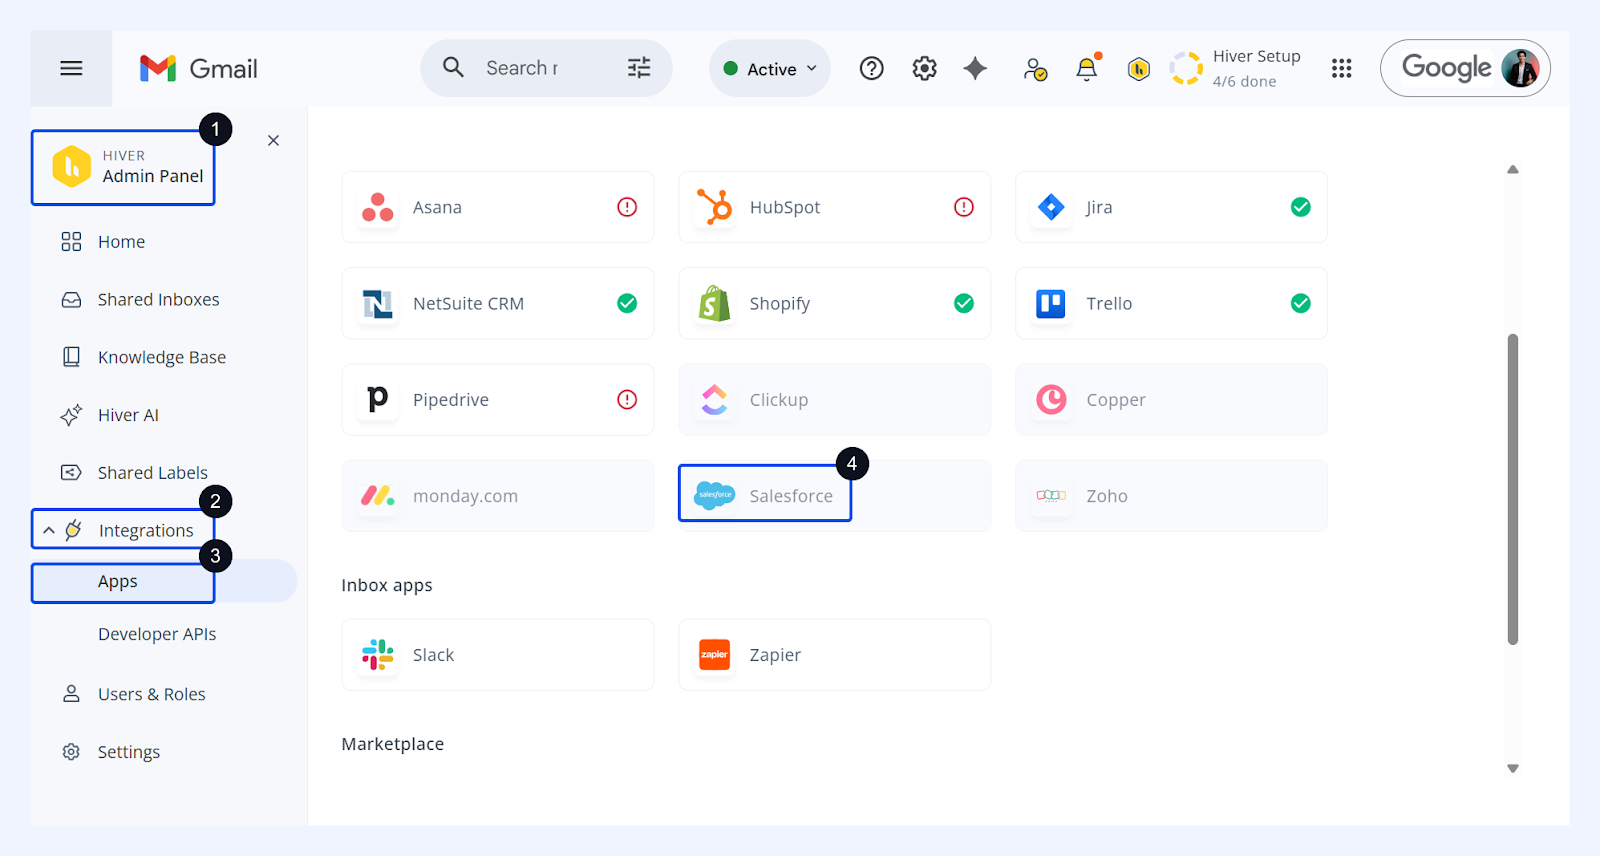
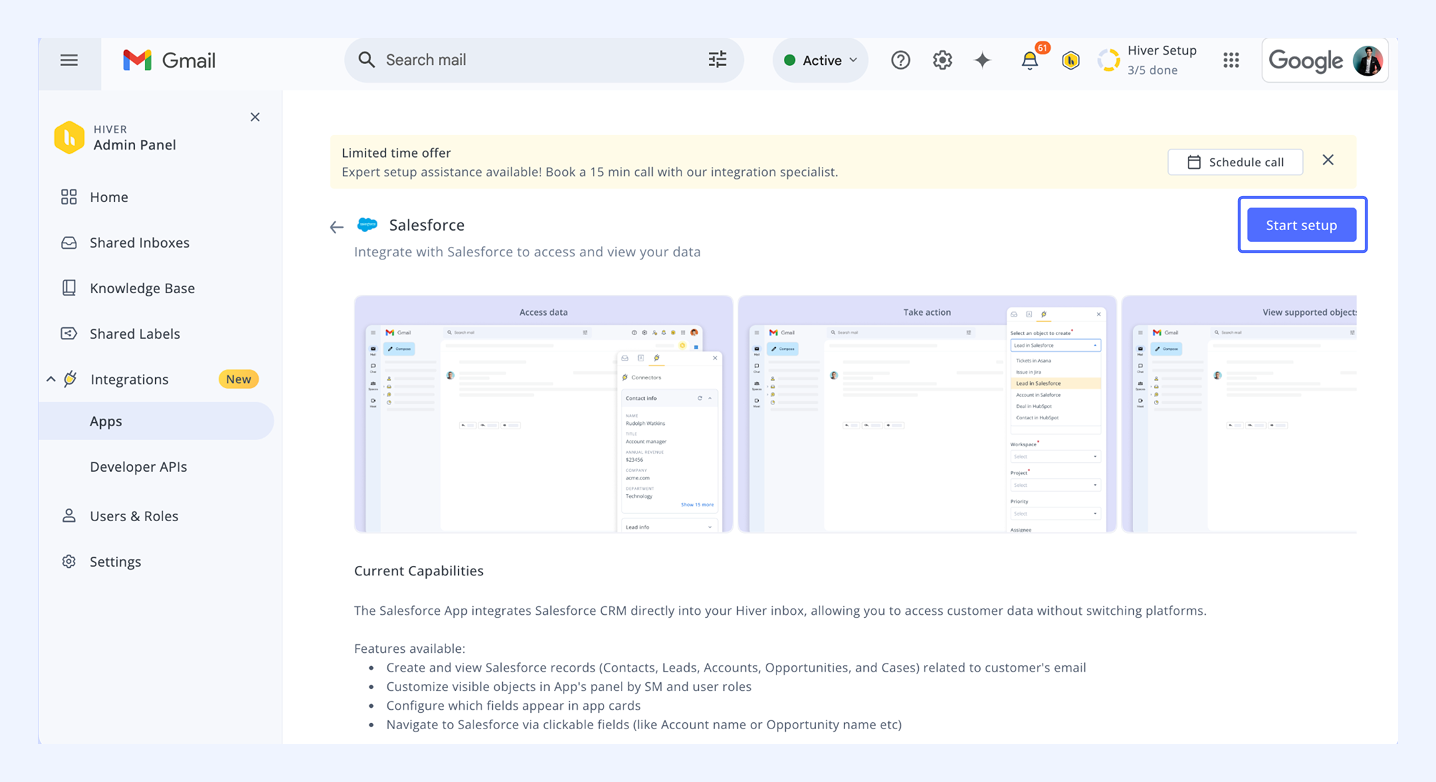
2.Review the capabilities of the Salesforce-Hiver integration and click Start setup when you’re ready.
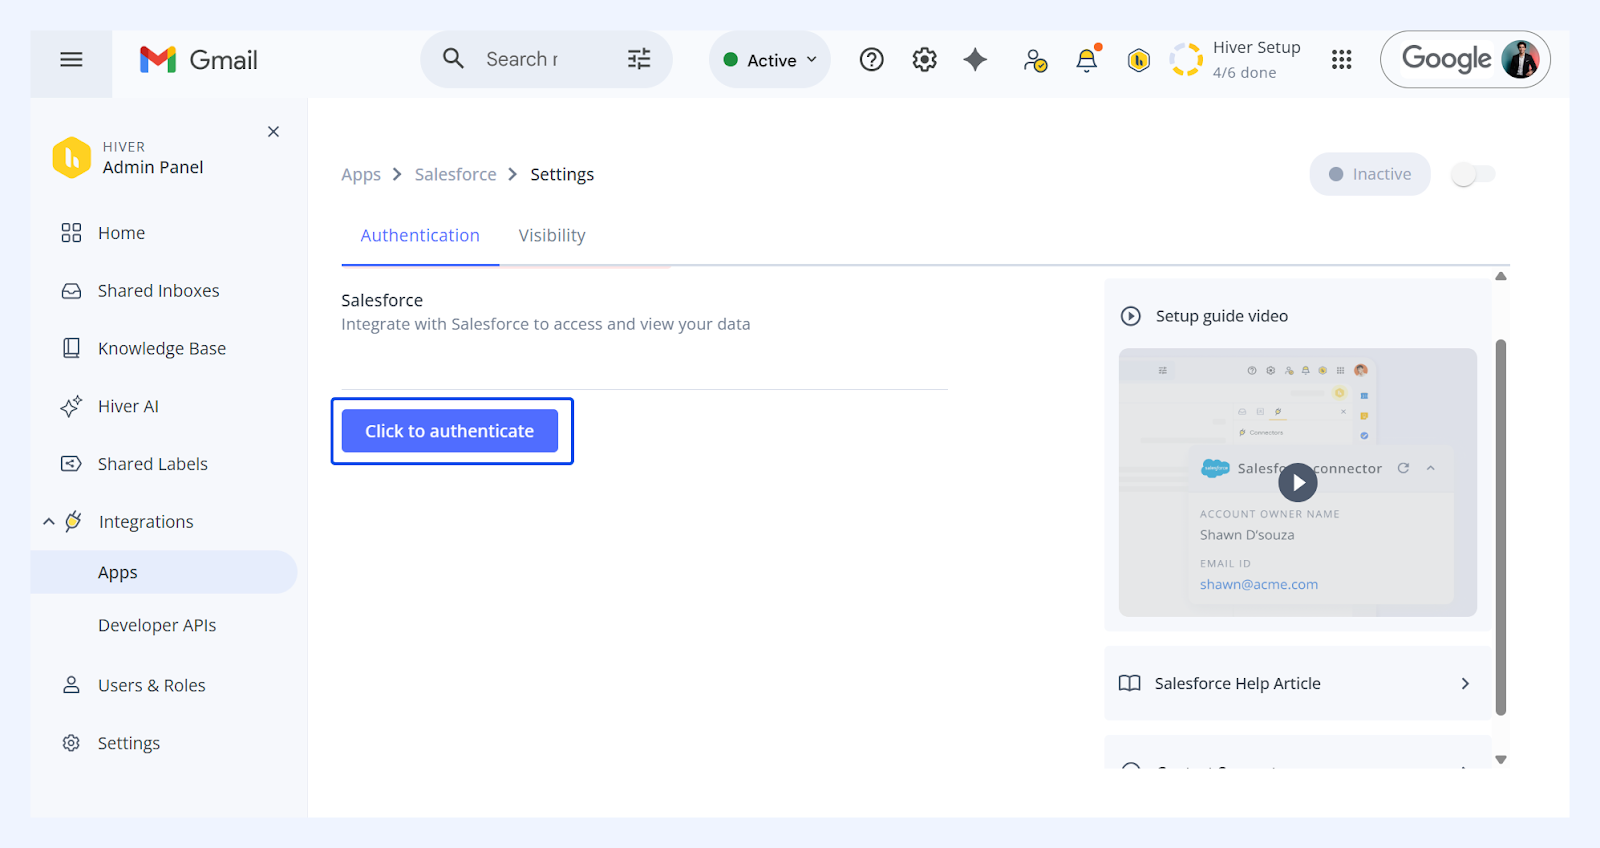
3. Next, Click to authenticate. In the new tab that opens, log in to Salesforce, and approve permissions requested. When you have a confirmation from Salesforce, return to Hiver.
4. In the Setup tab, select the Shared Inboxes and user roles who should have access to data from Salesforce, and click Save and enable.
5. In the confirmation popup that appears, click Got it.
Configure Salesforce for your team
Your app will now be enabled. Go back to Apps and click on Salesforce. Turn on the toggle to activate the app.
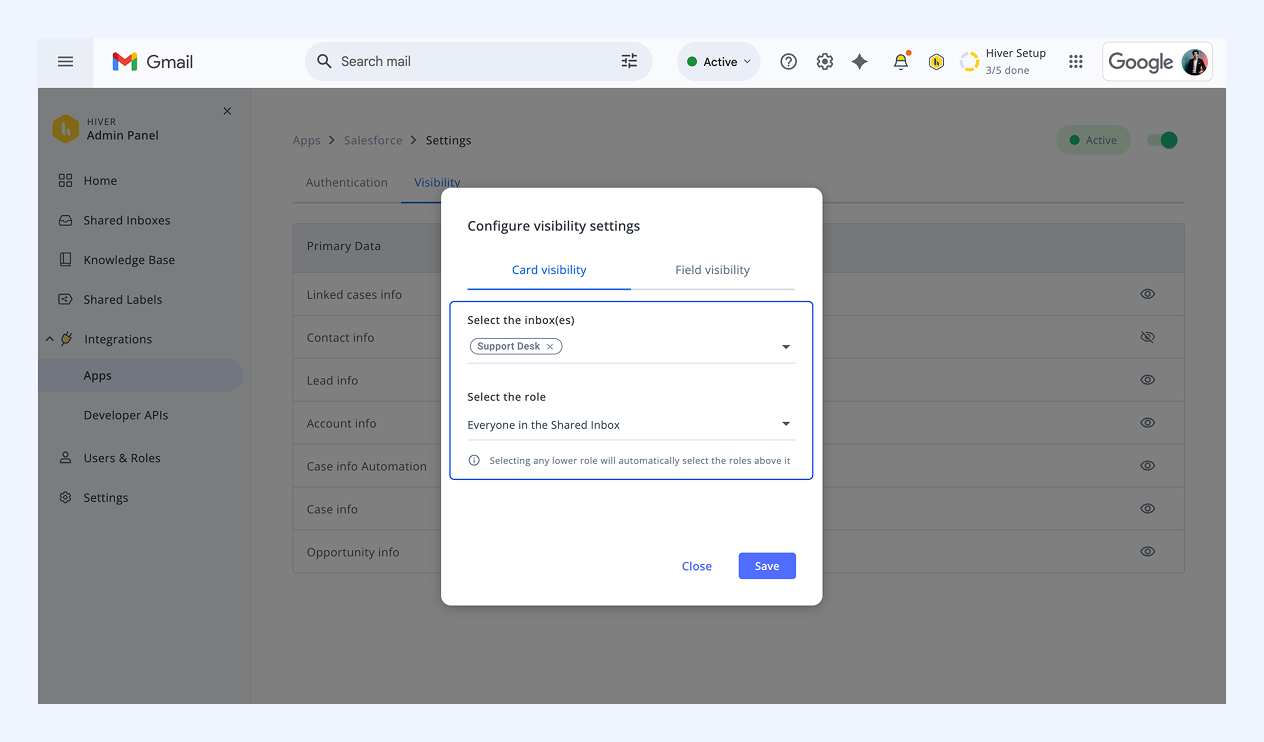
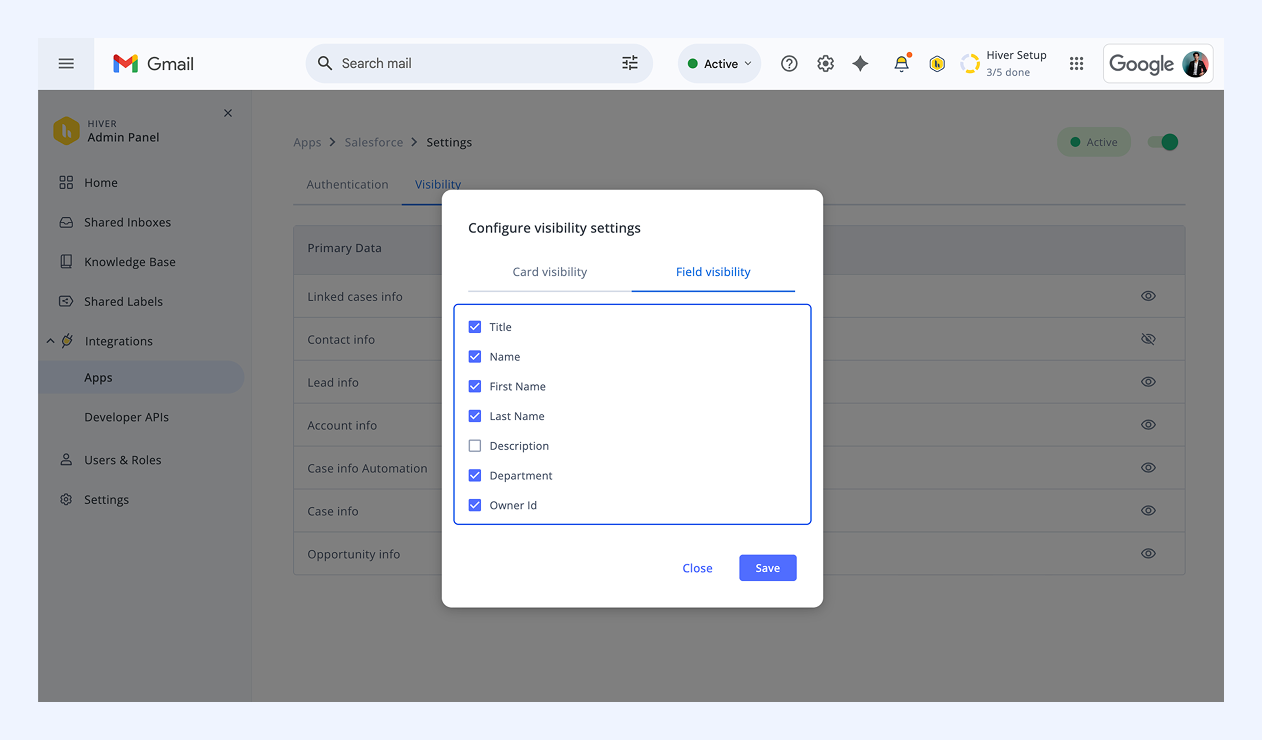
For each information card, you can control who sees the Salesforce panel and which fields are visible.
To configure visibility:
- Click the Configure visibility settings icon (eye icon) next to the card name.
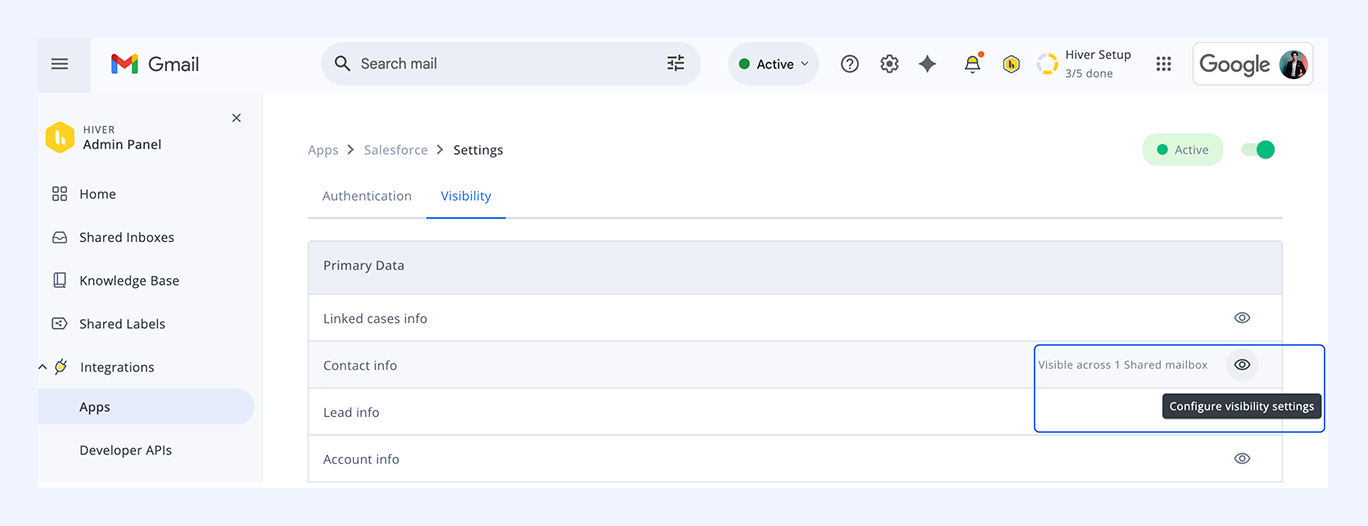
2. In Card visibility, choose the Shared Inbox and user roles.
3. In Field visibility, select fields to display, then click Save.
Additional options
While the standard integration offers comprehensive functionality out of the box, Hiver provides additional customization options through our support team. Organizations can request custom field mapping to tailor the integration to their specific needs:
- Map specific Salesforce fields to your Hiver views
- Choose which fields appear in the agent panel
- Customize the display of Salesforce data
To explore these customization options for your organization, reach out to Hiver support at support@hiverhq.com.
Managing advanced settings
Quick Access
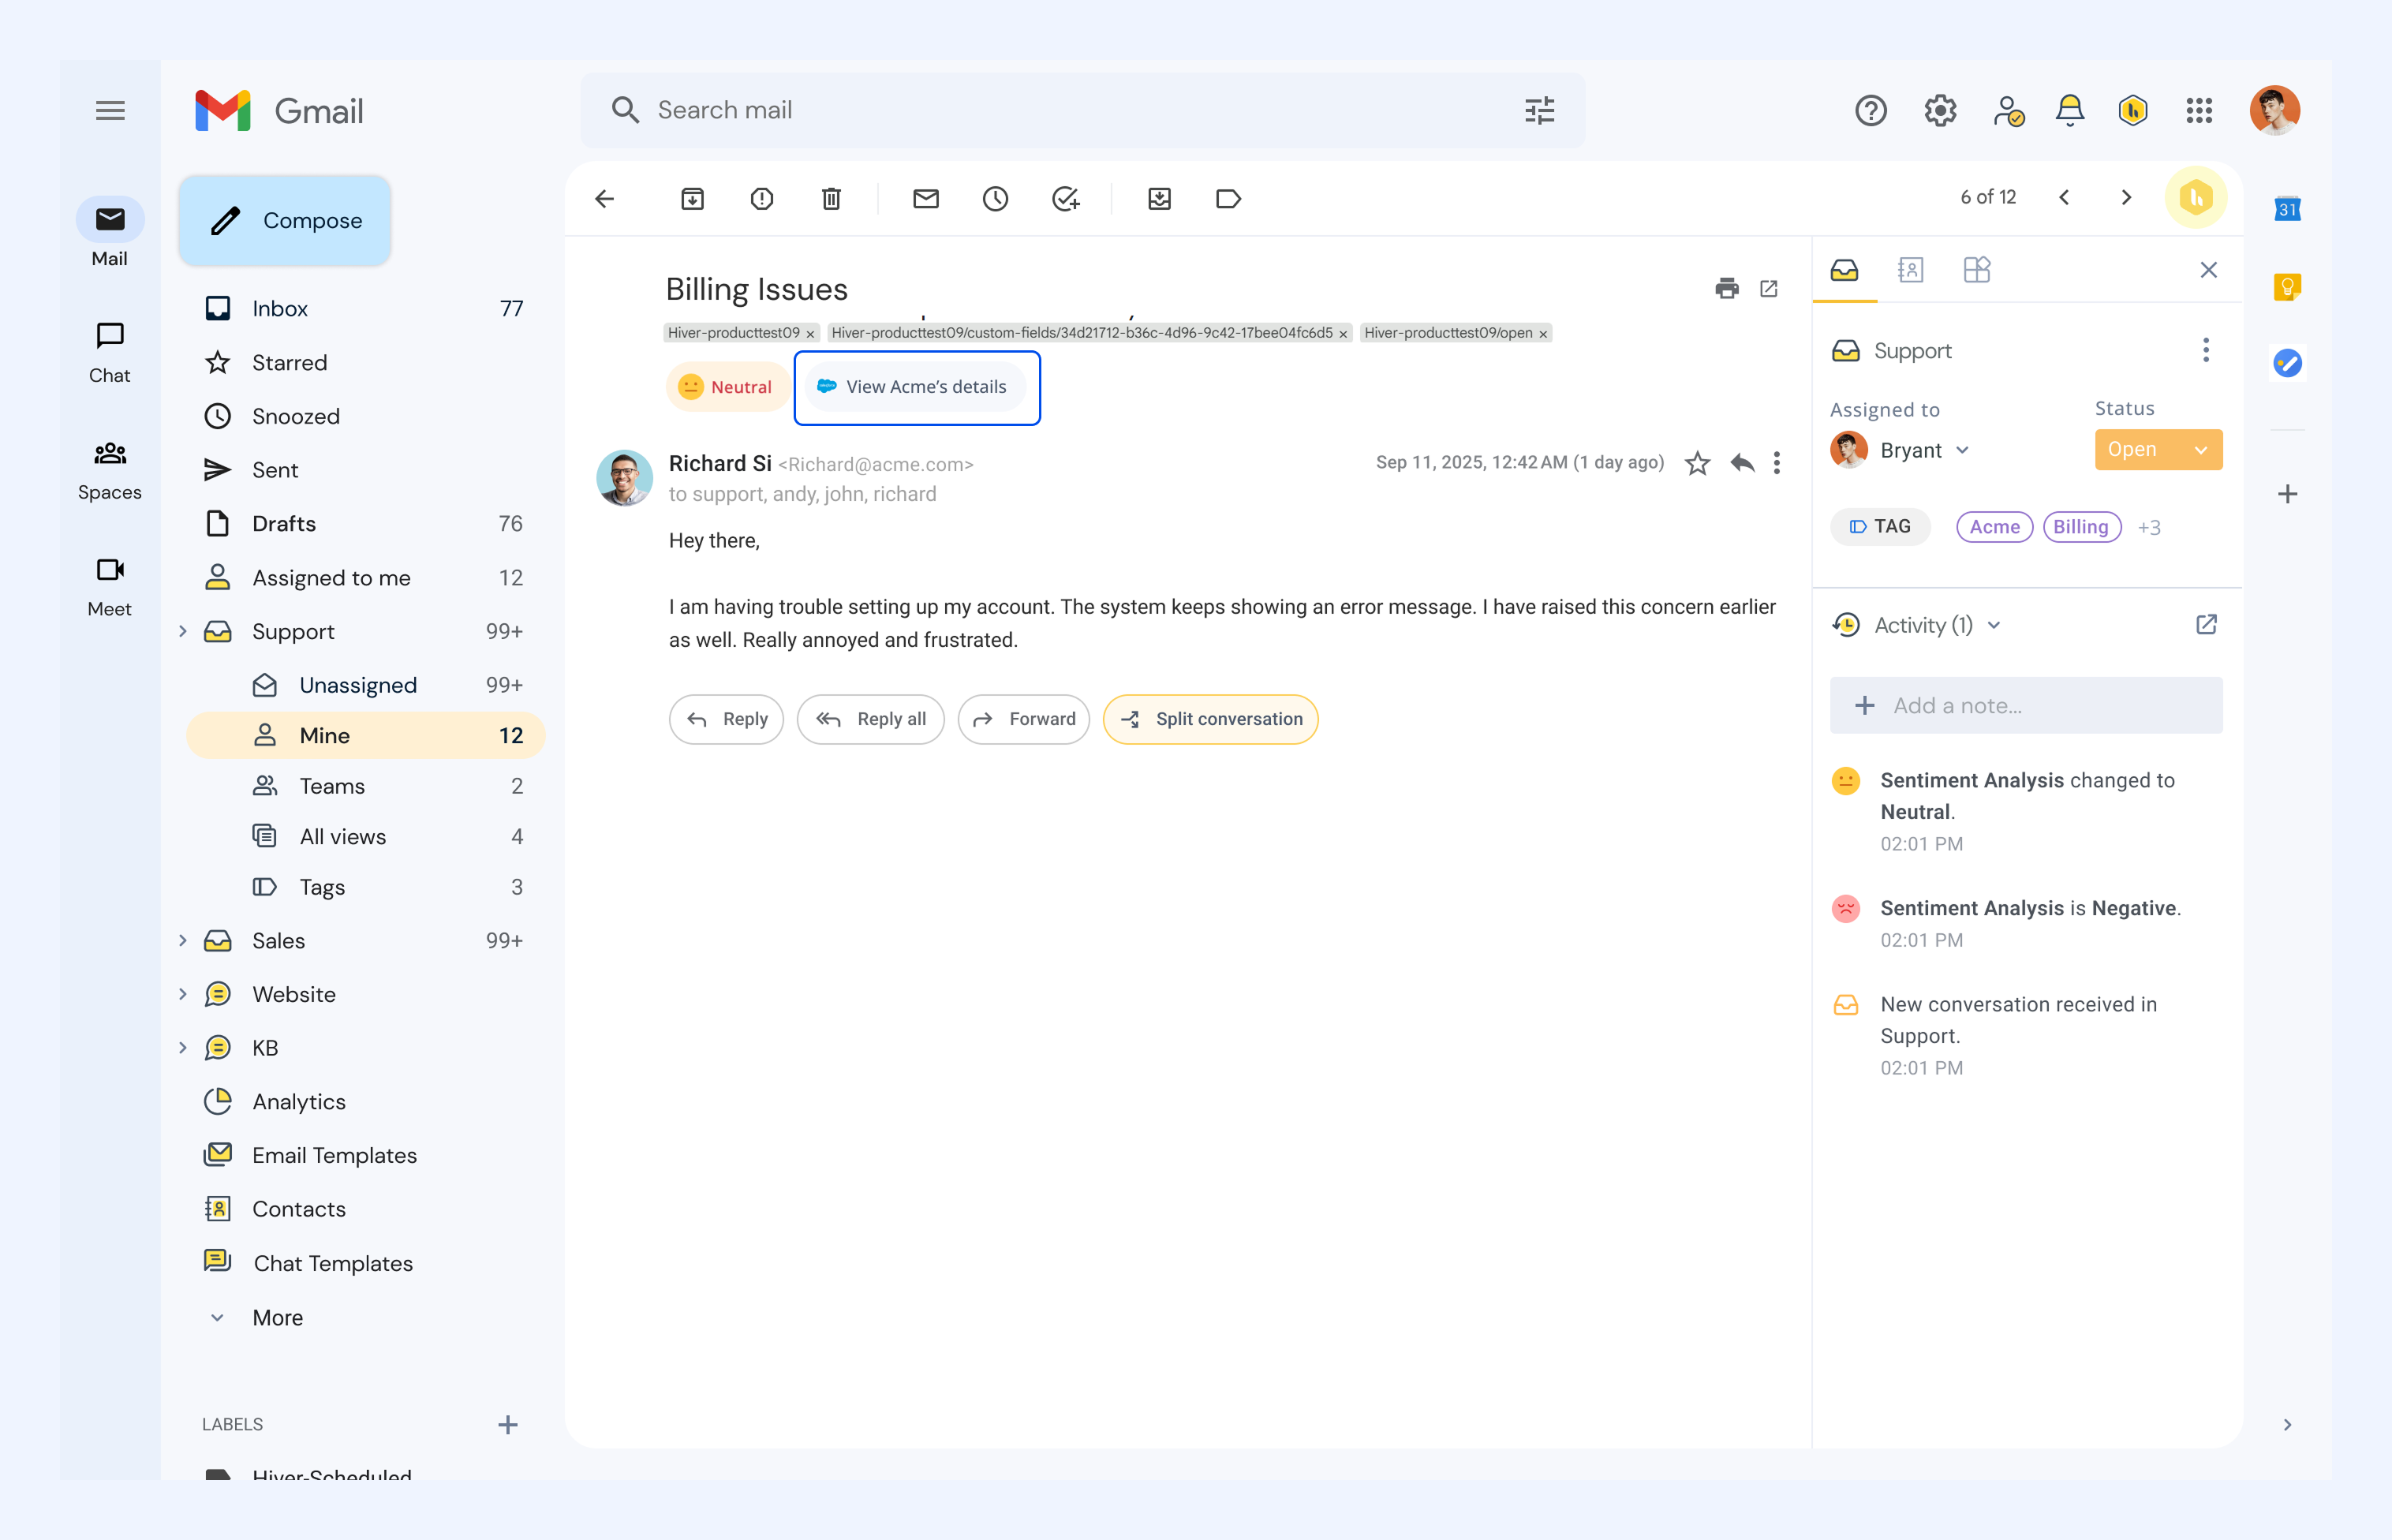
Quick Access shows a button at the top of each conversation with the matched customer's name from Salesforce. If no matching record is found, the button instead lets you add the contact to Salesforce.
Note: Quick Access can only be active for one app at a time.
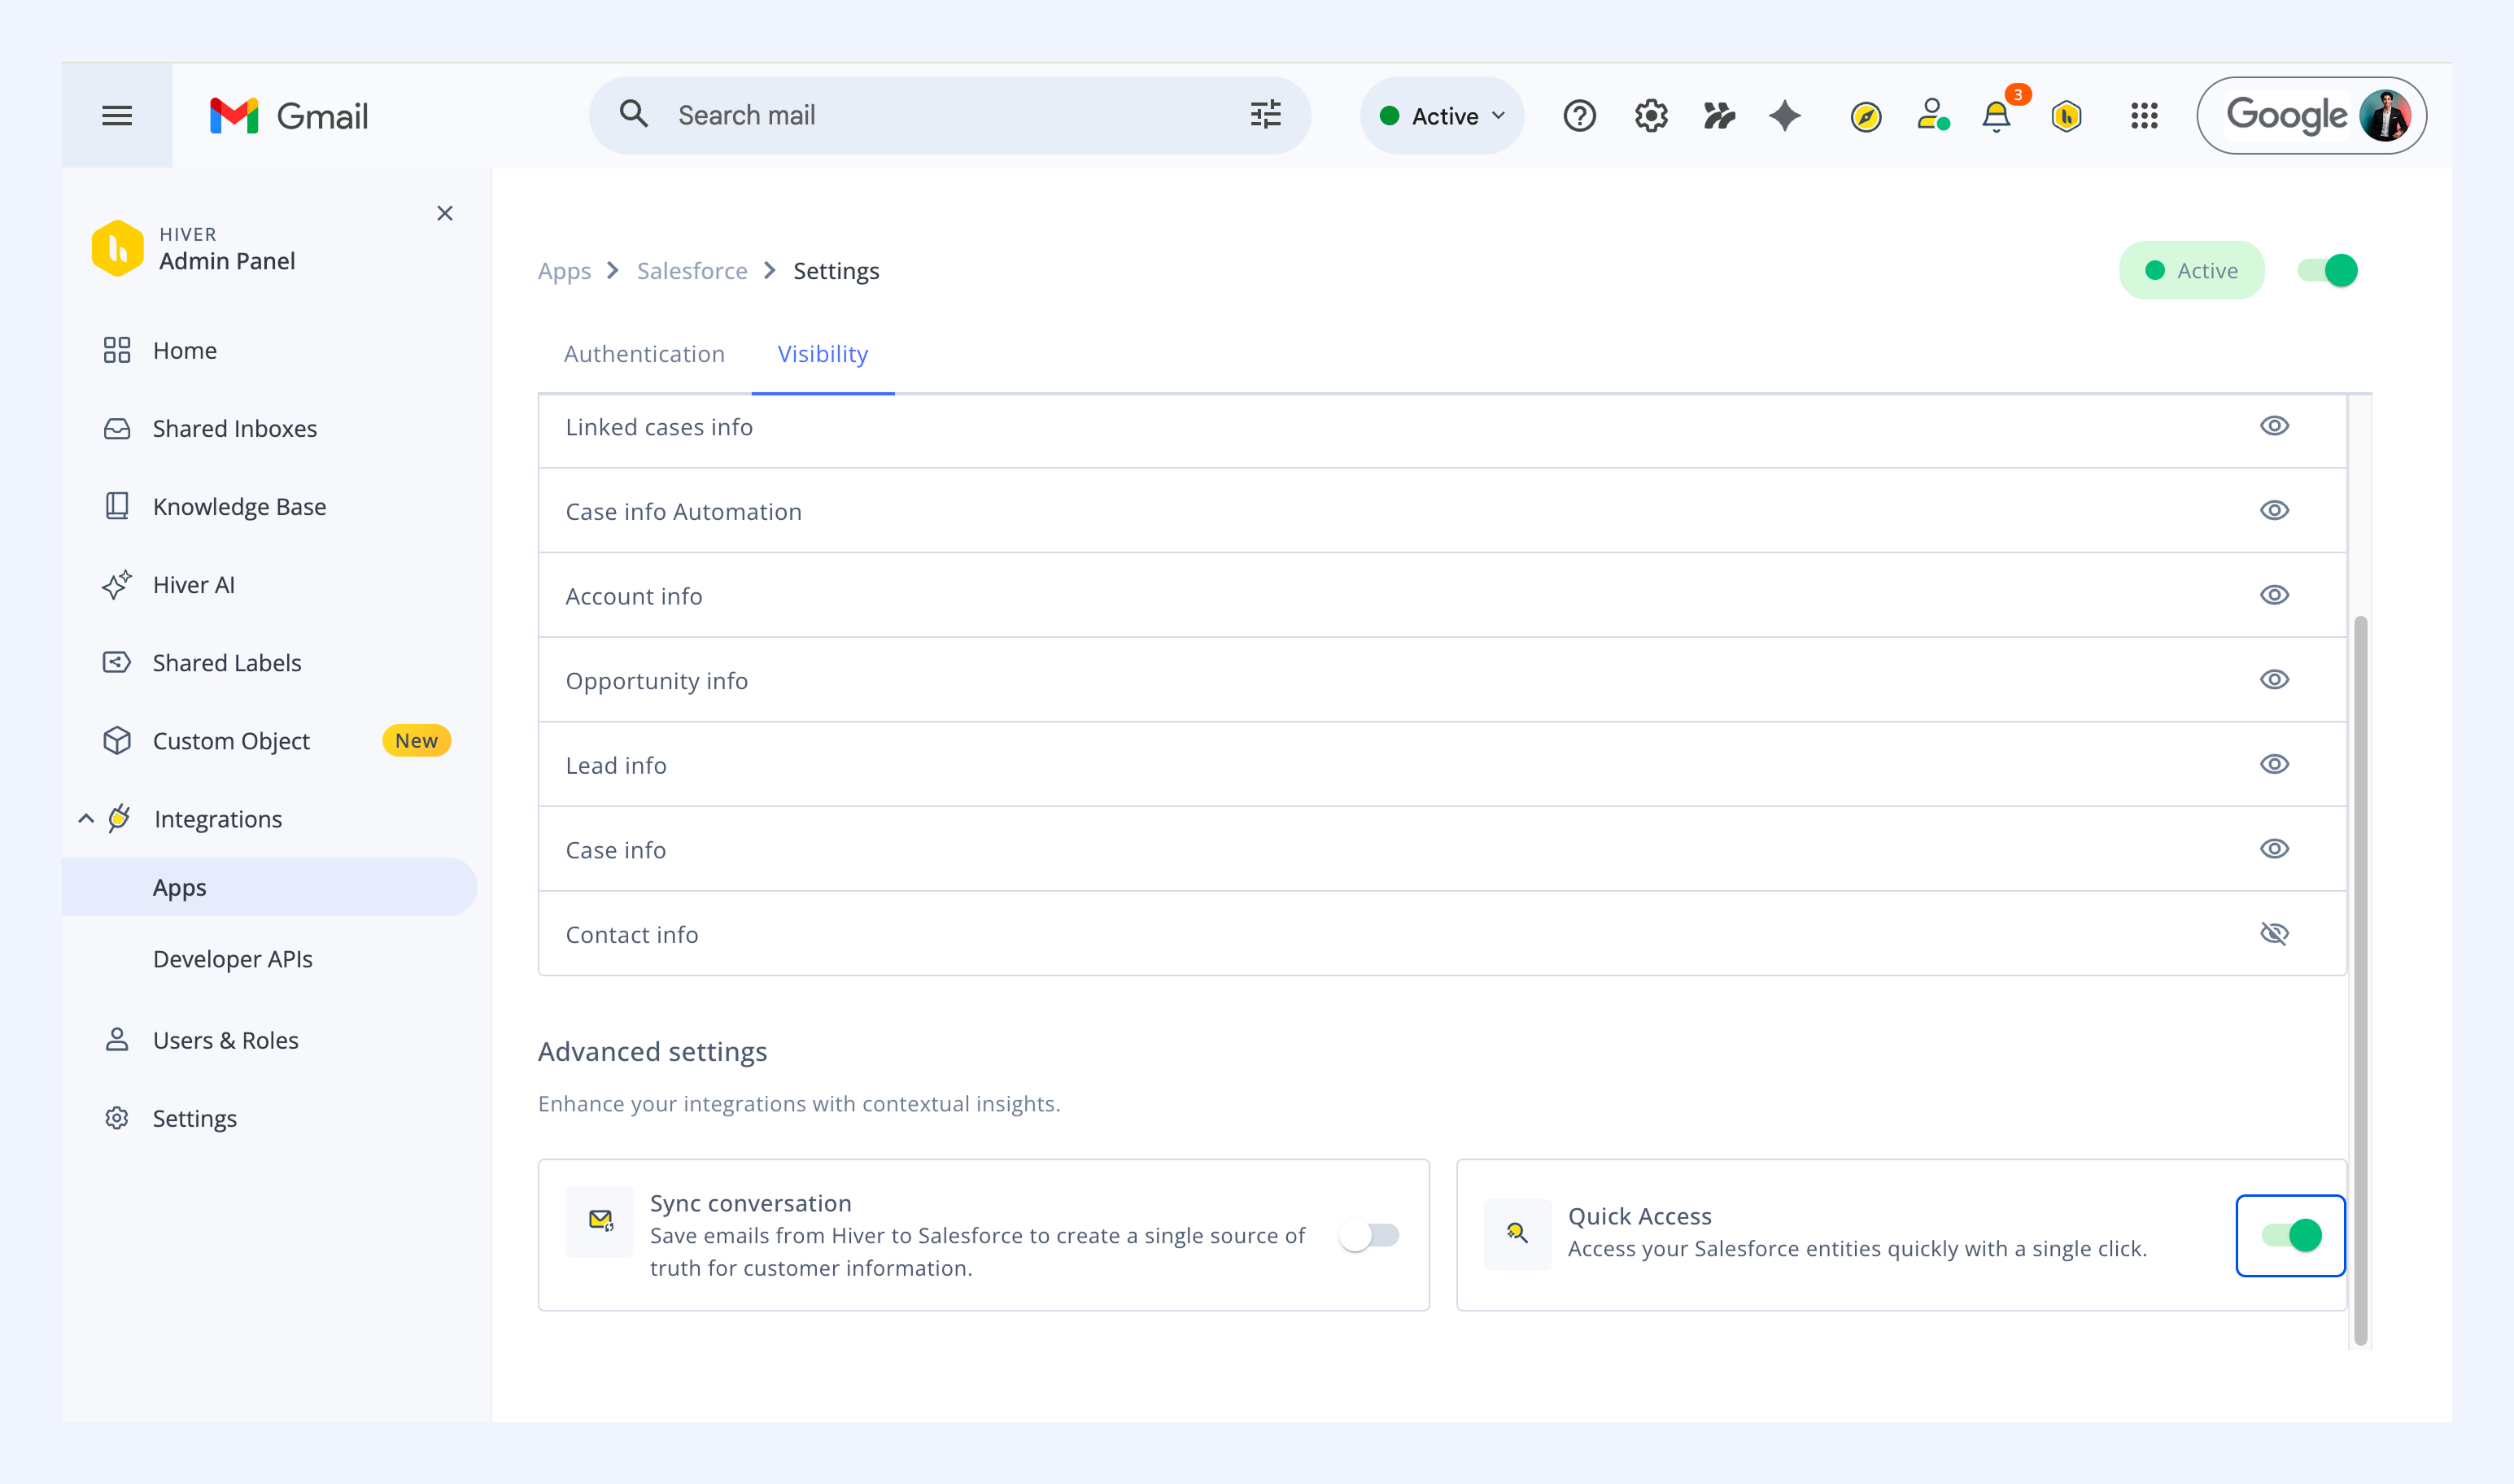
To disable it for Salesforce, toggle Quick Access off in the Advanced settings for this app.
Using Salesforce integration with Hiver
Imagine a prospect emailing your sales team asking about product pricing or a customer contacting your support team to report a faulty product. Once the integration is live, here’s what you can do inside Hiver for every conversation:
1. View, create, and update CRM records
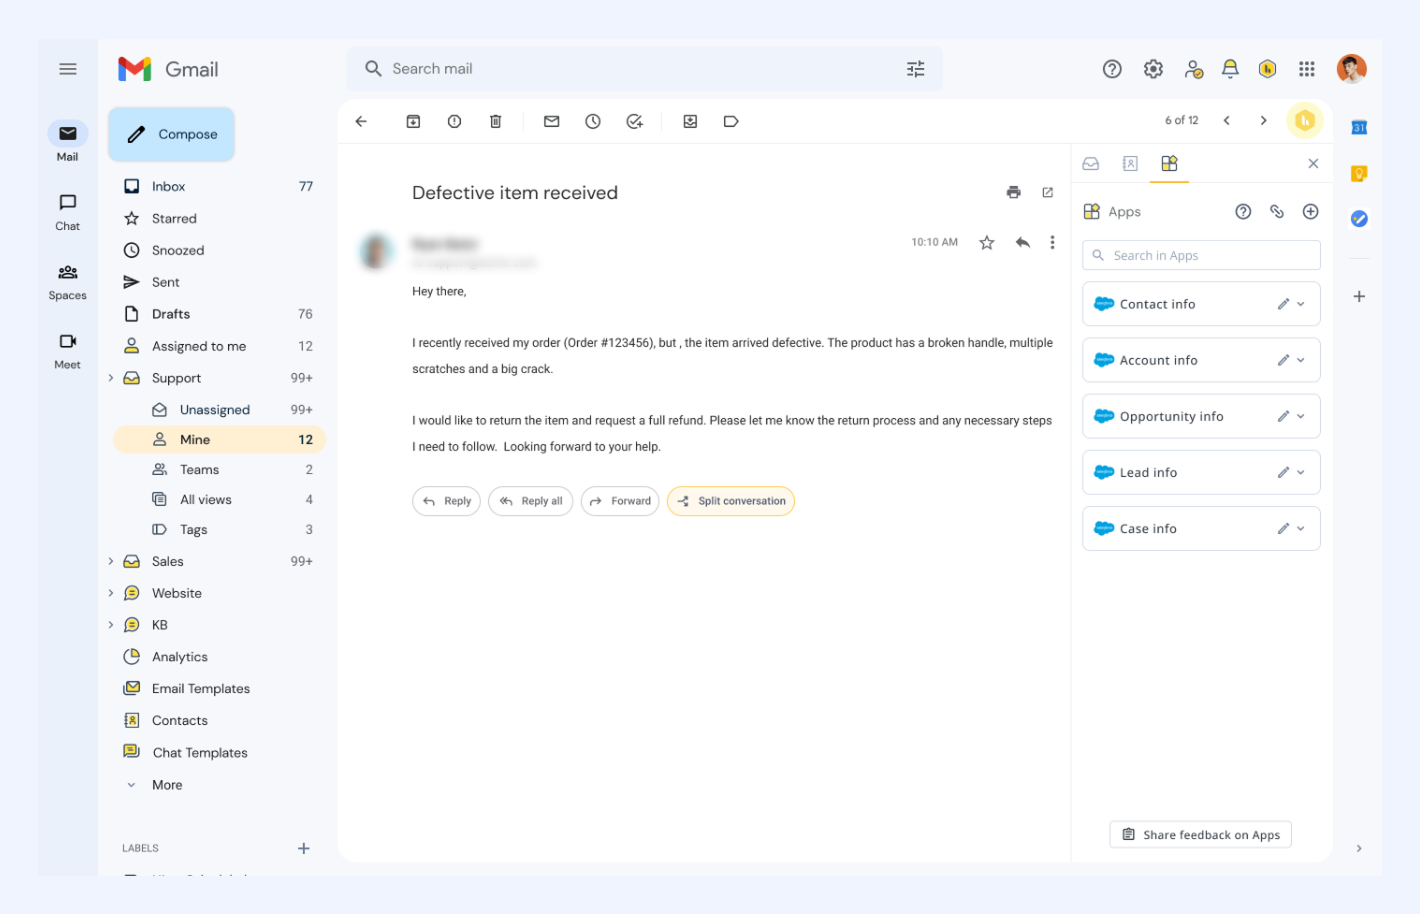
When you open a conversation in Hiver, the Apps panel on the right shows relevant data instantly. You can view:
- Contact info: Name, department, owner, etc.
- Account info: Account number, revenue, industry, owner, etc.
- Opportunity info: Name, stage, amount, etc.
- Lead info: Company, source, description, etc.
- Case info: Number, description, priority, etc.
2. Create new Salesforce records
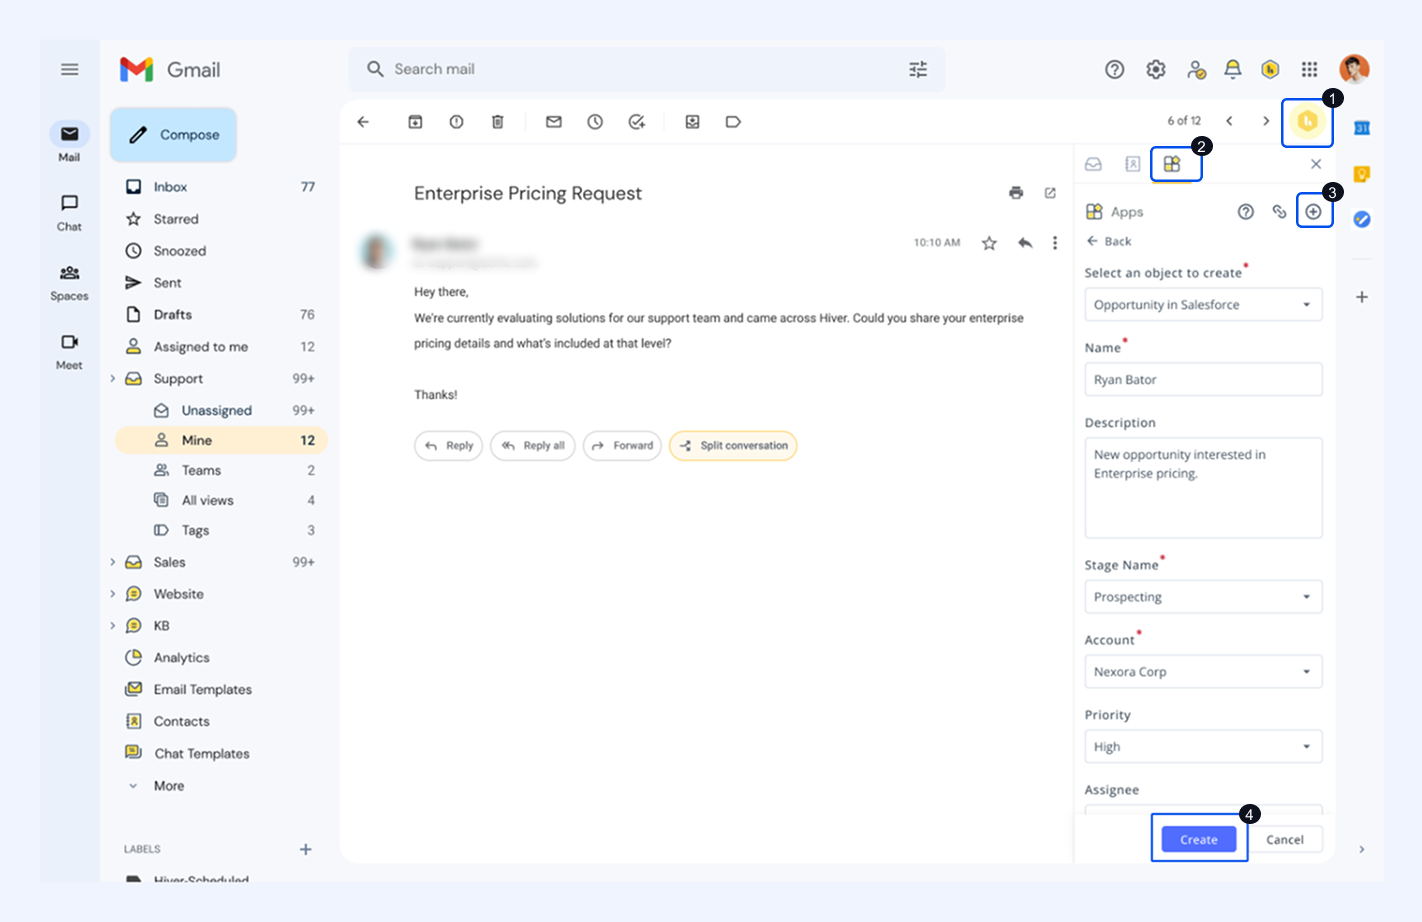
If a lead, opportunity, contact, or account doesn’t exist in Salesforce, you can create it directly from Hiver. To create a record,
- Click the plus icon (+) in the Apps panel.
- Select the object type.
- Fill in the fields and click Create.
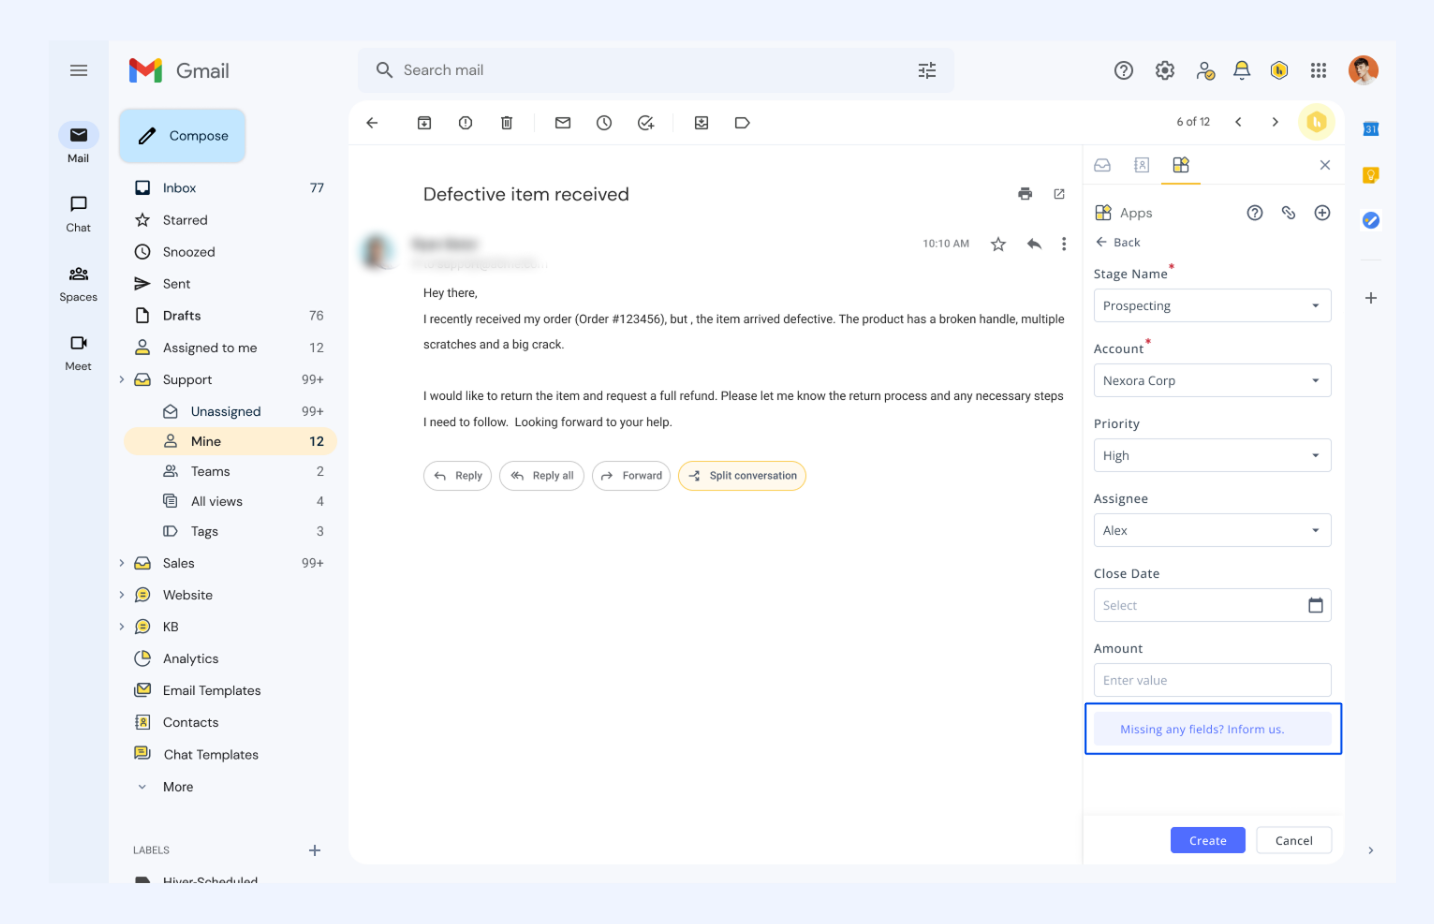
If you need a missing field, click Missing any fields? Inform us to contact Hiver support.
3. Update existing Salesforce records
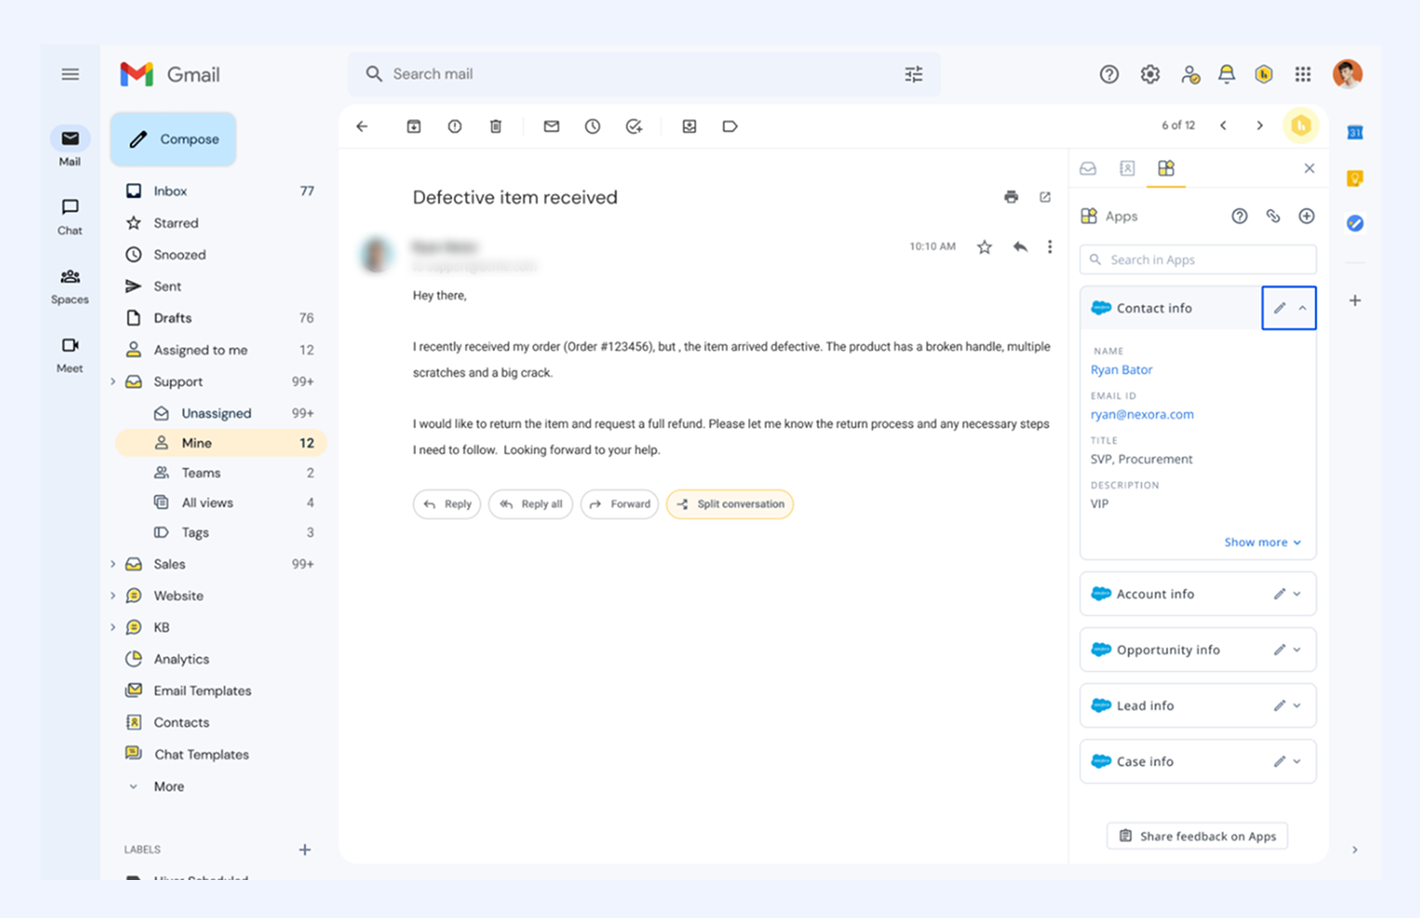
To update Salesforce records, click the edit icon beside the record, edit the fields, and click Update. This helps reps keep Salesforce data current without switching tools.
4. Search and link Salesforce records
If the correct record isn’t visible, you can search and link it manually:
- Search: Type keywords to find CRM records from within Hiver.
- Smart suggestions: Hiver recommends likely matches based on email content.
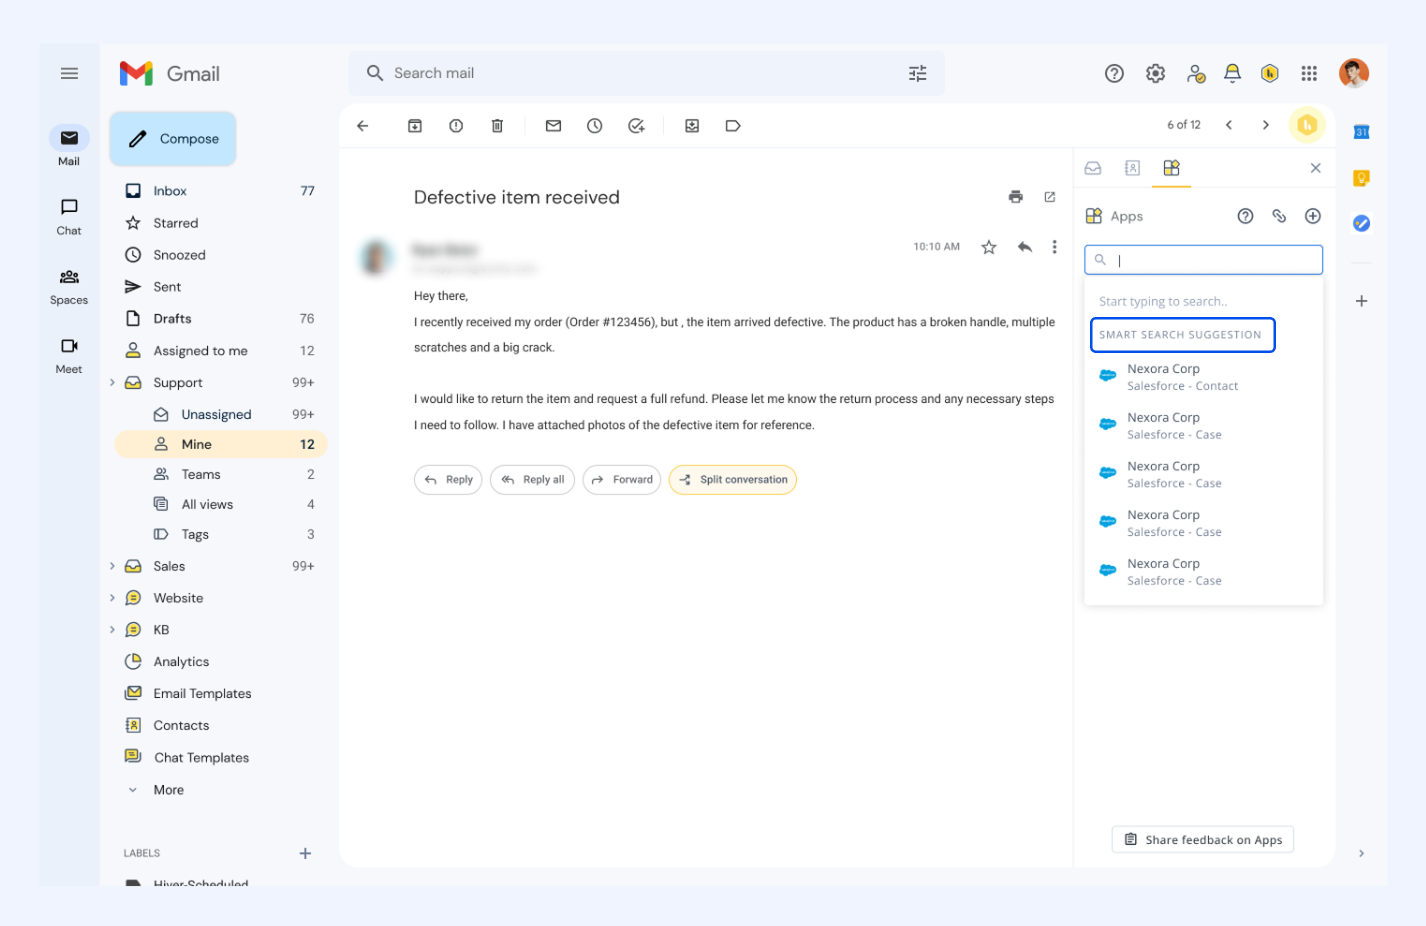
- Link records: Select a record and click Link to attach it to the conversation.
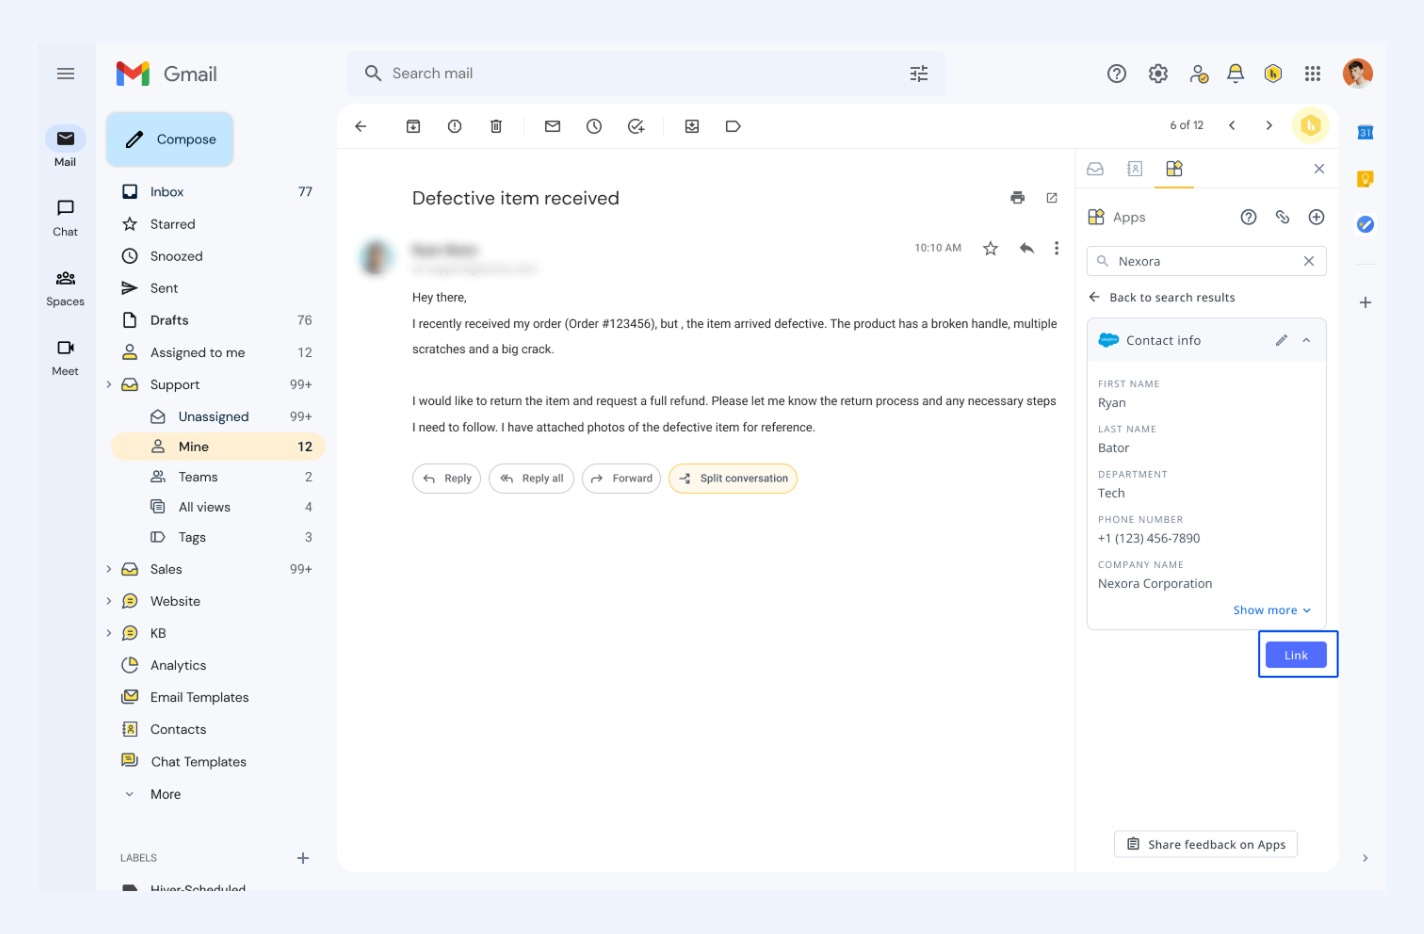
Now, when anyone on your team looks at this email later, they’ll see the right Salesforce records linked to the conversation. No confusion, no duplicate records.
5. Set up Automations to trigger when the first email comes in
With Salesforce connected to Hiver, you can set up automation rules to:
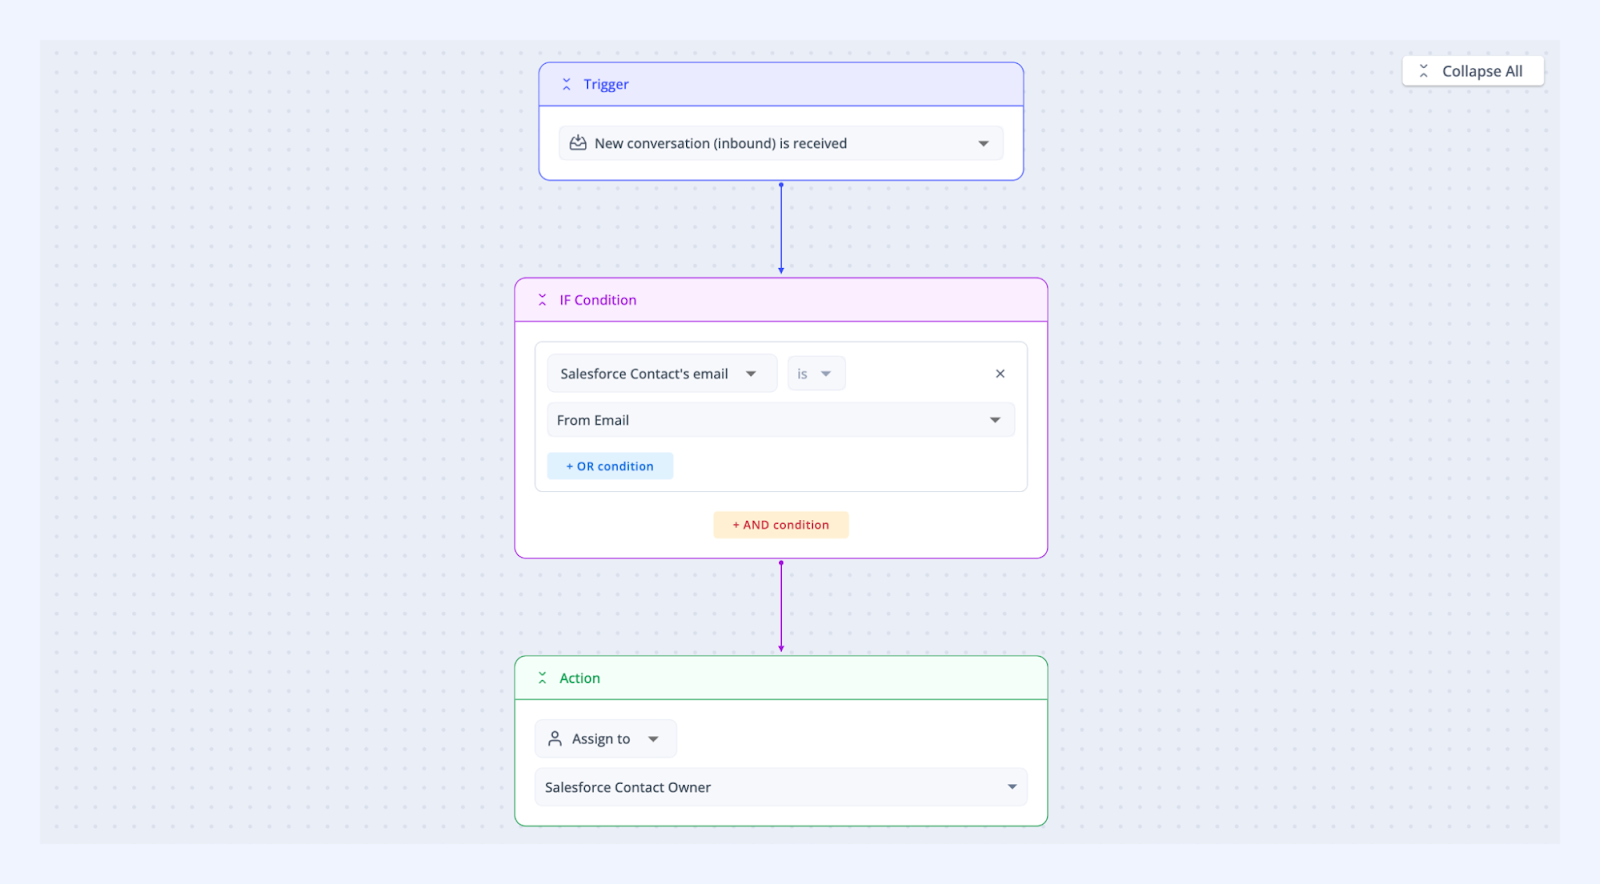
- Assign conversations to the right owner: Automatically assign email to the right sales or support rep based on Salesforce data (like account owner or contact owner).
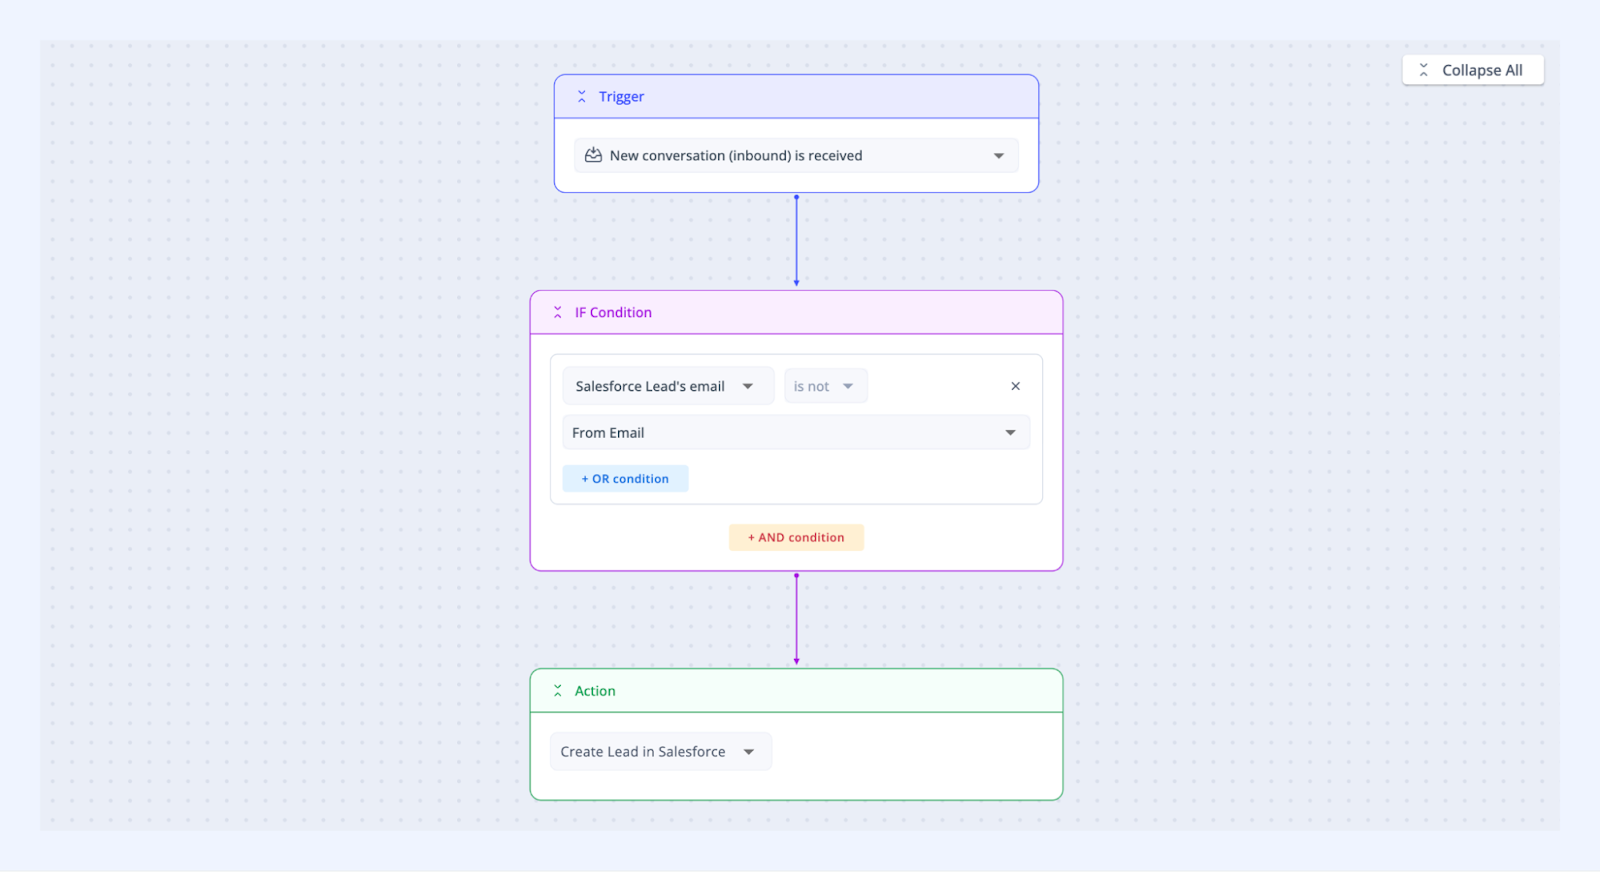
- Create leads in Salesforce: Automatically create a lead in Salesforce for any new contact not already in your records, so you can track potential opportunities immediately.
- Create cases in Salesforce: Automatically create a Salesforce case for any conversation without an existing ticket, and link it to the email thread. So every support request is tracked in Salesforce from the start.
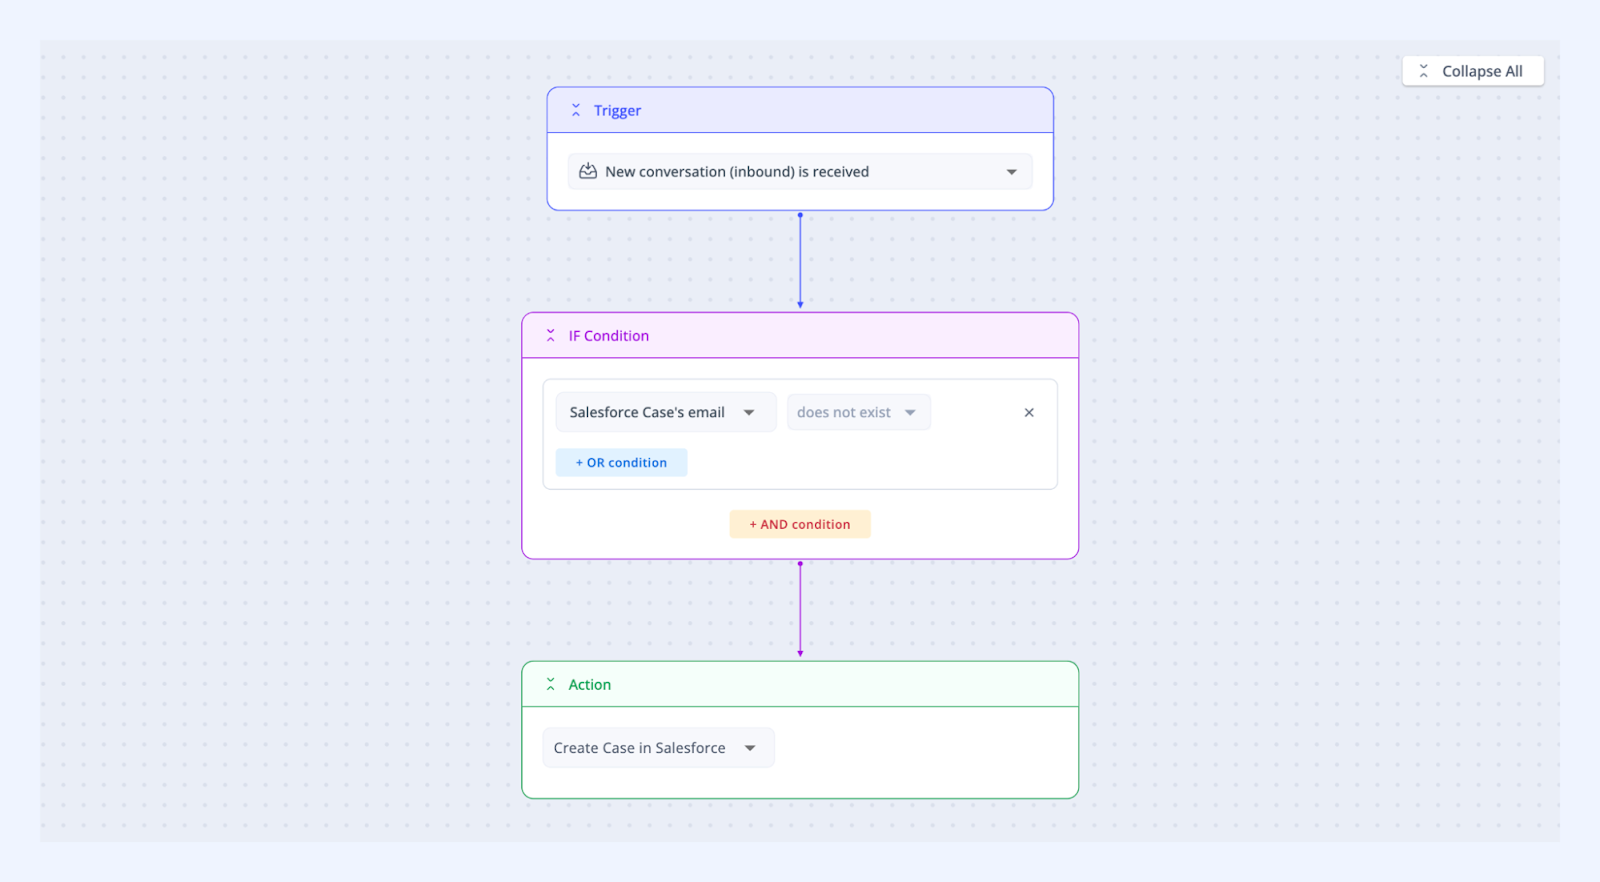
- Log Emails in Salesforce: Automatically log every email to the relevant Account in Salesforce based on the customer’s email address. This records all communication with that company in one central place, ensuring your CRM has a complete history of interactions tied to the correct account.
Note: The ability to manually log emails into Salesforce will be coming soon.
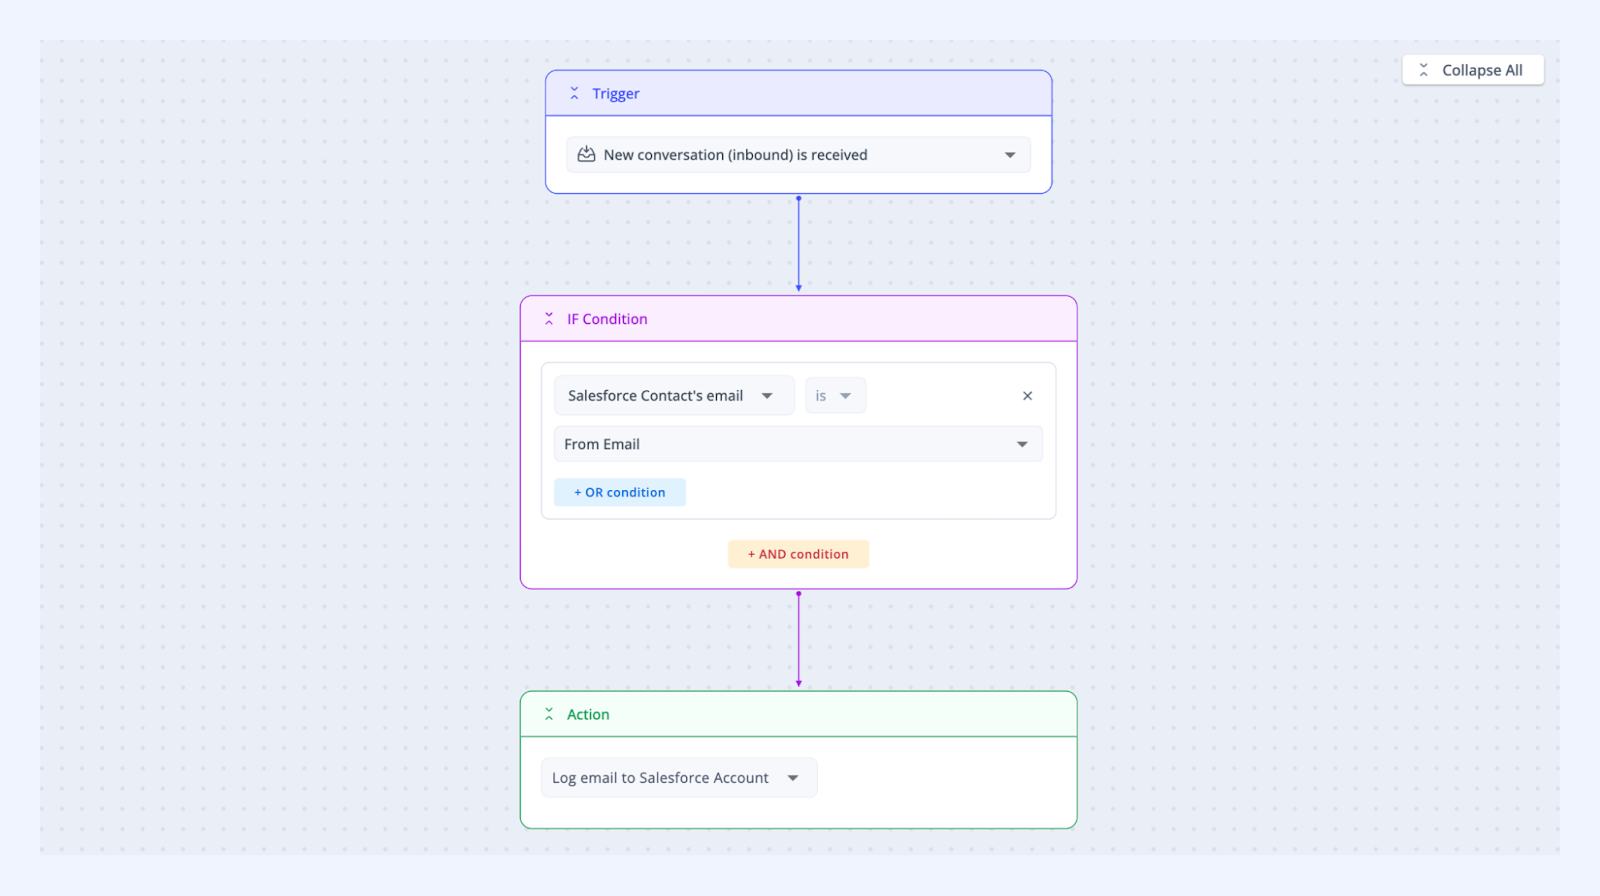
These automations ensure every new inquiry - sales or support - is instantly routed, tracked, and logged in Salesforce, so nothing slips through the cracks.
6. Enabling Sync conversation
You can log email conversations from Hiver to your Salesforce CRM. This helps you:
- Maintain a single source of truth for customer communication and ensure easy auditing and visibility across teams.
- View customer conversations related to a specific lead or contact at one glance.
- Enable two-way visibility between Hiver and Salesforce for faster issue resolution.
- Eliminate the need to download and attach emails to Salesforce records manually.
To enable Sync conversations, turn on the toggle under Advanced settings.
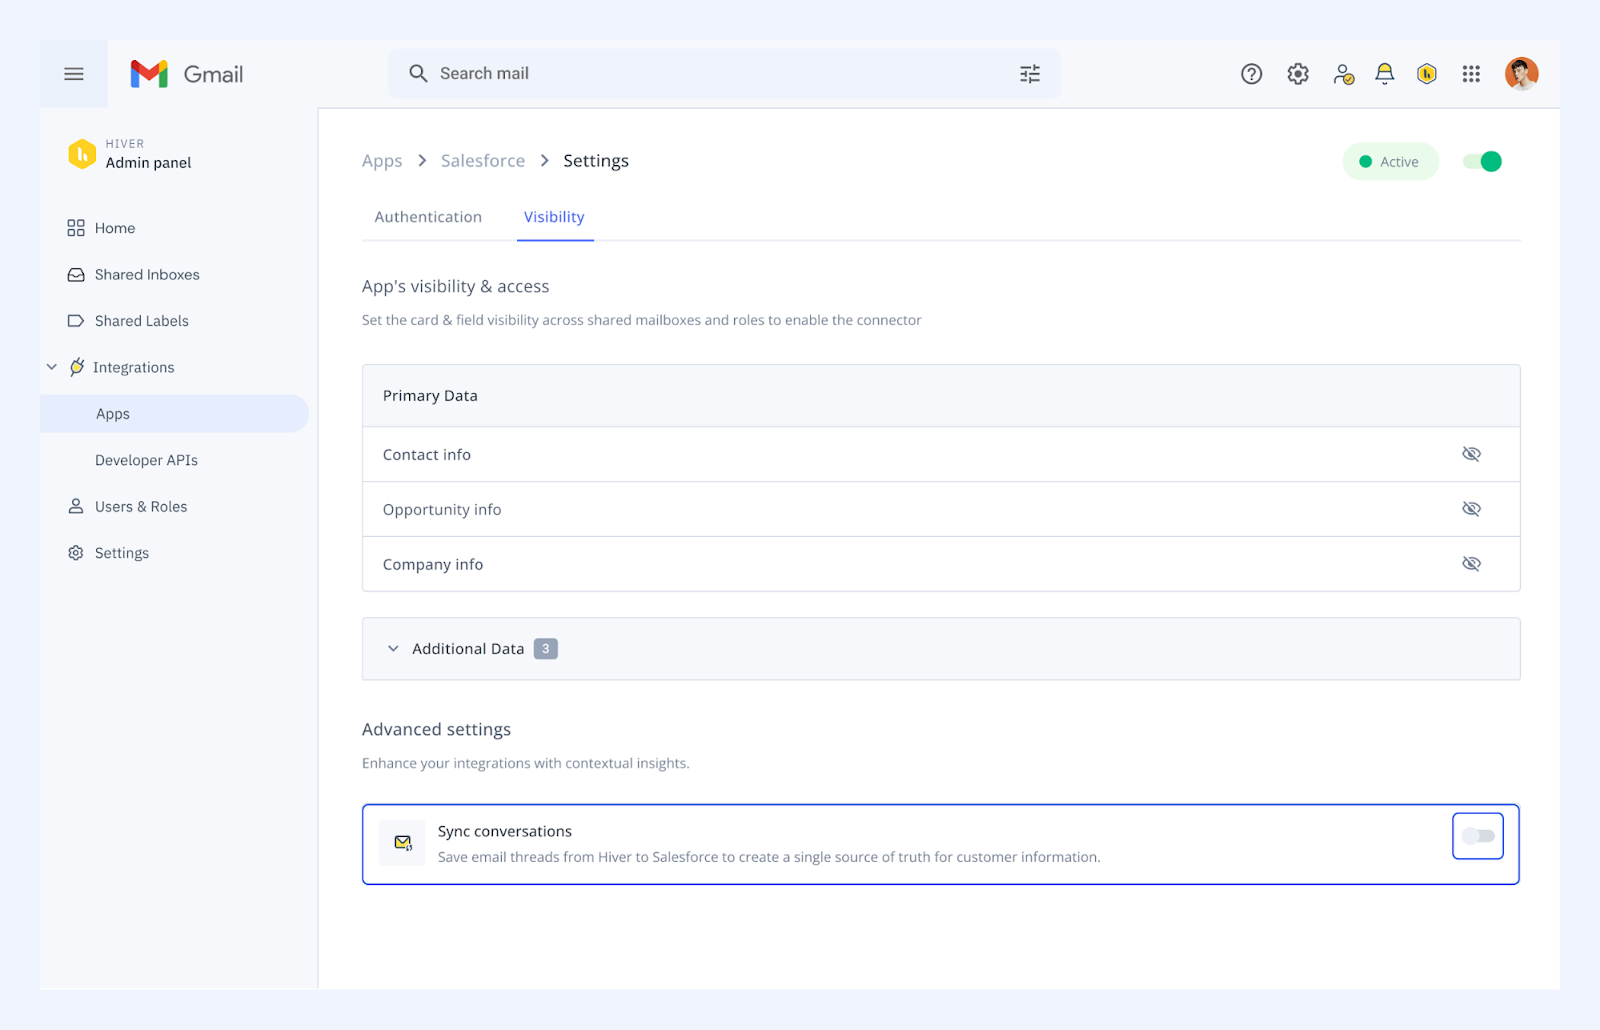
Once enabled, you and your team will see a Sync conversation option on every email in your Shared Inbox. You can choose a specific Salesforce record to which to log the conversation. The selected email and all future emails in that thread will be automatically synced to Salesforce.
Note: By default, attachments will not be logged to Salesforce.
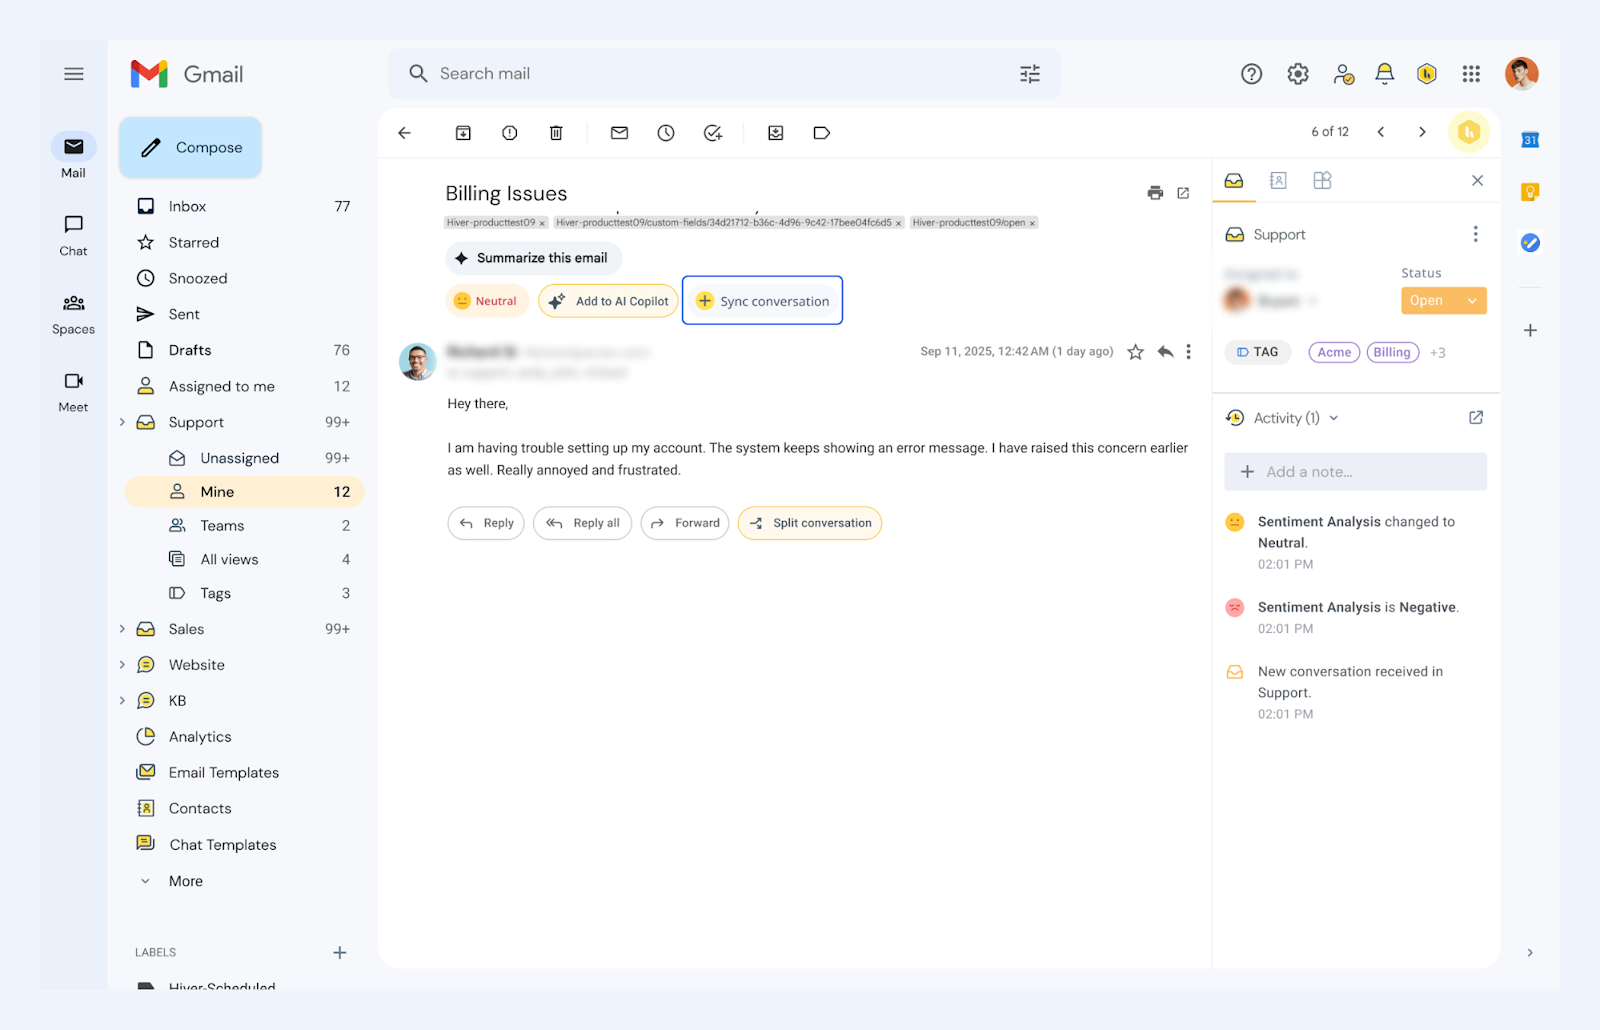
To log an email thread from Hiver to Salesforce,
- Open the email and click Sync conversation.
- Search for and select the relevant Lead, Contact, Account, Opportunity, or Case.
- Click Save & Enable.
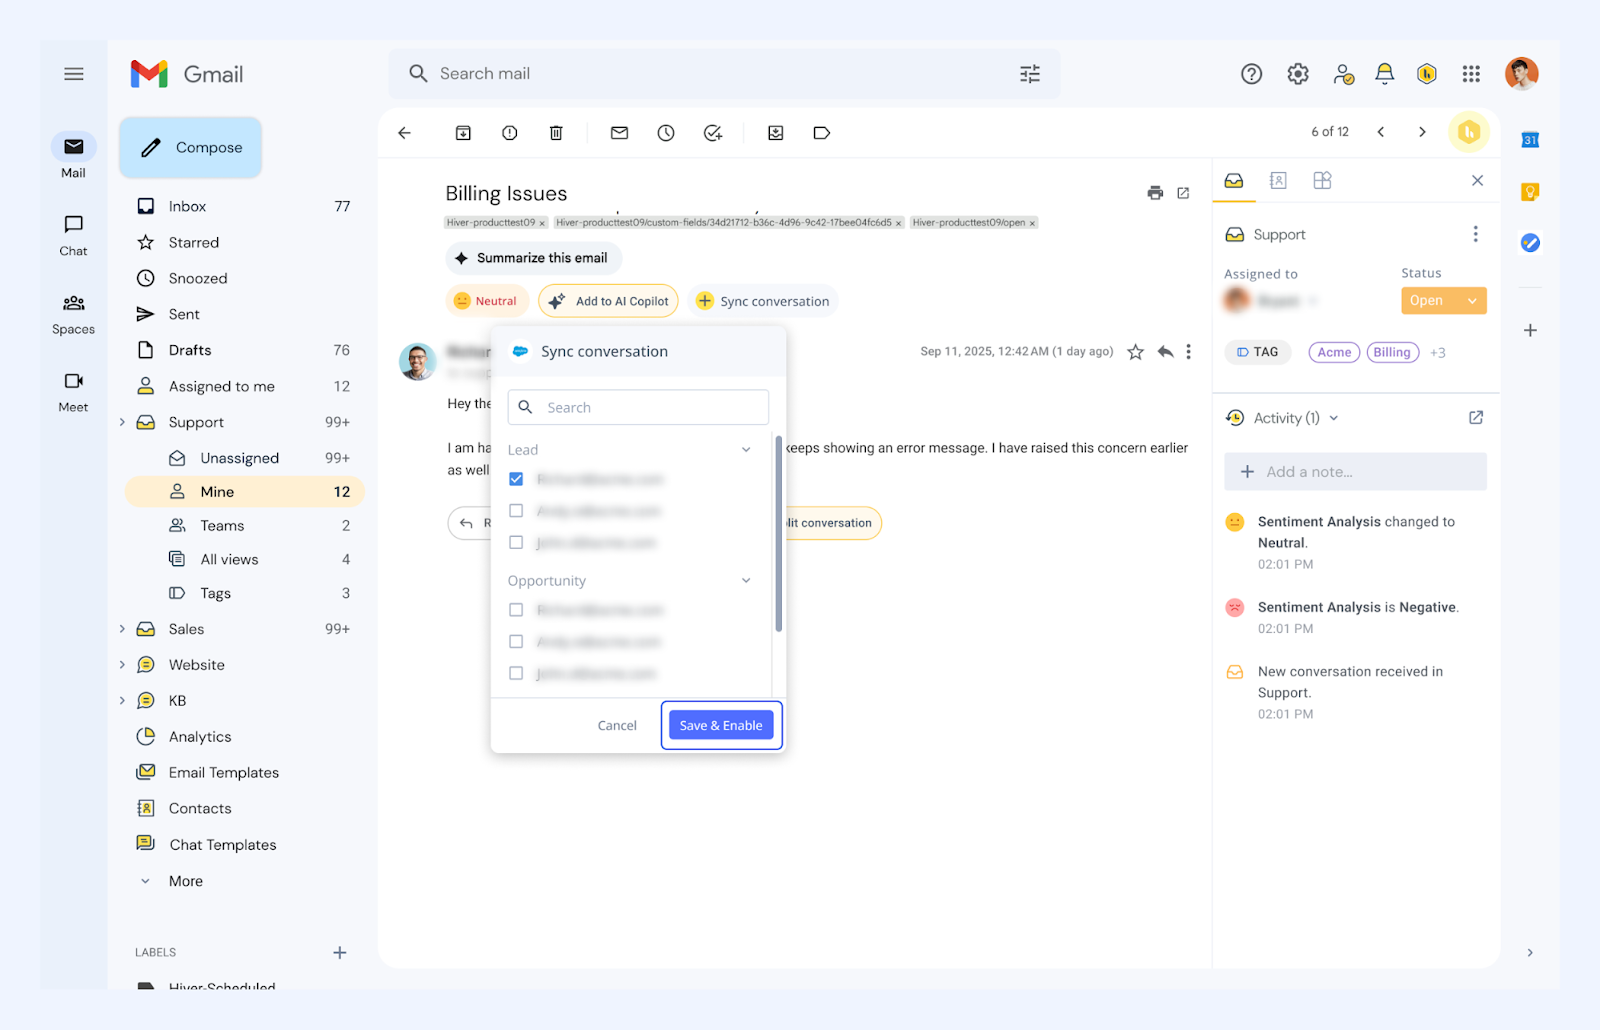
The selected email and all future replies in that thread will be logged to Salesforce. You can track progress using the status:
- Syncing in progress → syncing has started
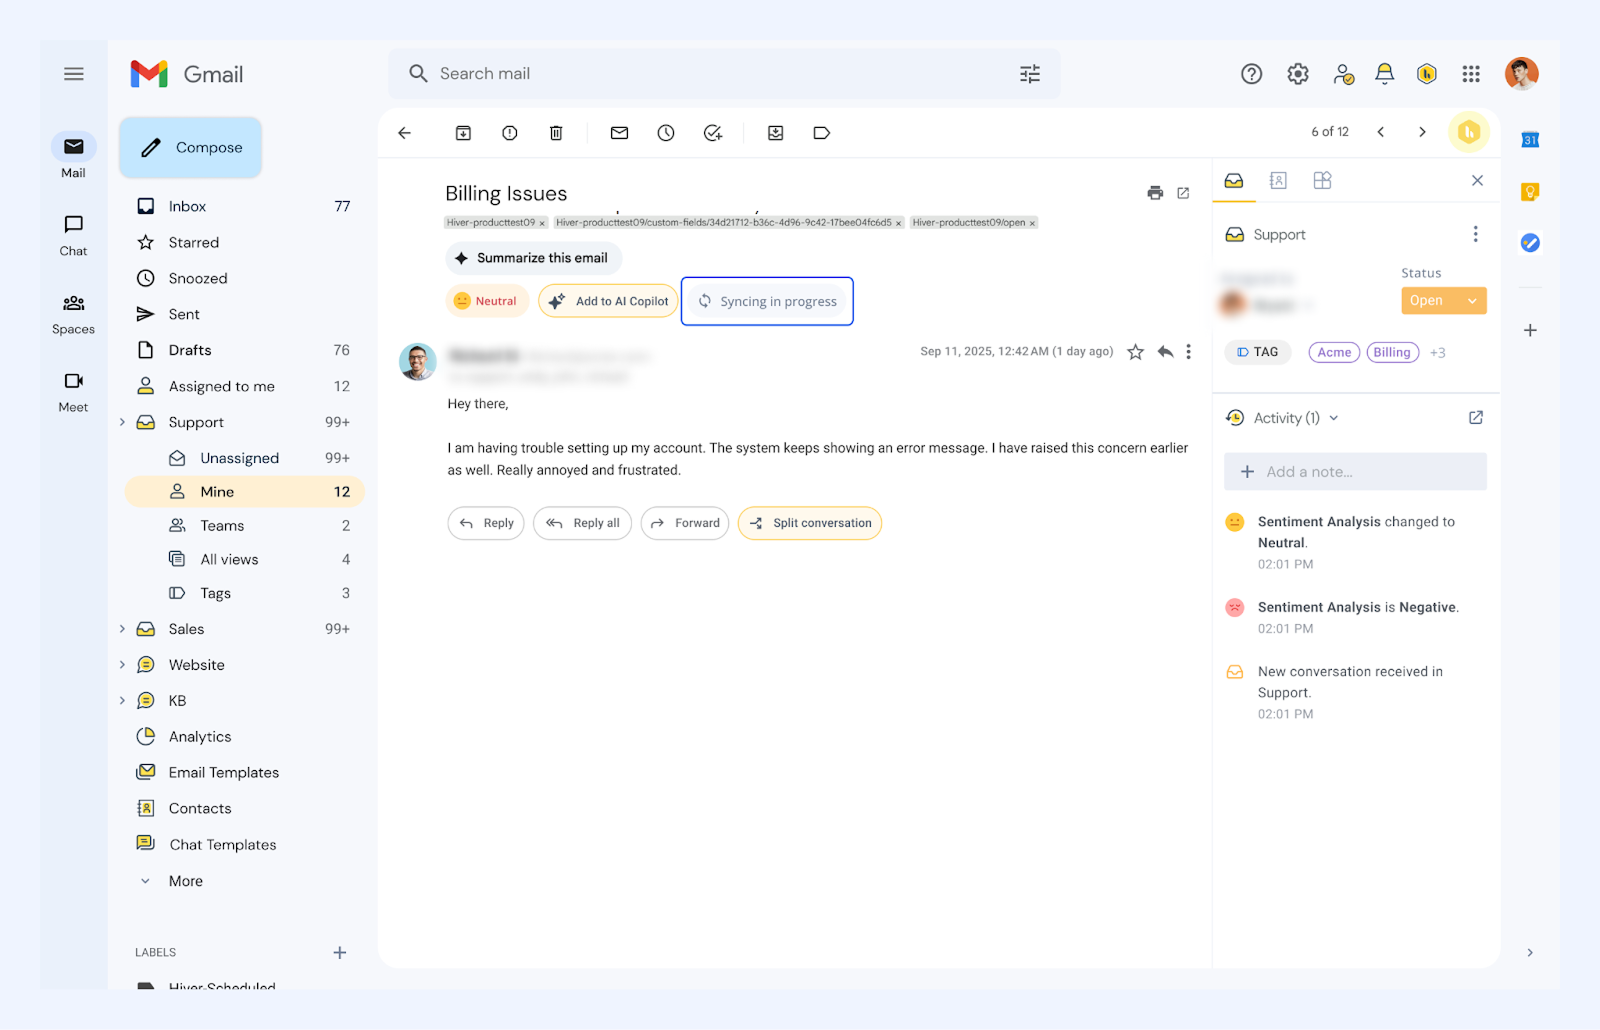
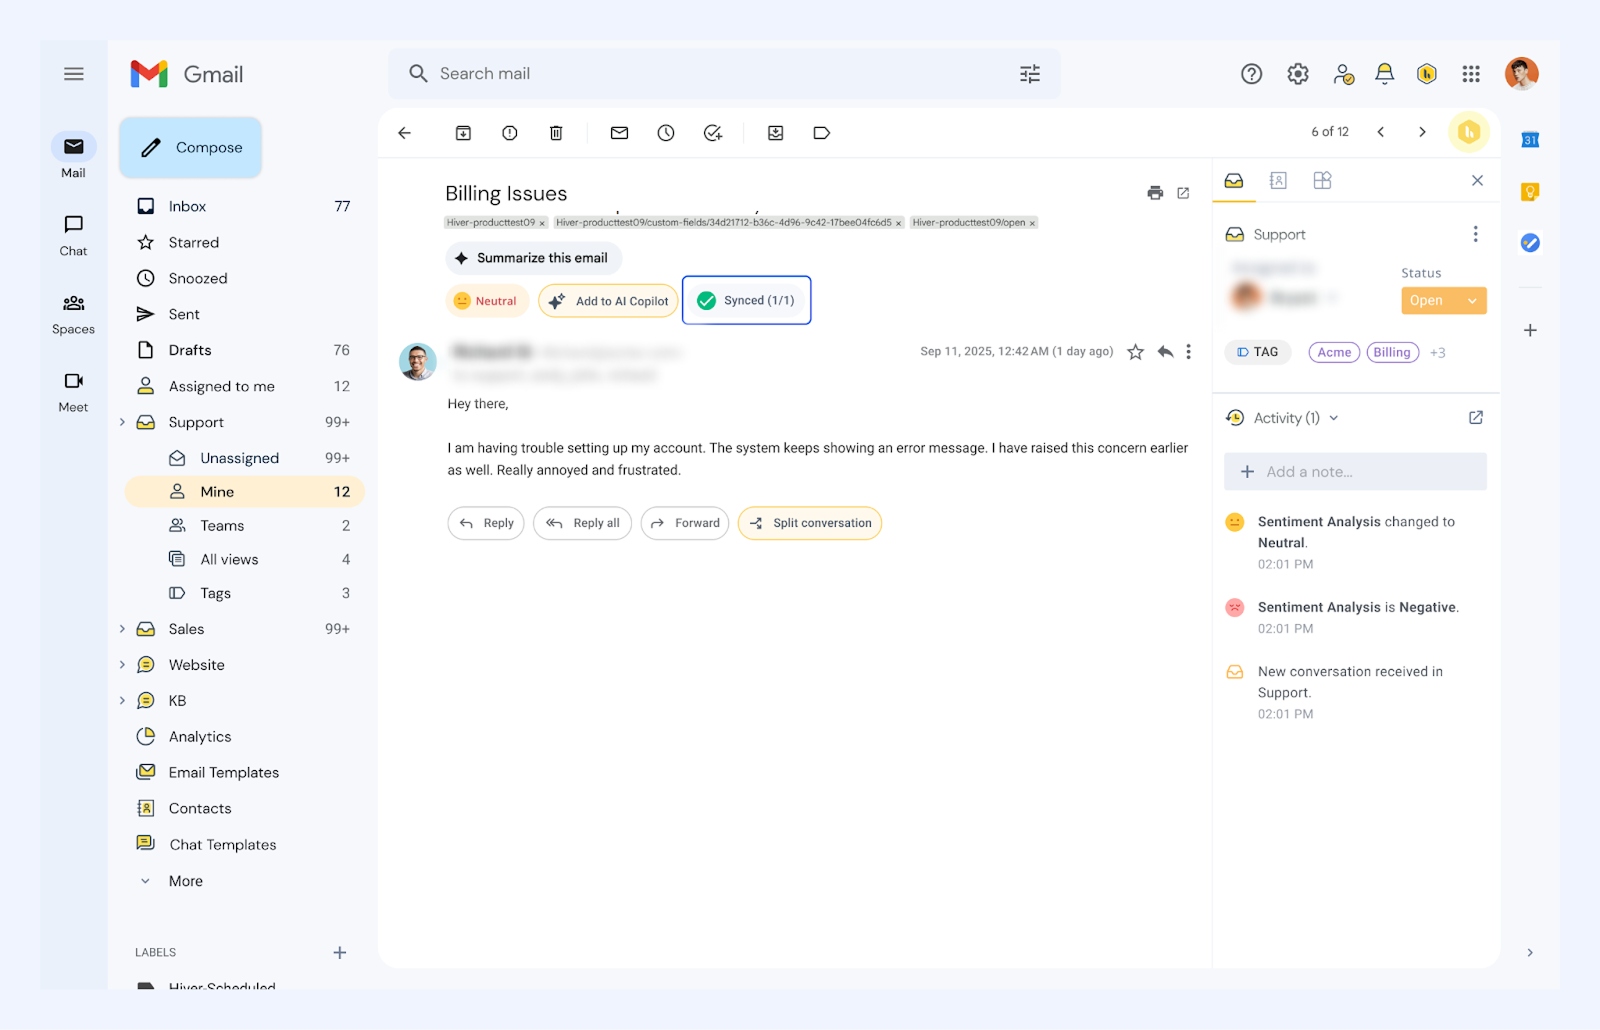
- Synced (1/1) → shows number of synced emails out of the total number of emails.
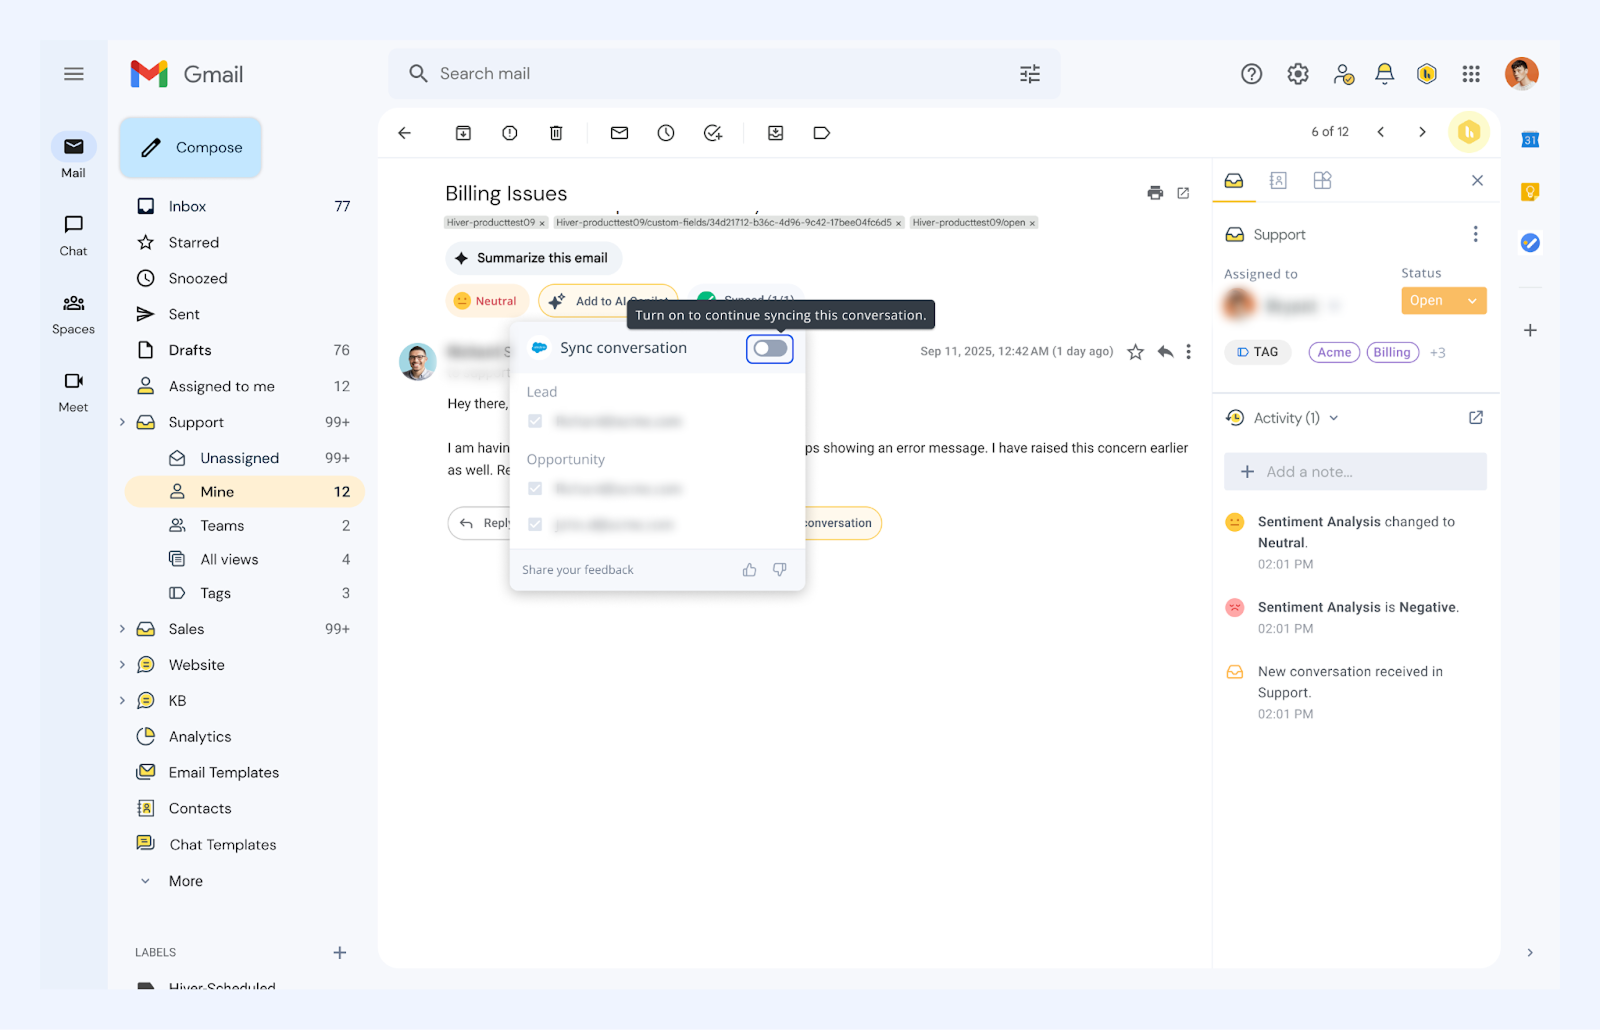
To disable syncing, hover over the Synced status and use the toggle to turn it off. Future emails will no longer sync automatically. Use the same toggle to re-enable syncing anytime.
Final note
With Salesforce connected to Hiver, your team gets complete customer context - contact details, account status, deal progress, and support history, right inside the inbox.
This means faster responses, fewer errors, and no switching between tools. Creating leads, updating records, and logging emails can run automatically, keeping your CRM accurate with no extra effort.
As the Apps module evolves, users can expect even more powerful integration capabilities, further streamlining their customer service and sales operations. If you have any questions about current capabilities or want to explore advanced features, contact Hiver support at support@hiverhq.com.