Inviting your team to Hiver and managing permissions
Hiver lets you share email access with your team through Shared Inboxes. Instead of forwarding or copying teammates, you can simply add them to an inbox. This way, you and your team can manage conversations together. You can assign roles to each to define what they can do, ensuring clarity and accountability.
Note: In Hiver, team members are referred to as Users.
Prerequisites to know
Before sending invites, note that Hiver has specific limits based on your subscription plan.
Plan | Number of users | Roles and permissions |
Growth | 10 users | Two default roles (Member, Admin) |
Pro | Unlimited | Two default roles (Member, Admin) + All four default roles (Member, Admin, Shared mailbox admin, and Supervisor) |
Elite | Unlimited | Two default roles (Member, Admin) + All four default roles (Member, Admin, Shared mailbox admin, and Supervisor) + Advanced and custom roles
|
How to invite users to Hiver
To invite a new user to your Shared Inbox, follow these steps:
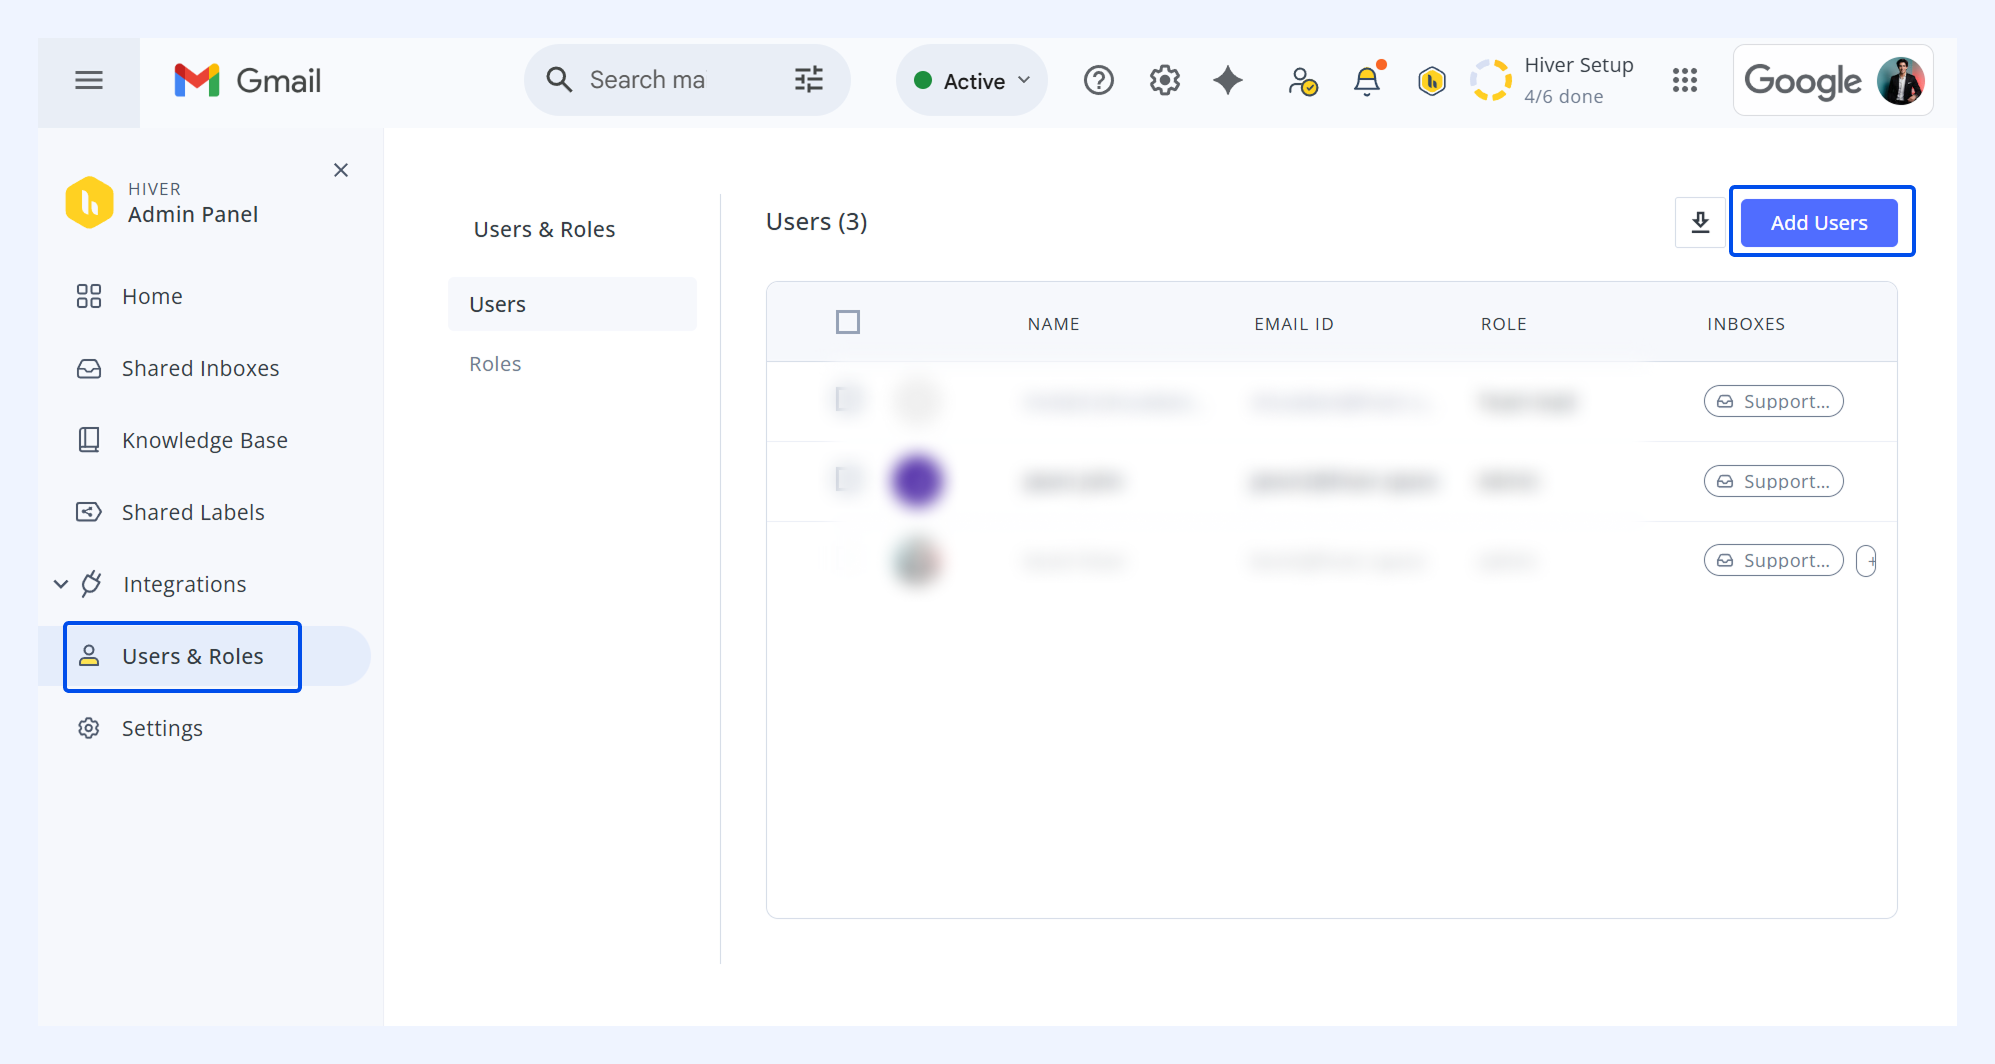
- Go to the Hiver icon in Gmail → select Admin panel →Users & Roles→ Add Users.
- Enter your team member’s email address, assign a role, and select the Shared Inboxes you want to add them to.
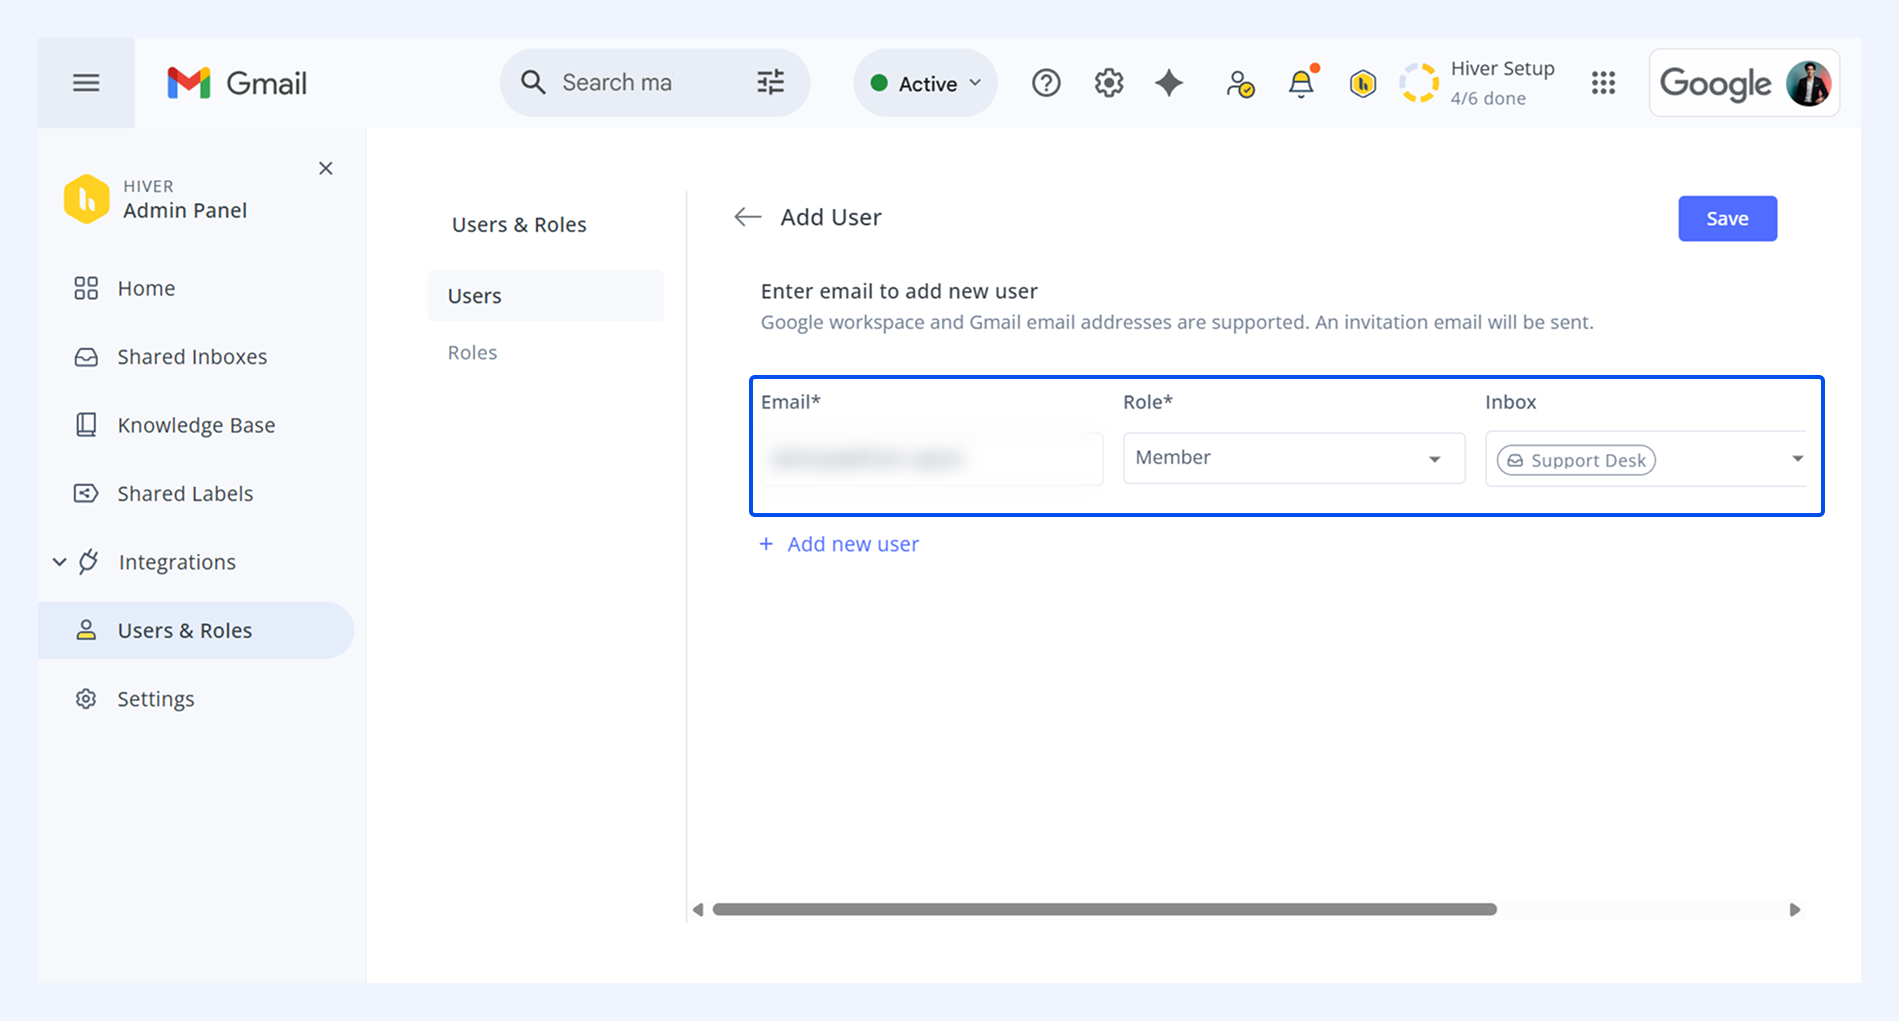
- Select Save, and an invitation with joining instructions will be sent.
Tip: Enable Auto-join to automatically add new users with your company domain (for example, @acme.com) to your account and selected Shared Inboxes. This helps new team members get access from day one. Learn more
How to manage existing users
To modify or remove users:
- Go to Hiver icon → Admin panel → Users and Roles.
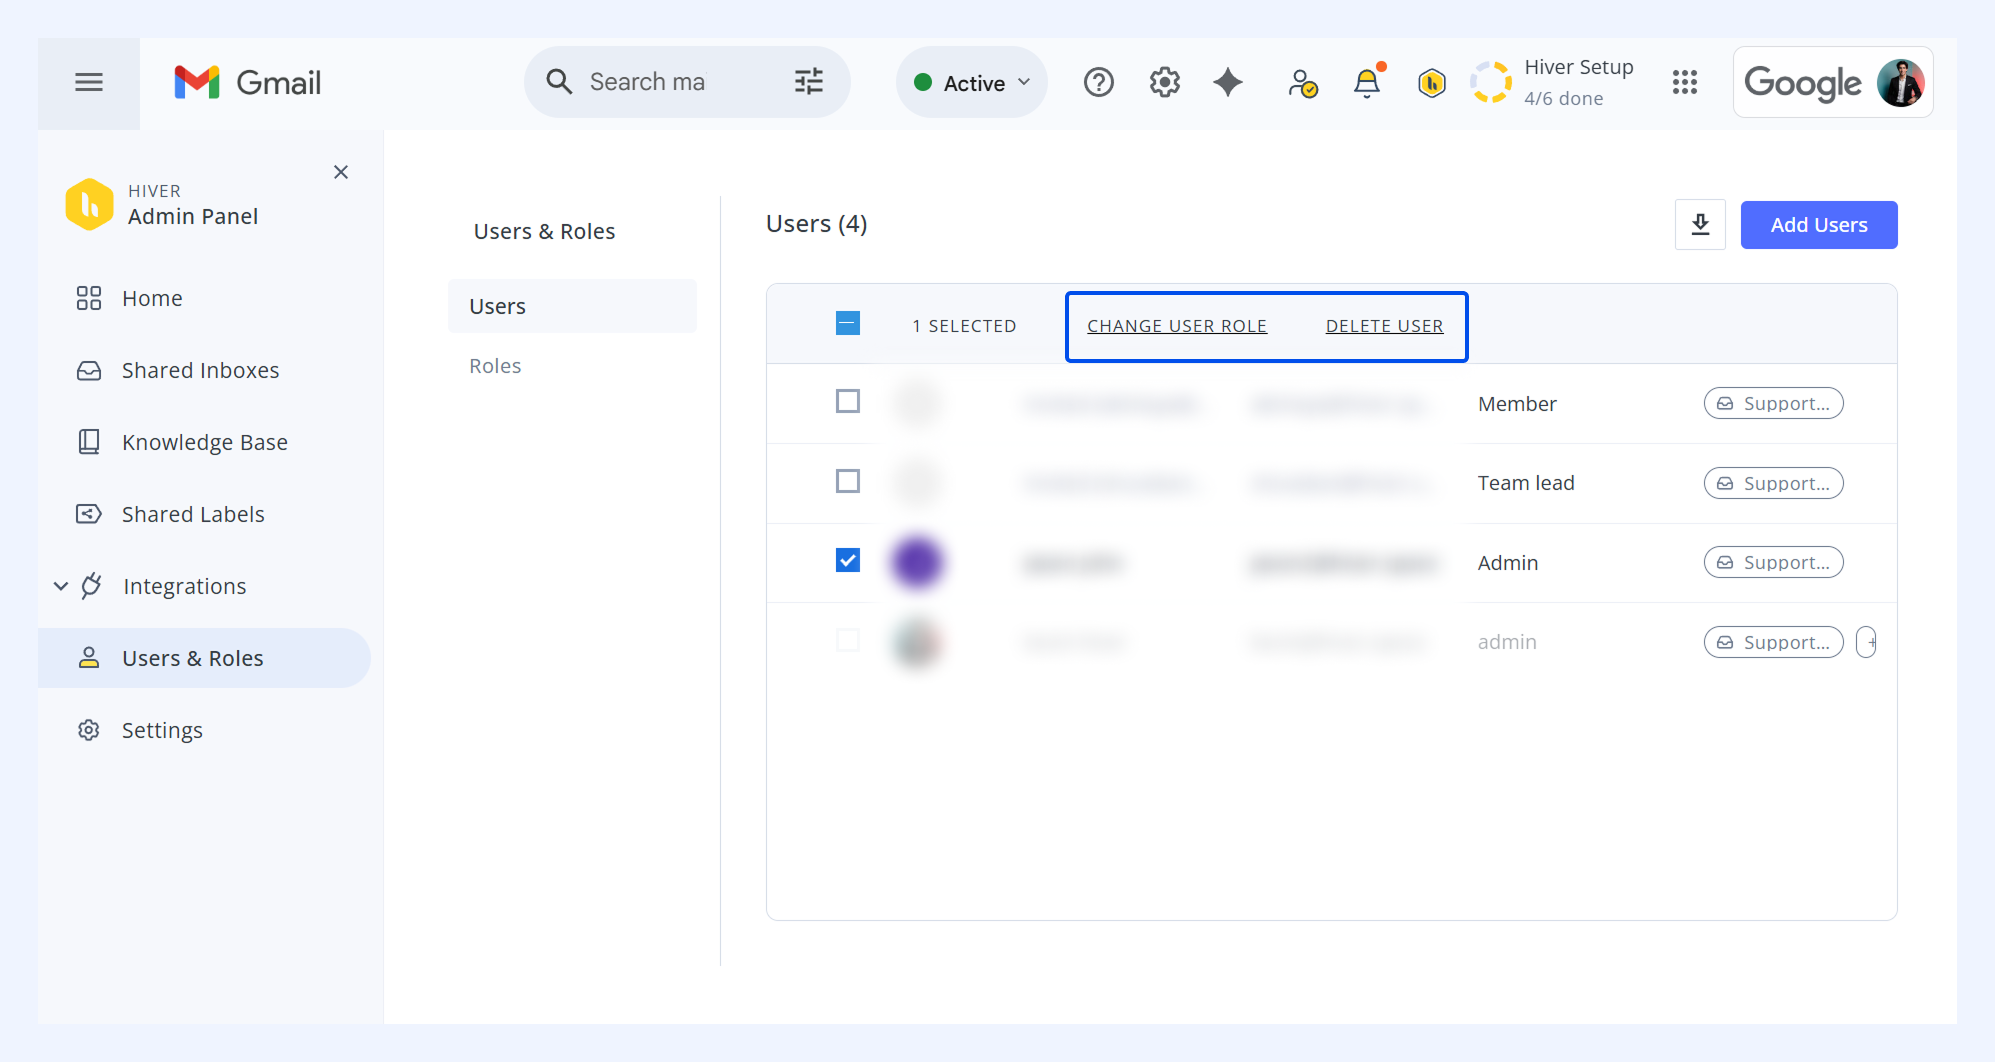
- Select the checkbox next to the user's name.
- Choose to change the user’s role or delete the user.
Important: Deleting users removes them from all Hiver Shared Inboxes and Shared Labels but does not delete emails from their Gmail account. Deleting invited users who have not yet accepted the invite will cancel their pending invitations.
How to view users in a Shared Inbox
- Go to Admin panel → Shared Inboxes.
- Select an inbox.
- Open the Participants tab to see all users in the Shared Inbox.
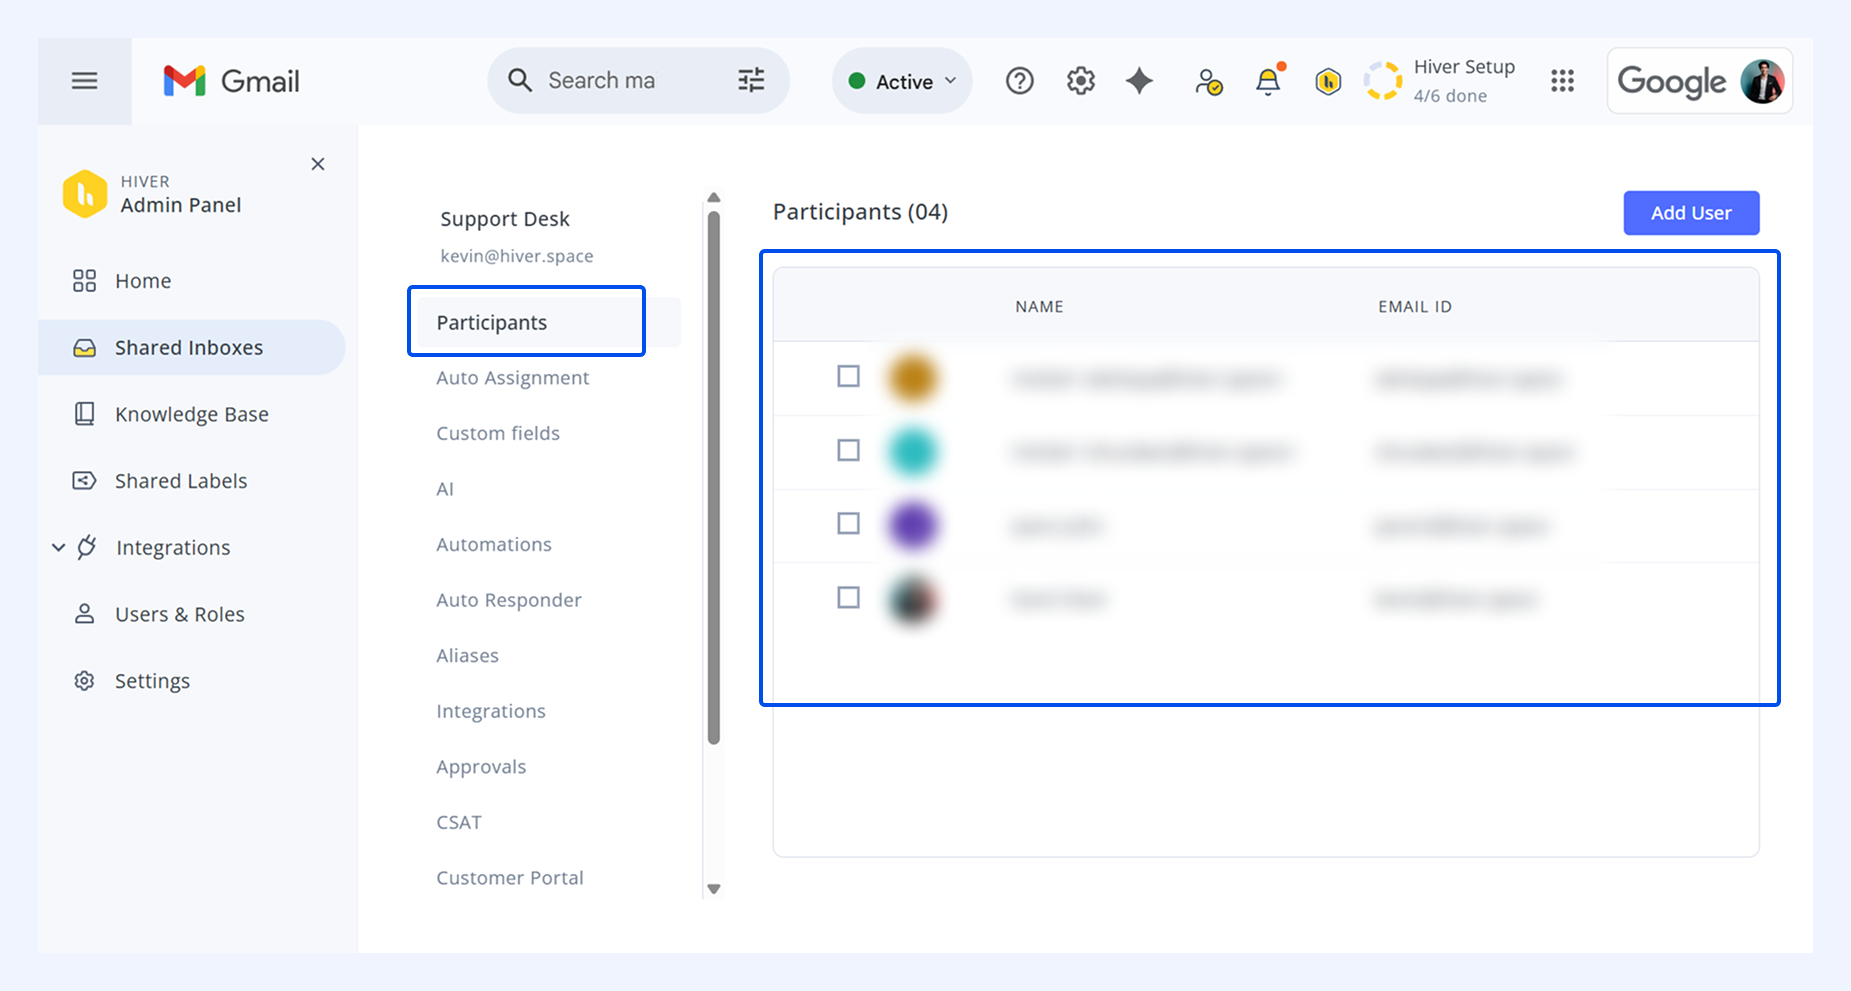
- To remove a user from your Shared Inbox, select their name and click Remove User. This removes the user from the selected inbox (they will still have access to other inboxes they’re part of).
How to manage user roles and permissions
In Hiver, every user is assigned a role that determines the functions they can access within the account. Hiver provides four predefined roles by default, and on eligible plans, you can also create custom roles to suit your team’s needs. These default roles cover:
- Member: Can manage and respond to conversations. This is the default role for all new users.
- Admin: Can create and configure Shared Inboxes, add or remove users, assign roles, and access account management and billing.
- Shared mailbox admin: Can configure settings for the Shared Inboxes they are part of.
- Supervisor: Can review team performance using analytics and perform housekeeping tasks like deleting tags or managing email templates.
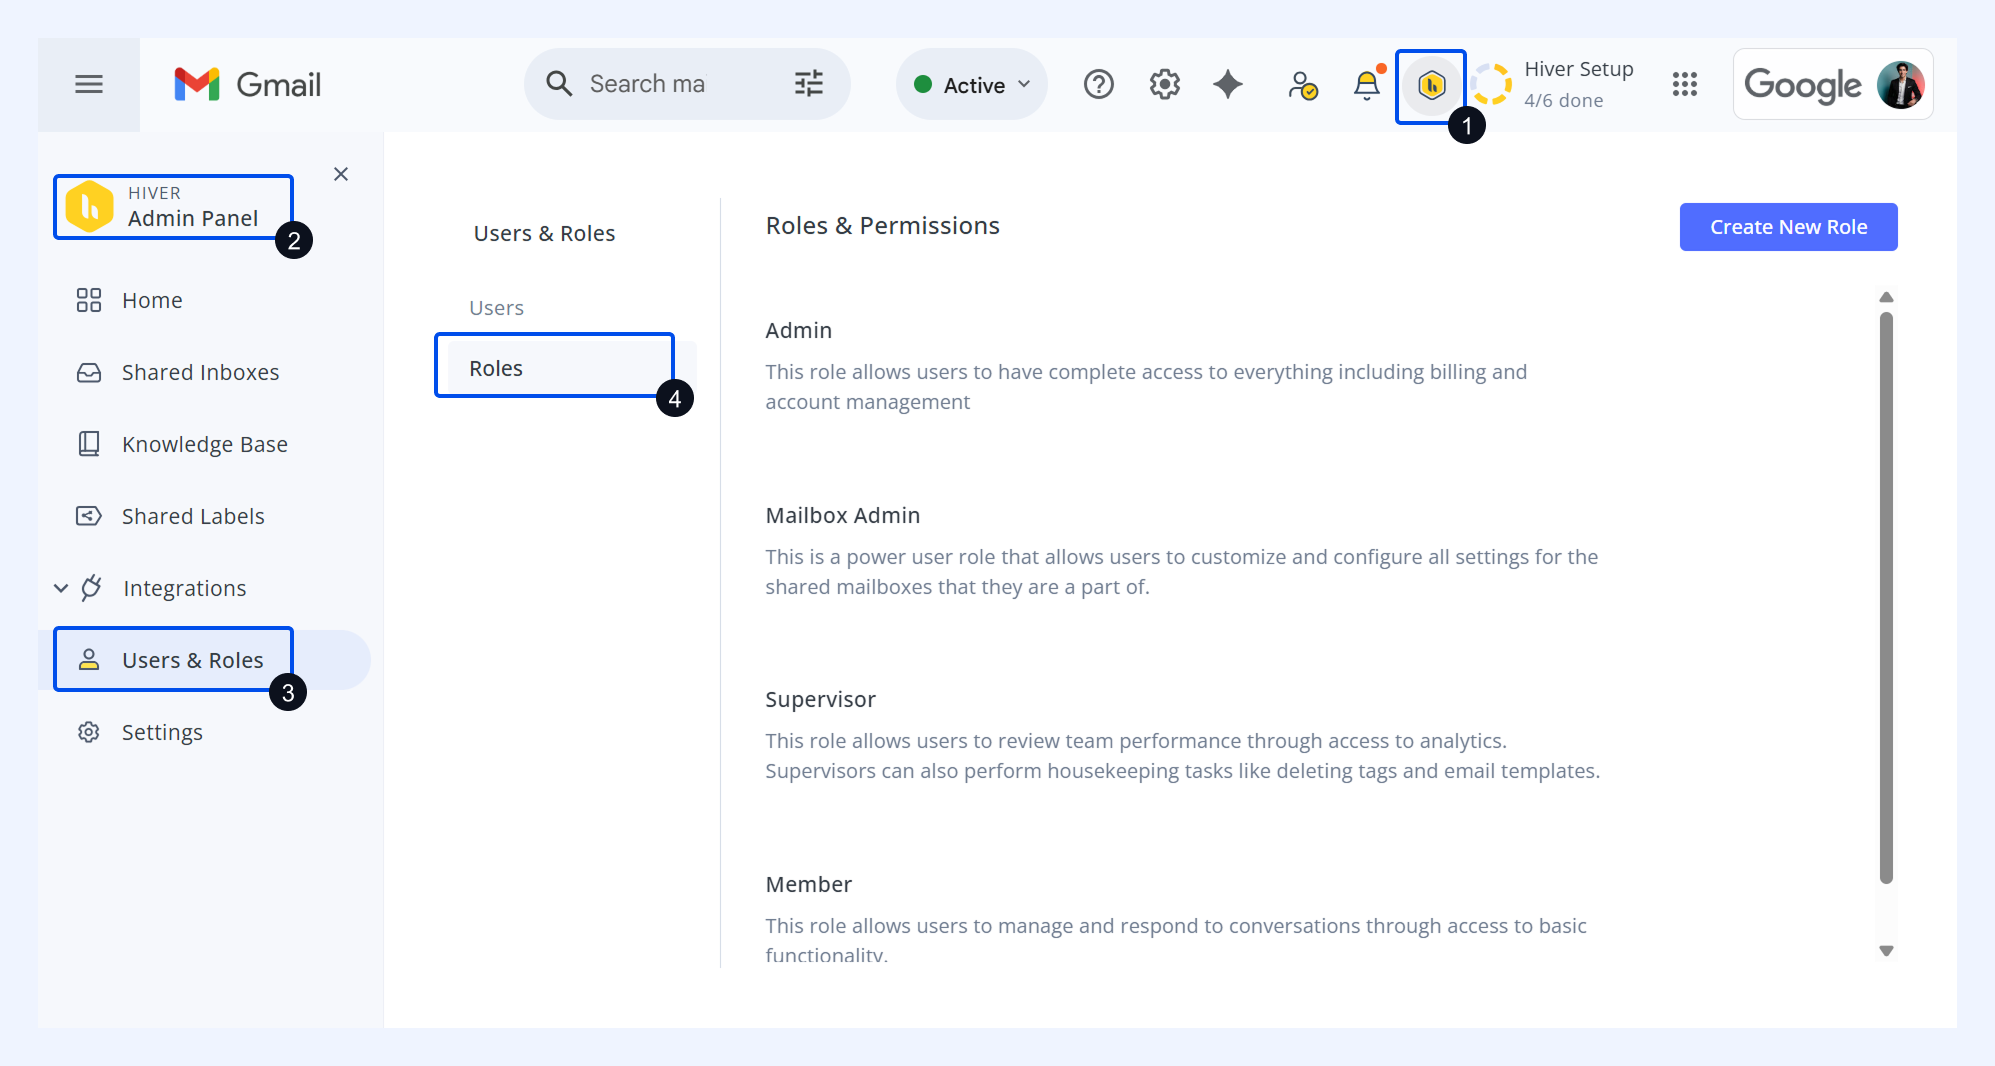
To Access Roles and Permissions, go to Hiver settings ( Hiver icon) → Admin Panel → Users & Roles → Roles.
Creating custom roles
If you’re on the Elite plan, Admins can create up to six custom roles by combining different permissions.
To create a custom role:
1. Go to the Hiver Admin panel by clicking the yellow Hiver icon, select Users & Roles → Roles.
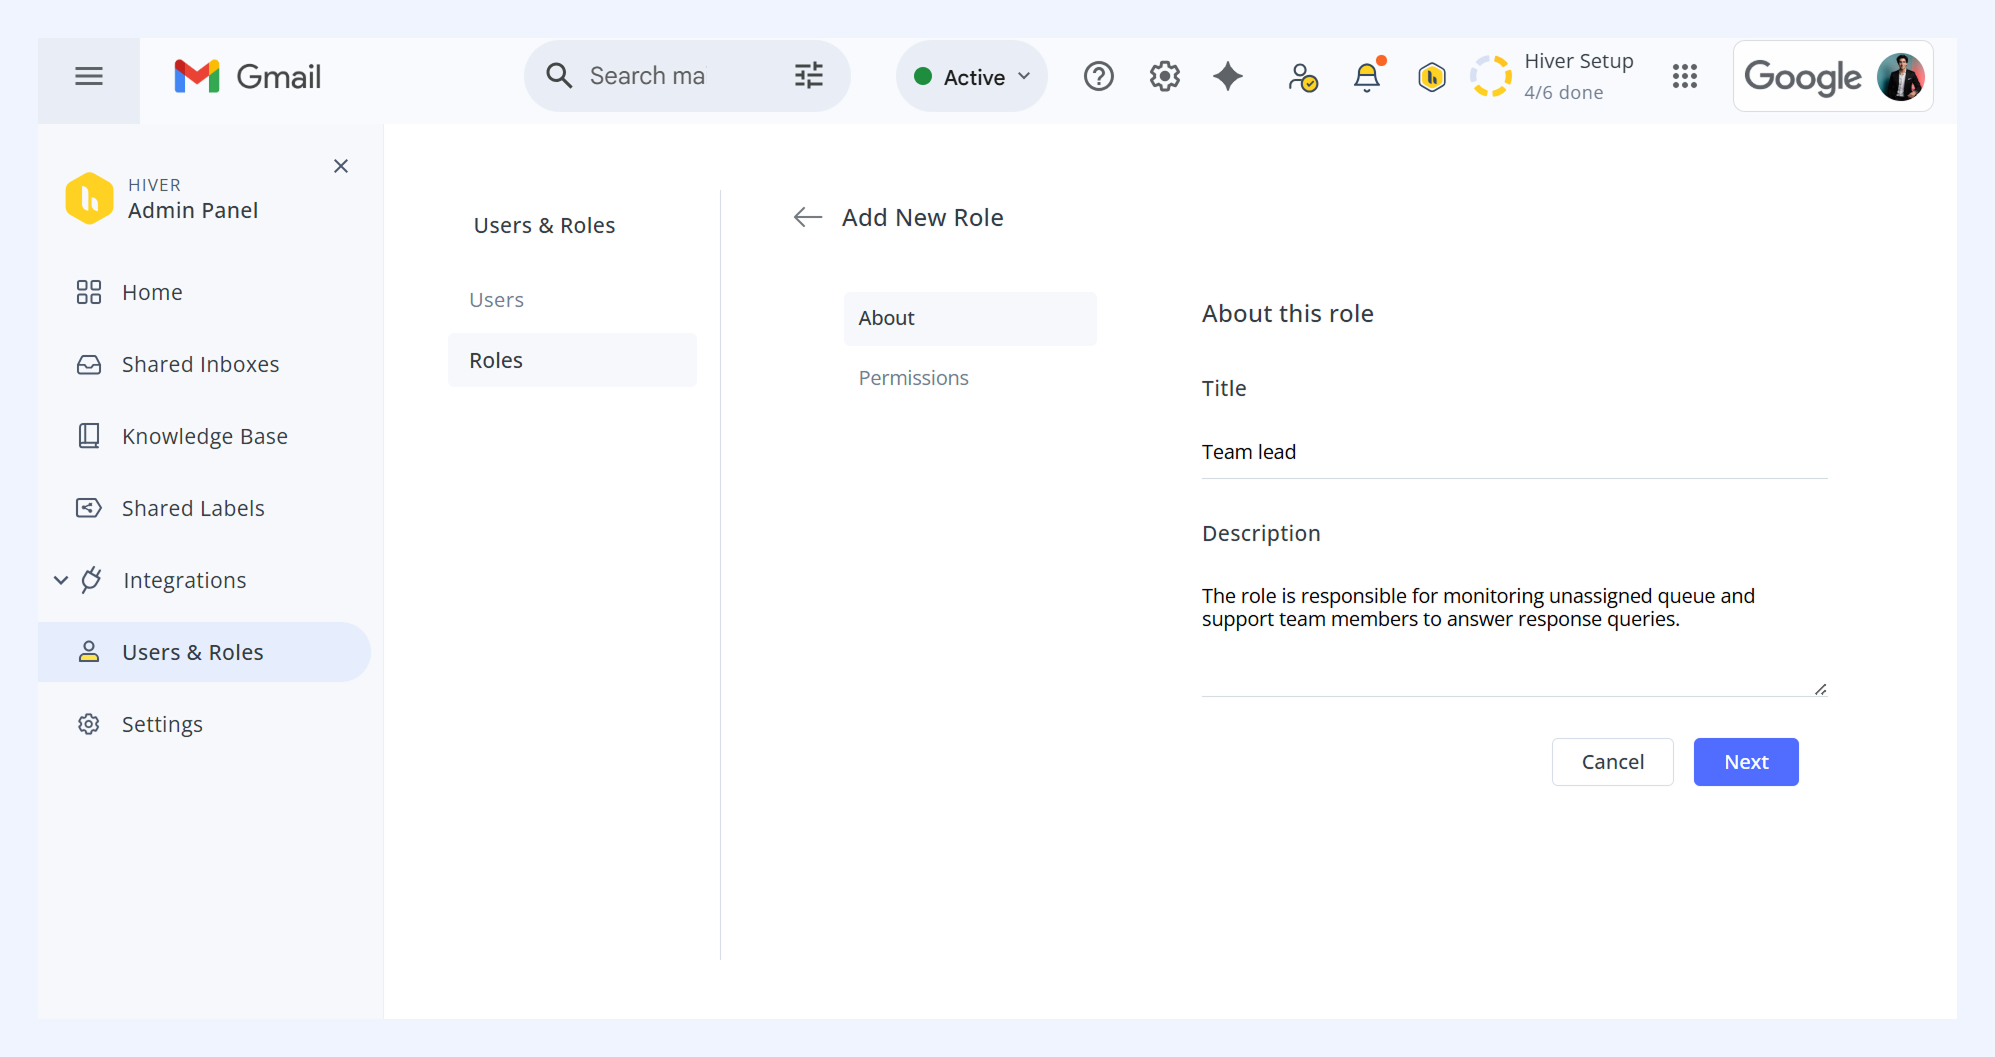
2. Click the Create new role button. In the About section, enter the role’s name and description.
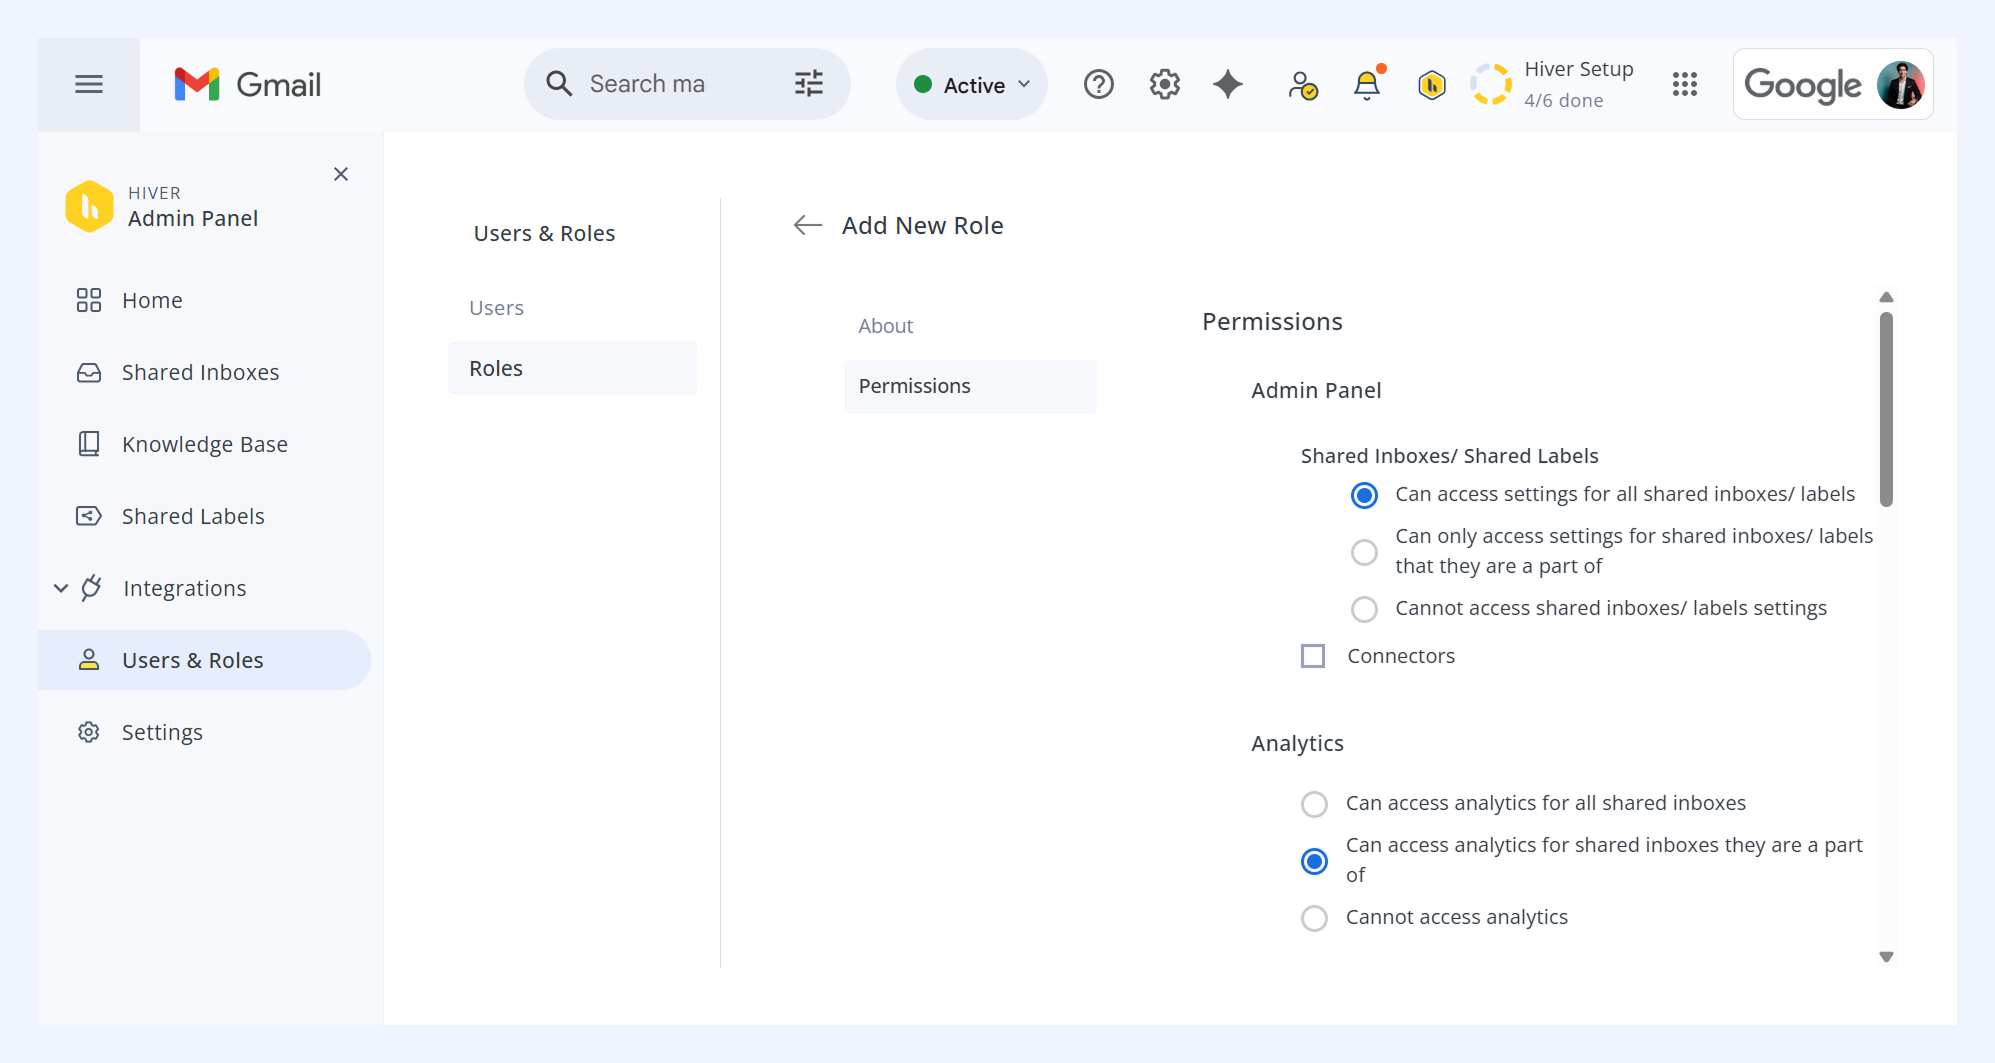
3. Define the Permissions by selecting the actions you want to allow. Once done, hit Save and proceed.
4. Click Add Users to add teammates to the created role directly.
Assigning roles
Only Admins can assign roles to team members. Each user can have only one role, and it applies across all Shared Inboxes they are part of.
For example: if someone is a Supervisor in one Shared Inbox, they cannot be a Shared mailbox admin in another.
To assign or change a role:
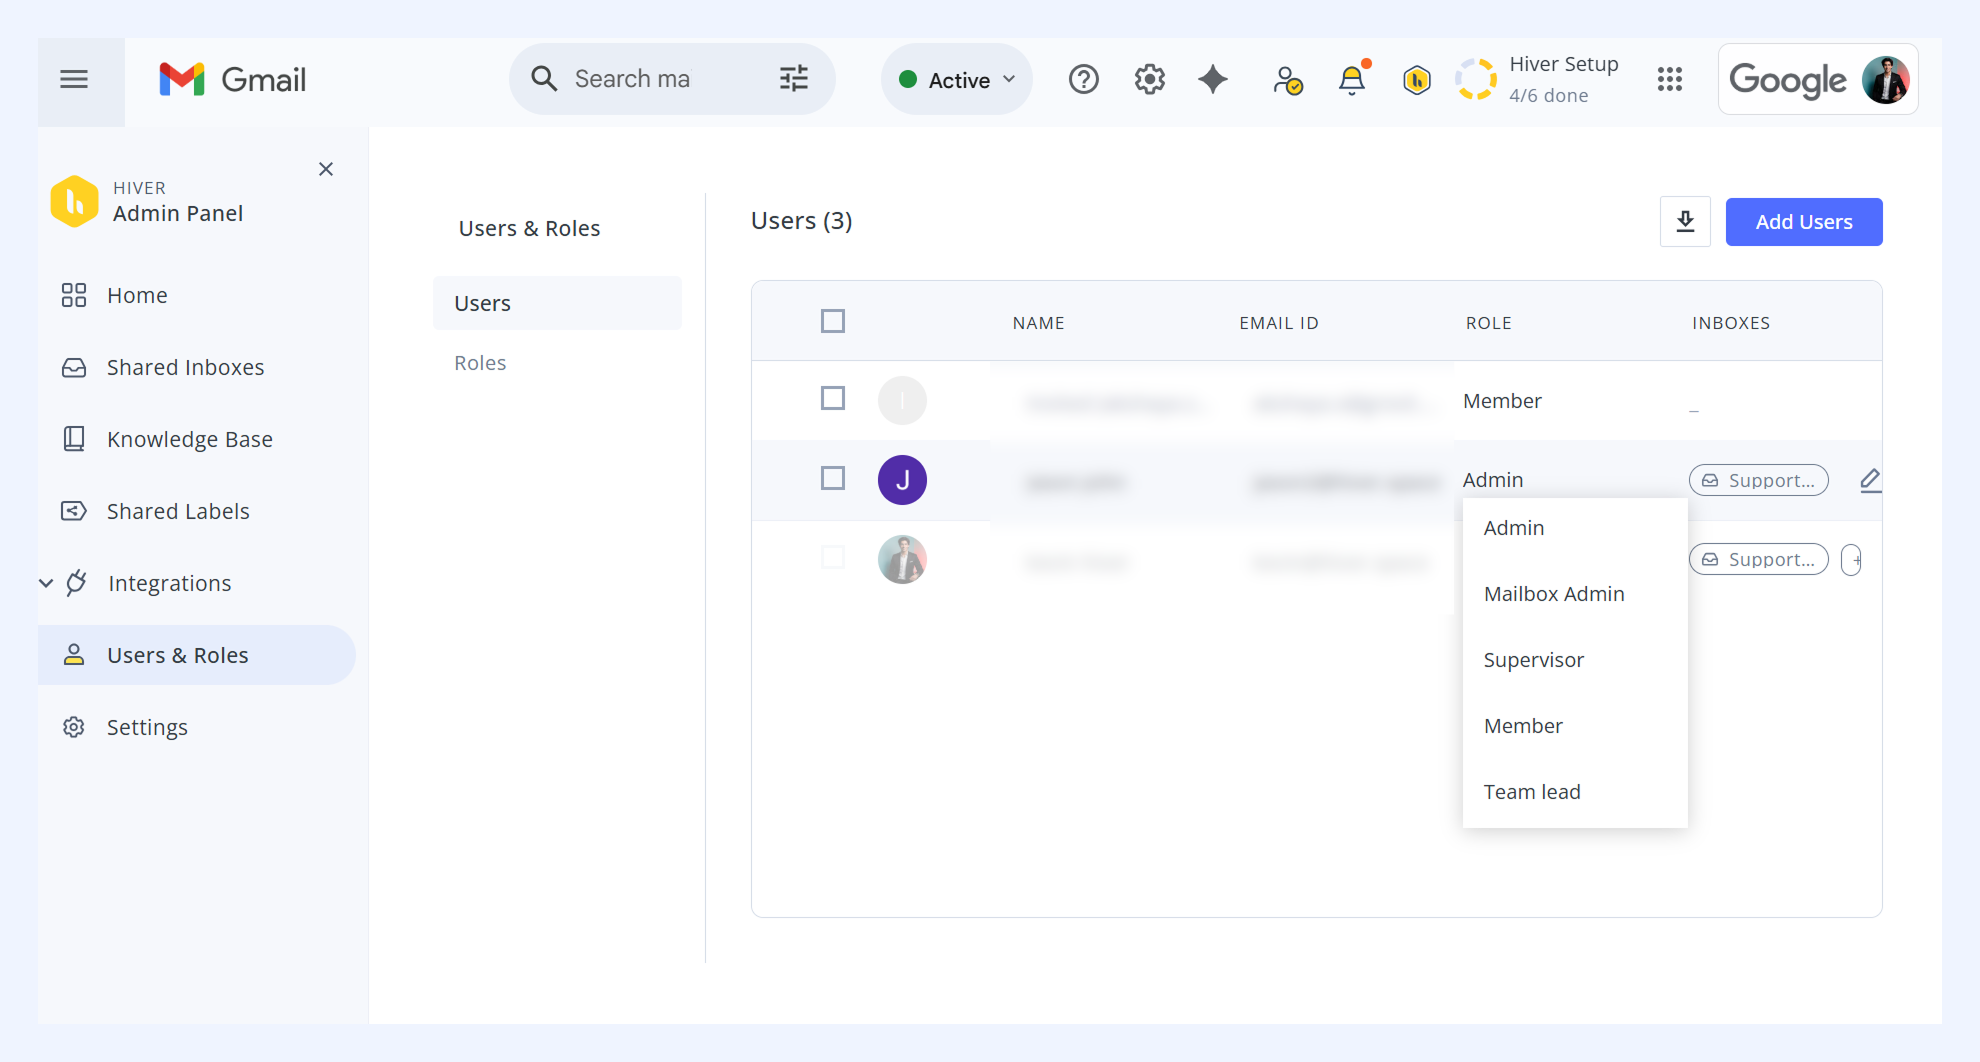
1. Go to Hiver Admin panel → Users & Roles → Users.
2. Find the user whose role you want to change.
3. Open the Role dropdown and choose a default or custom role.
Frequently asked questions
How do I add a member to a Shared Inbox?
1. Go to Admin Panel → Shared Inboxes, and select an inbox.
2. Open the Participants tab.
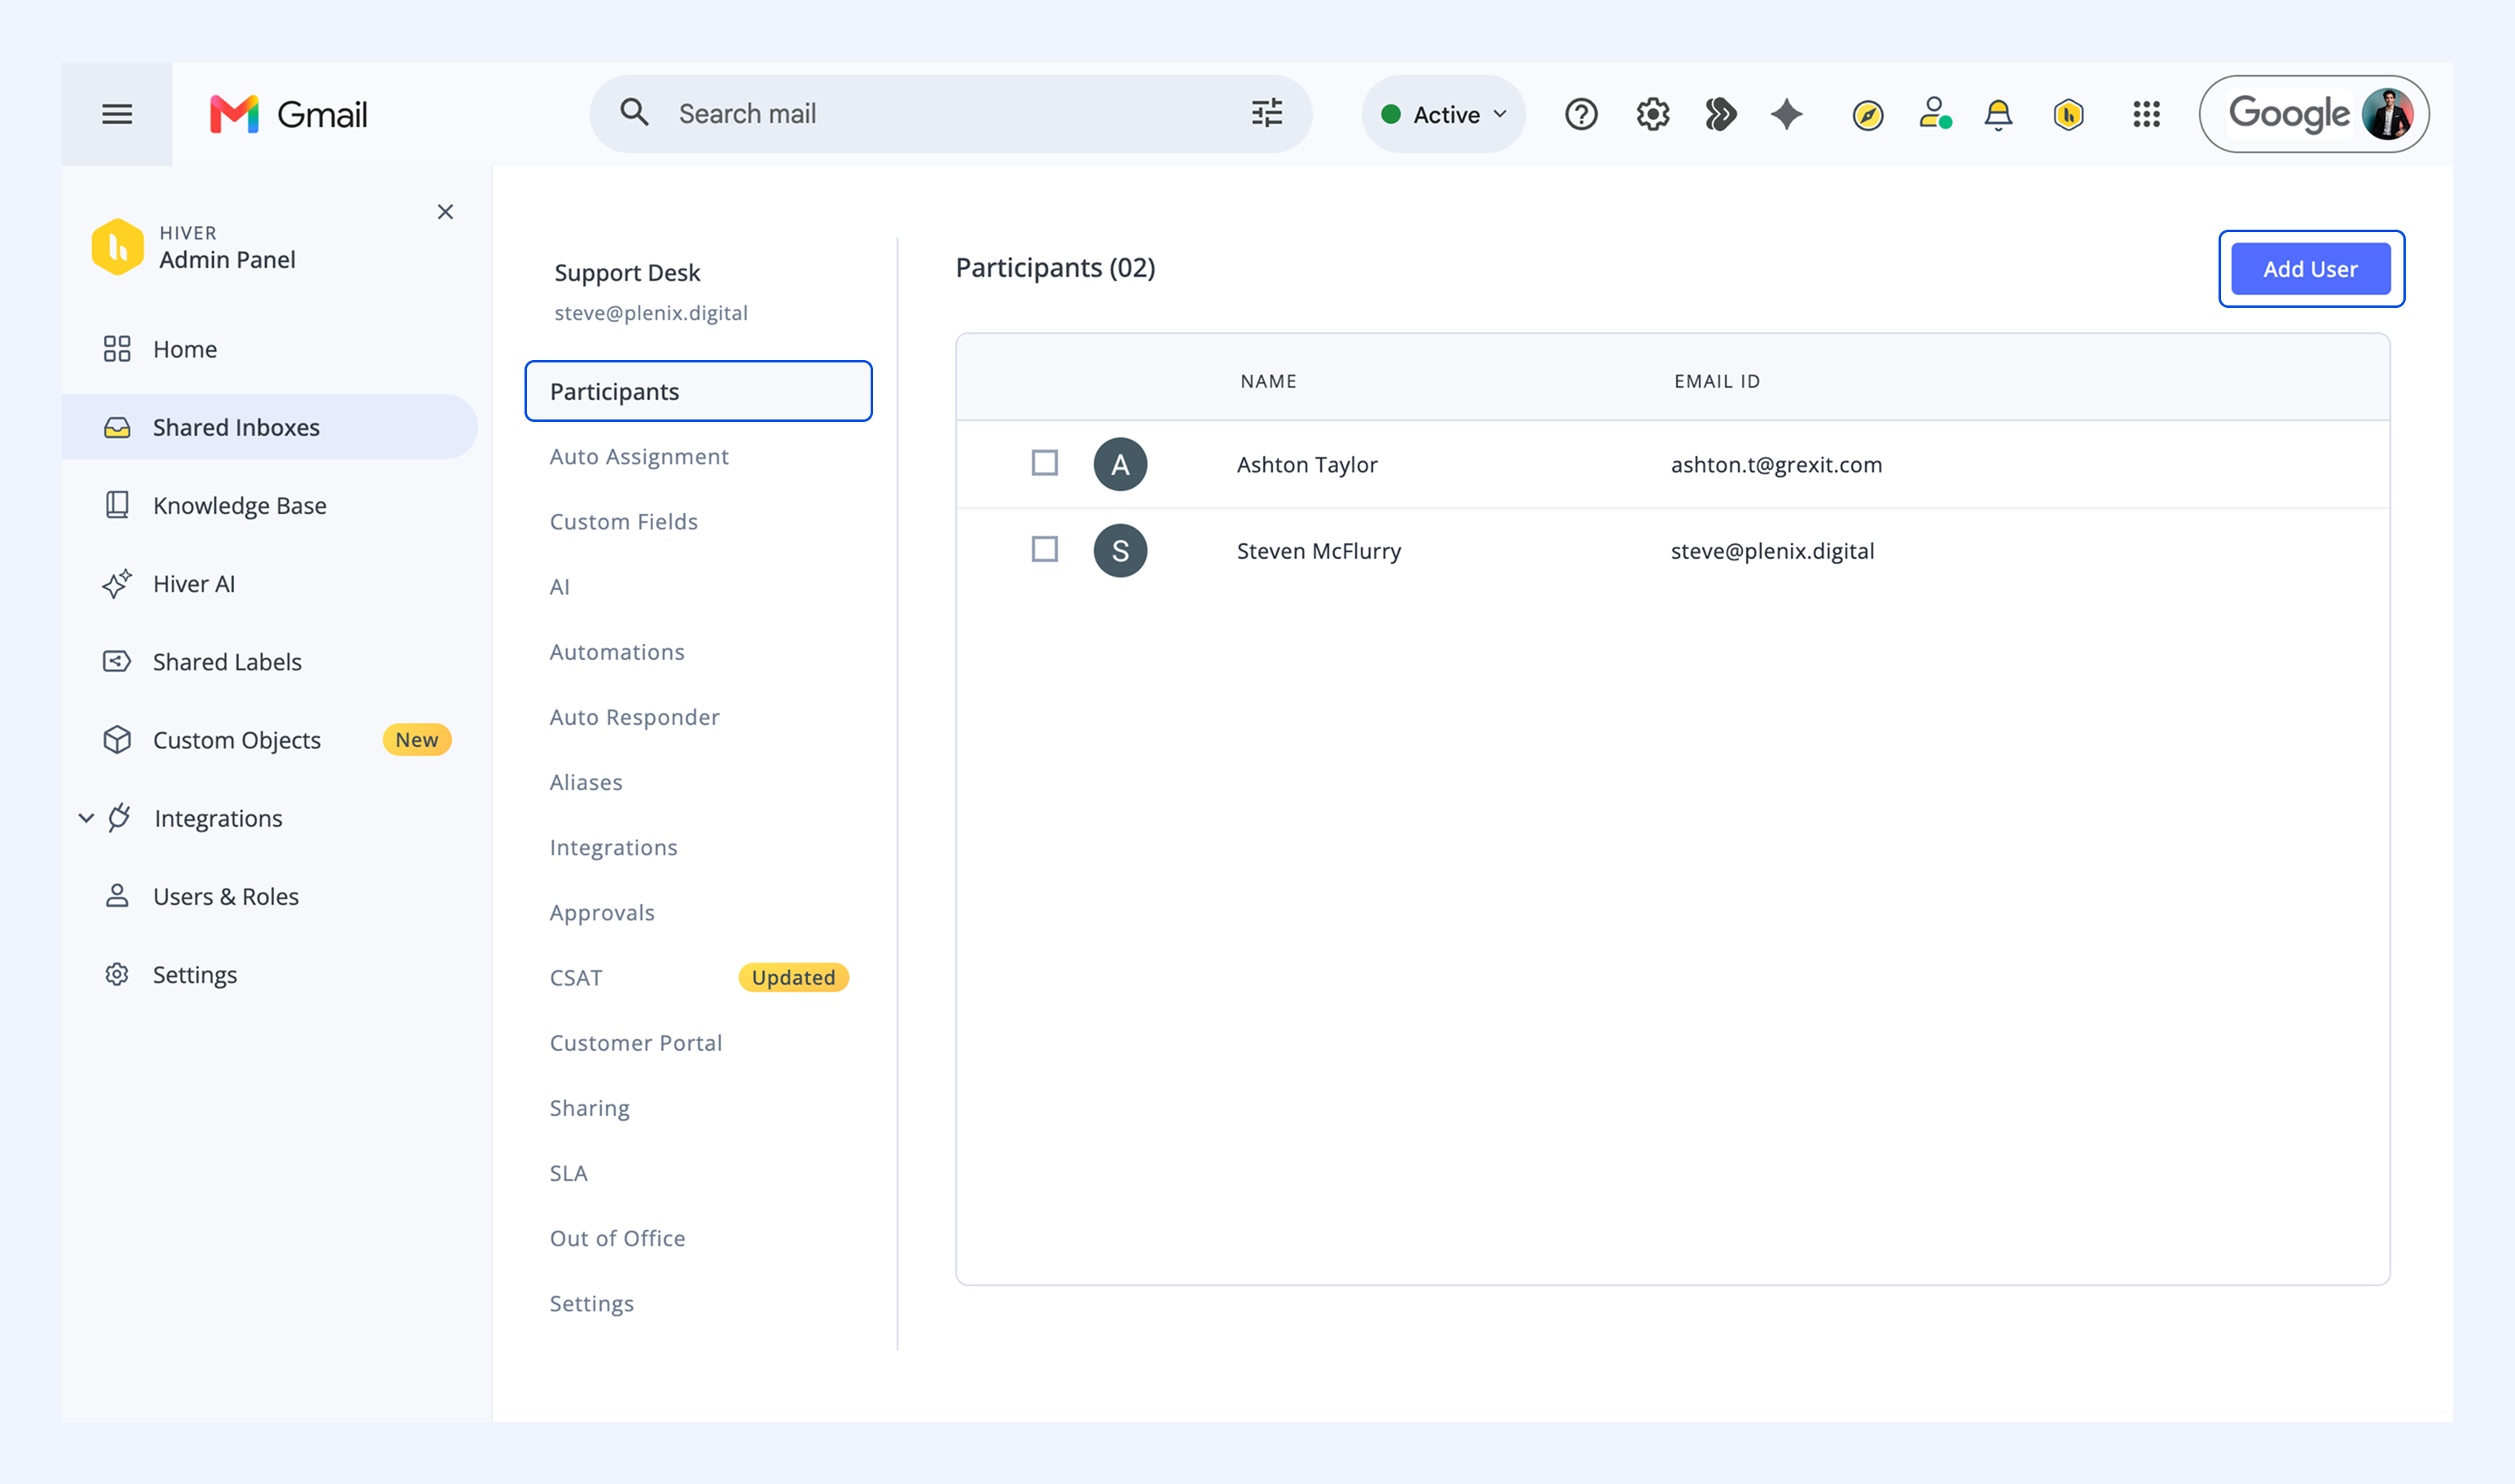
3. Click Add User.
4. Enter the user’s email address.
5. Click Done.
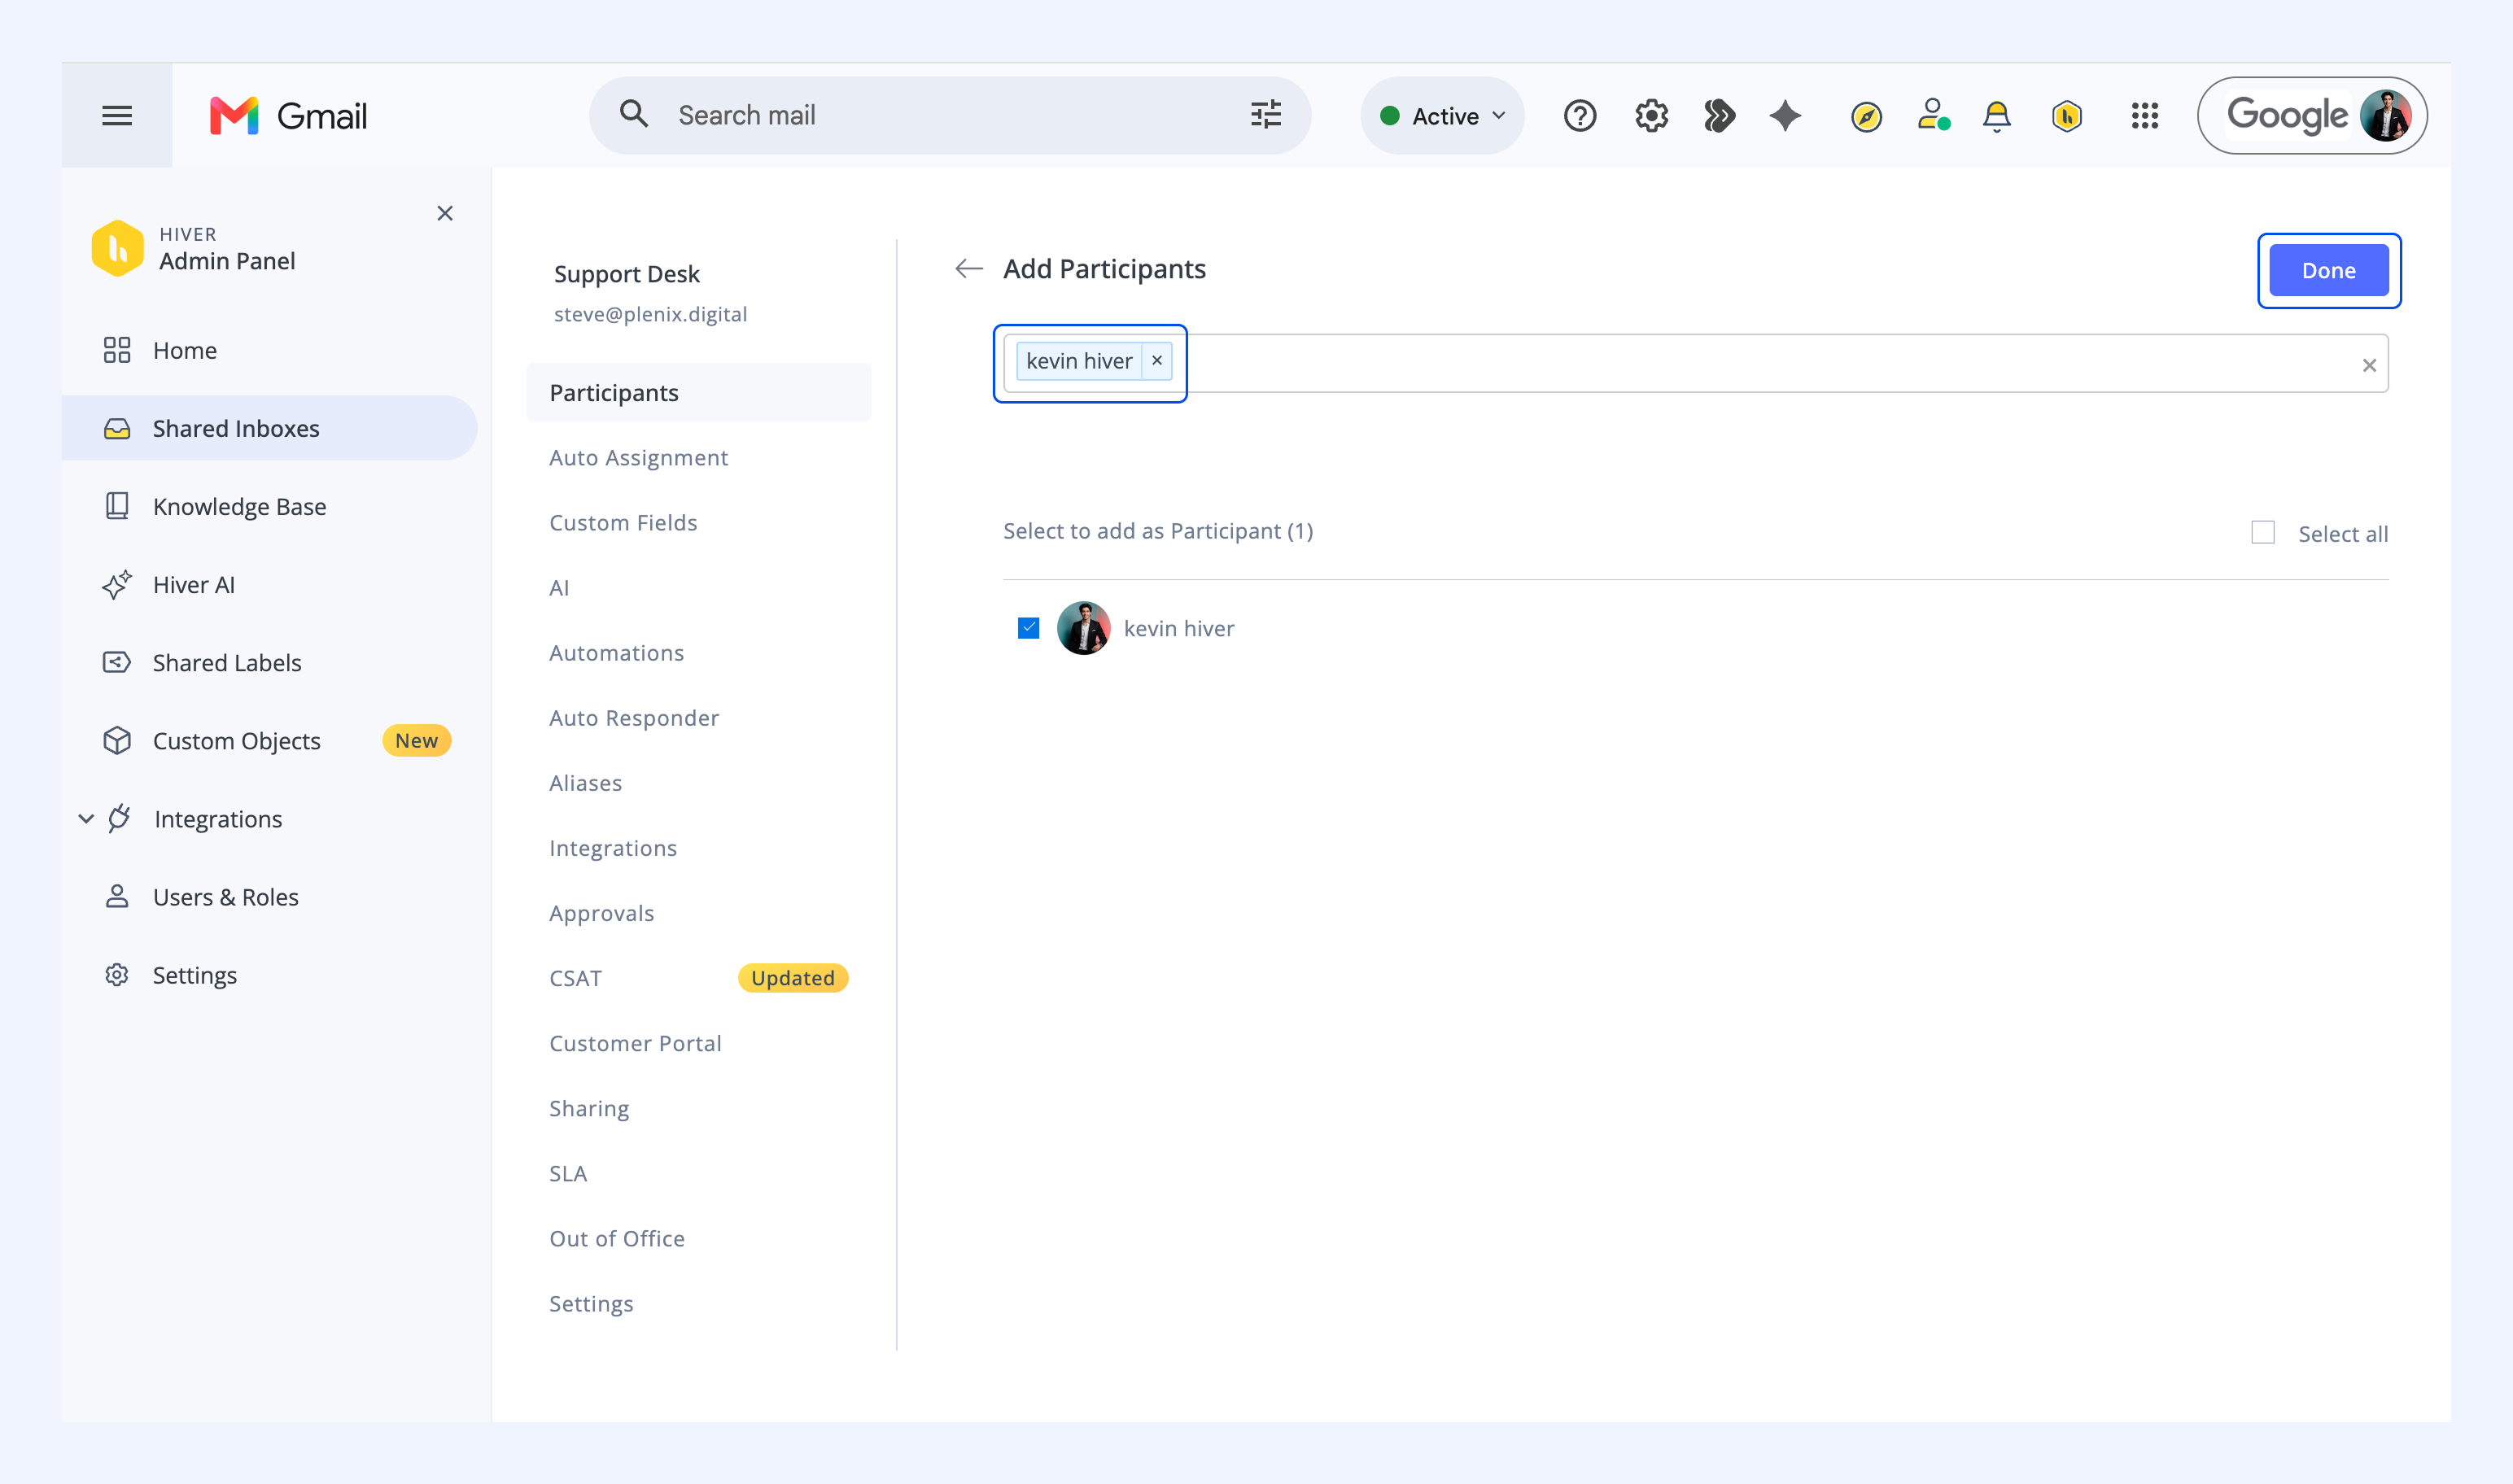
The user must already exist in your Hiver account before being added to a Shared Inbox.
Does adding someone to a Shared Inbox give them access to all inboxes?
No. Users only get access to the inboxes they are specifically added to.
What happens when I delete a user in Hiver?
- Open conversations assigned to them move to Unassigned
- Closed conversations remain preserved
- Email history is retained
- Any paid seat they were consuming immediately becomes free
Can I still see analytics for deleted users?
Historical Analytics remain available, but the deleted user appears as “Unidentified user.”
Why is a deleted user still receiving emails?
This usually happens because the user was removed from Hiver but still exists in the Google Group for the Shared Inbox.
You must remove them from both systems.
What’s the complete process for removing a user?
In Hiver
- Delete the user
- Reassign open conversations if needed
- Verify the seat becomes available
In Google Workspace or Microsoft
- Remove them from Shared Inbox groups
- Remove forwarding rules if applicable
- Suspend or delete their email account if required
Next steps
Manage emails in Hiver Shared Inbox