Setting up a Shared Inbox
A Shared Inbox in Hiver helps your team manage emails sent to addresses such as support@, sales@, or info@ right from Gmail. Each inbox acts as a collaborative workspace for a specific team or function, with its own members, automation rules, and more.
Here’s a quick overview of how you can manage emails with a Shared Inbox:
Shared Inboxes help your team:
- Collaborate on emails without forwarding or CCs
- Prevent duplicate or missed replies
- Maintain visibility into who’s working on what
- Automate routine tasks like assignment and tagging
- Respond faster and deliver a consistent customer experience
You can start with one inbox and add more for other teams (like HR or Finance) or channels (like Chat, WhatsApp, or Voice).
Prerequisites
Before you begin, make sure you have:
1. Access to the Gmail account or Google Group you want to connect to Hiver:
- For a Gmail account, you must be able to sign in to that account.
- For a Google Group, make sure:
- You are listed as a member, manager, or owner of the group.
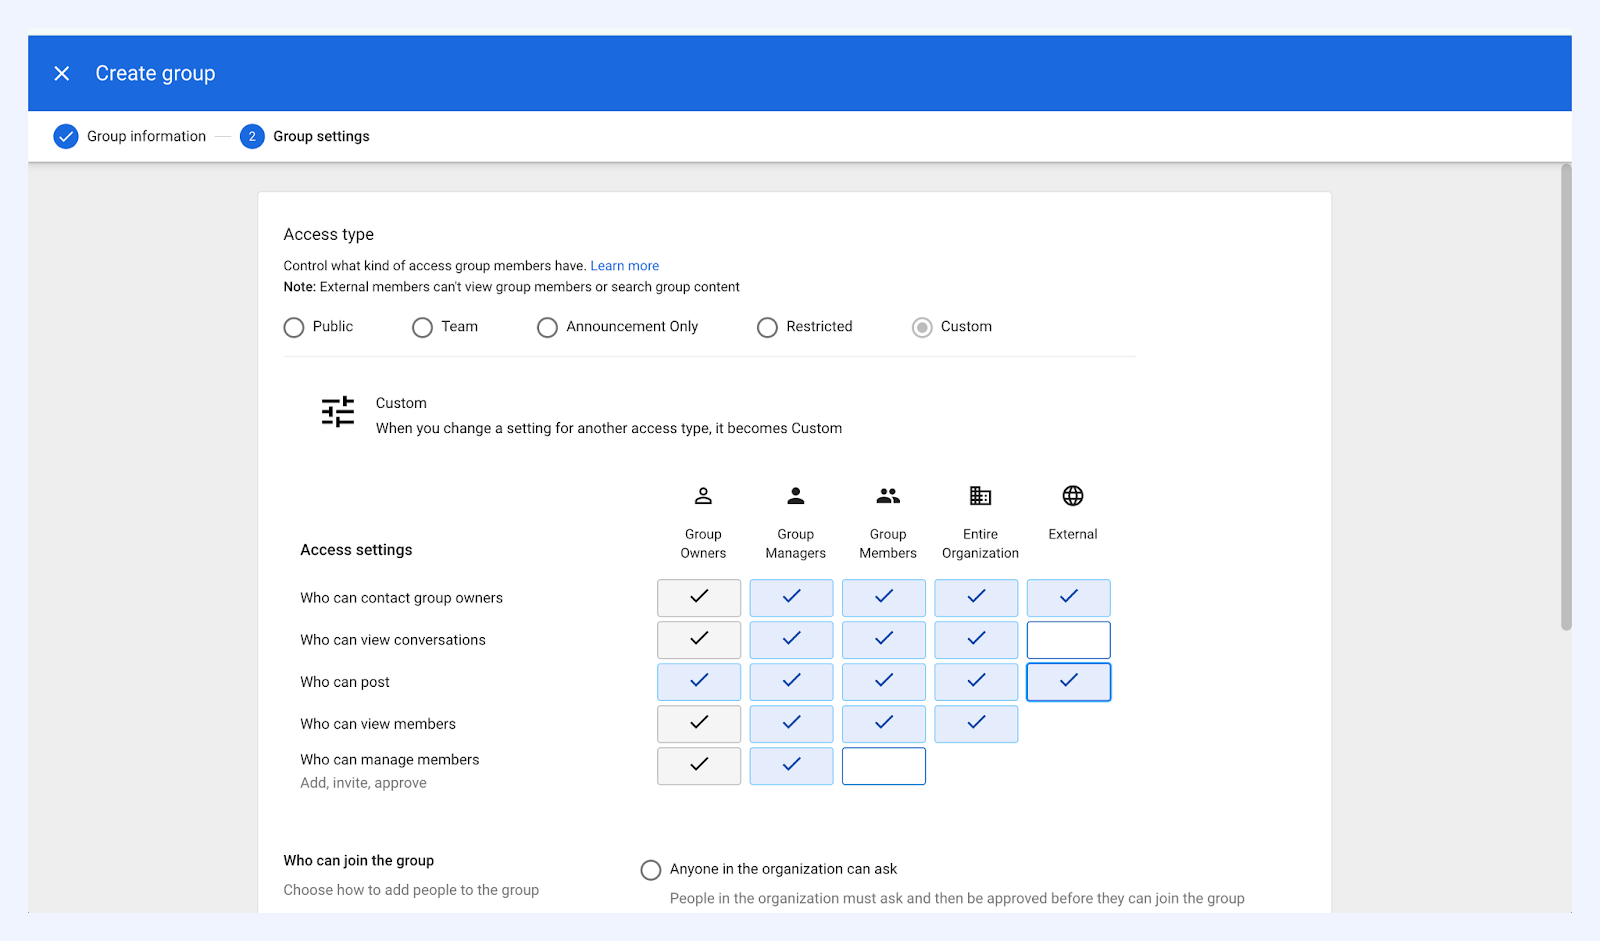
- Posting settings are set to External.
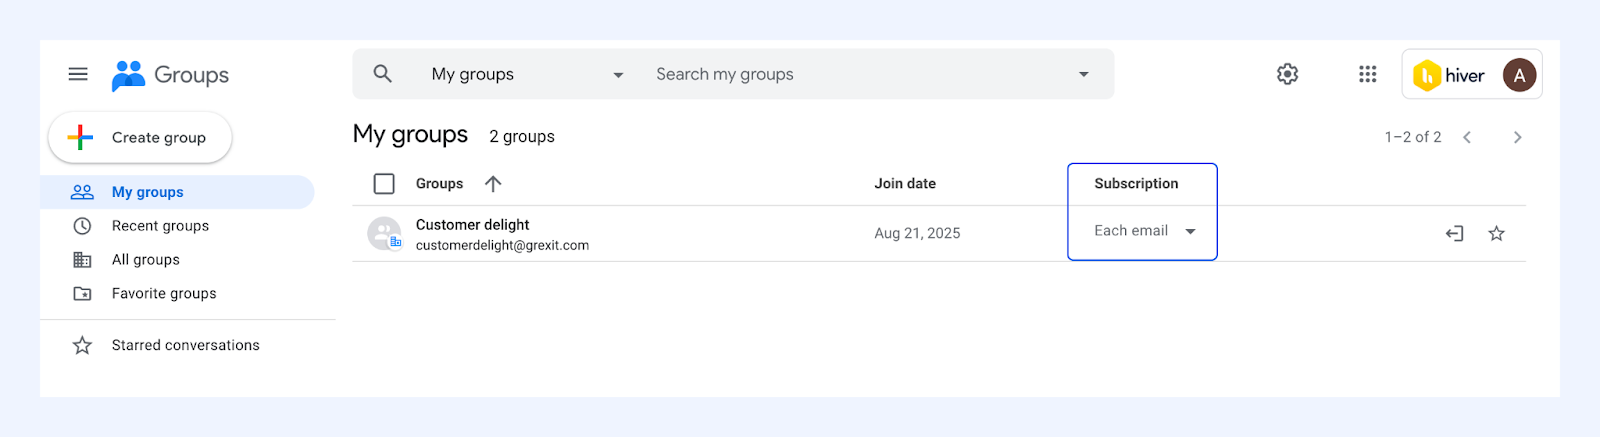
- Subscription setting is set to each email.
2. The Hiver Chrome extension installed and authenticated
3. Gmail's Conversation View turned on. This ensures features like email assignments, notes, and status updates work properly. To enable it:
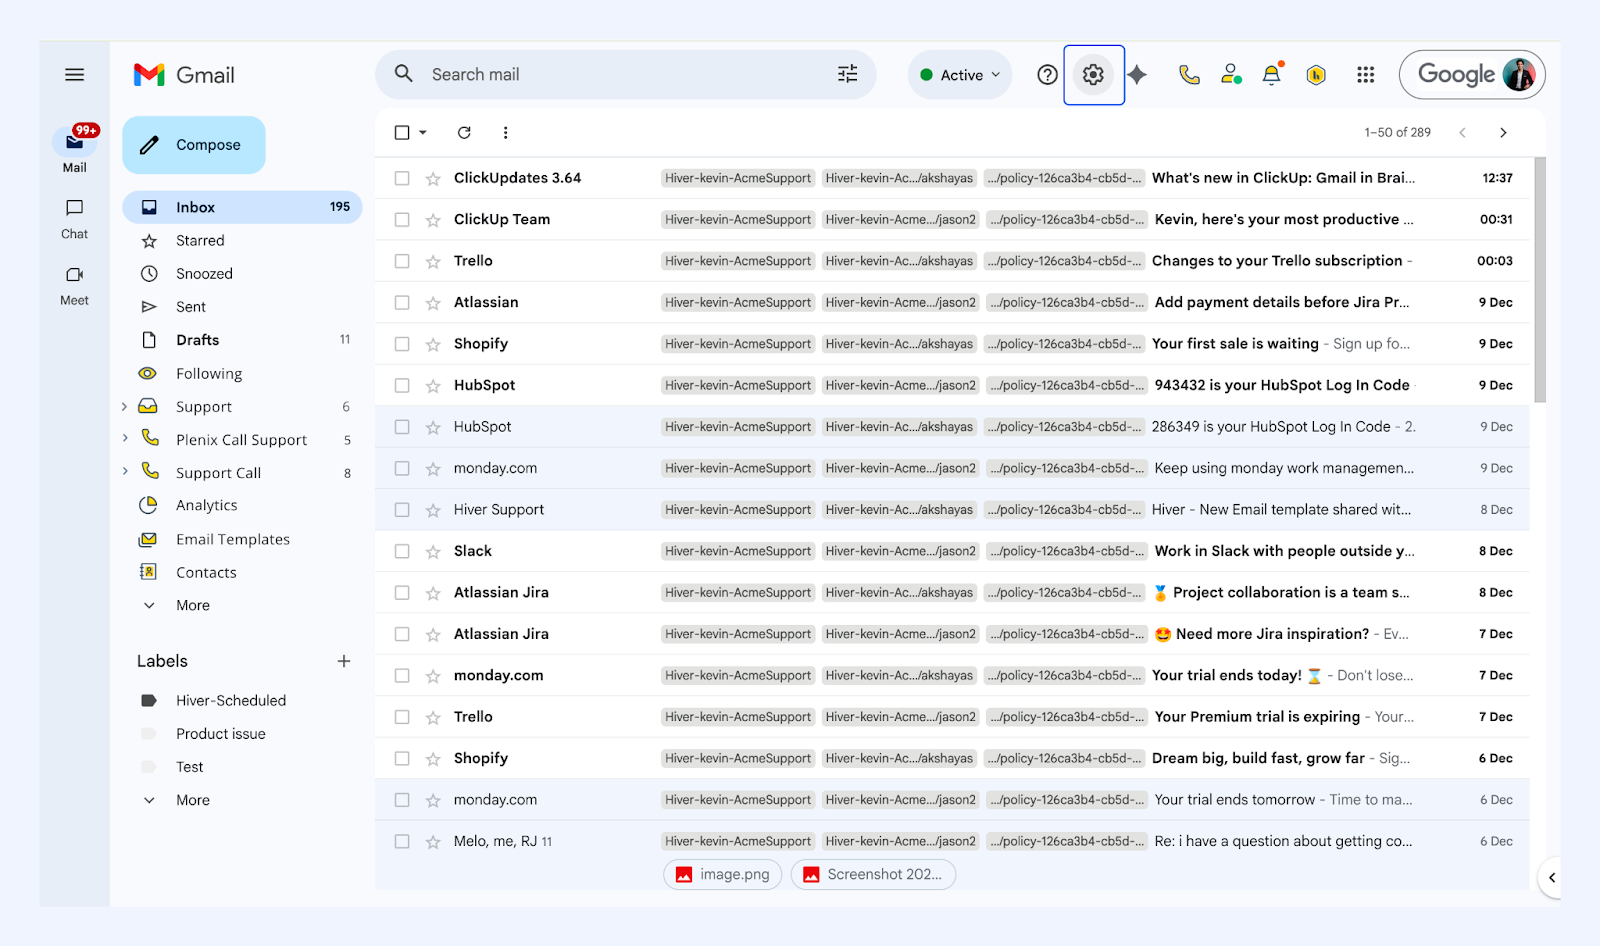
- Click the Gmail Settings icon.
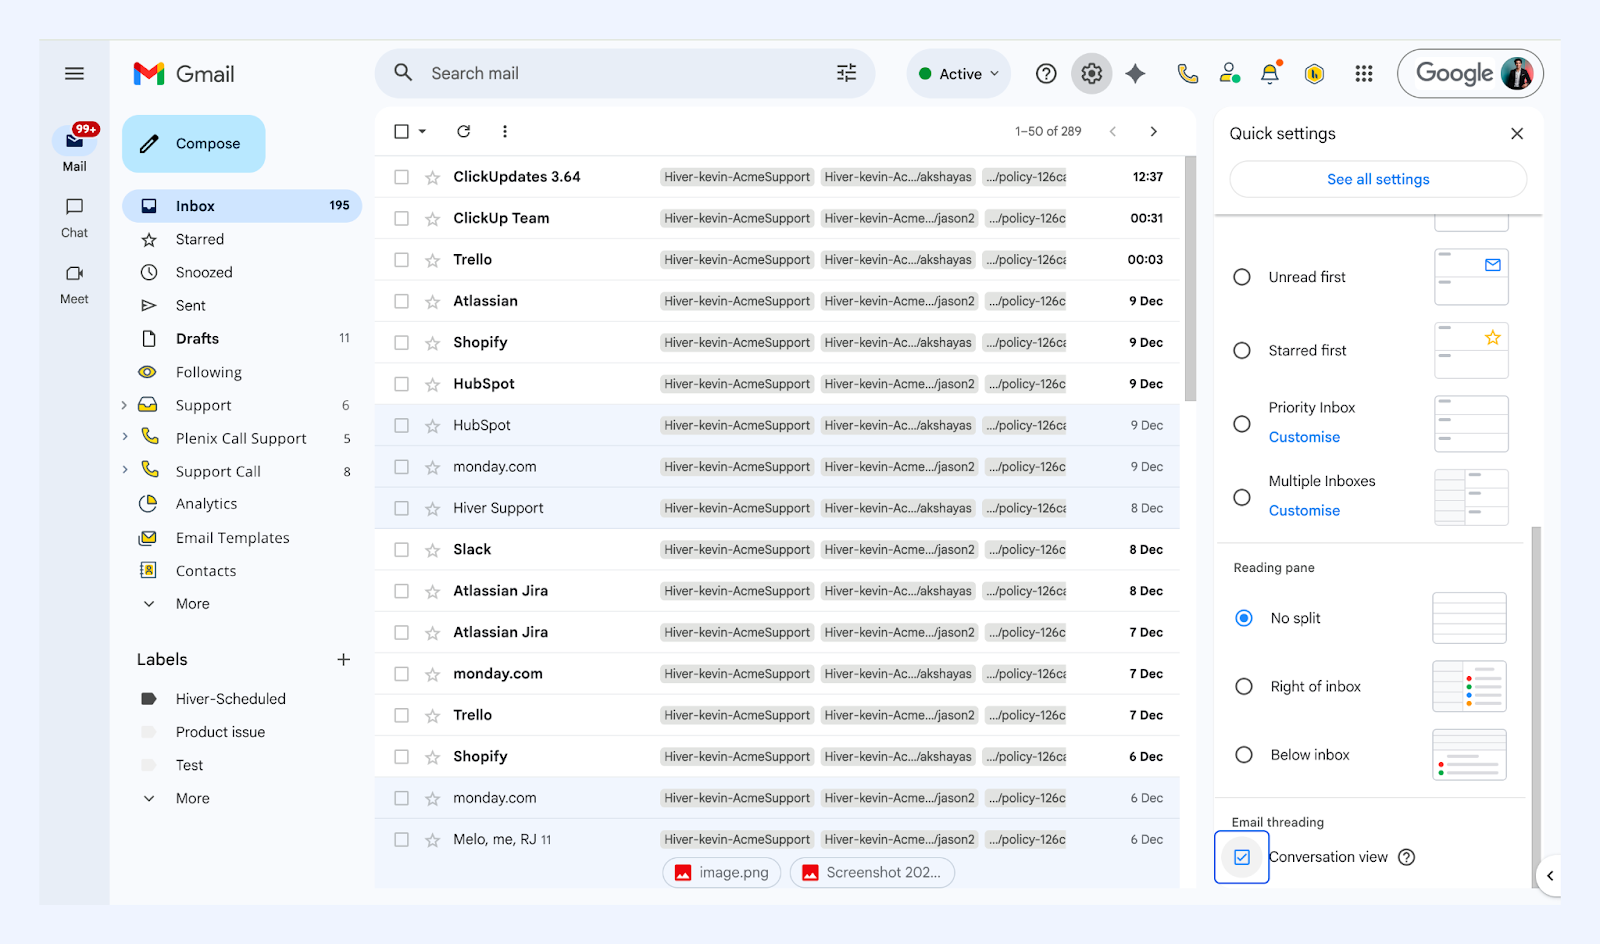
- Scroll to Email threading and enable Conversation view.
Steps to create a Shared Inbox
1. In Gmail, click the Hiver settings icon and select Admin Panel.
2. Go to the Shared Inboxes tab.
3. Click Create Shared Inbox.
.png)
4. You’ll see a list of channels you can create a Shared Inbox for. Select Email as the channel.
Note: You can explore the following resources to learn more about setting up Shared Inboxes for different channels:
- Live chat: Chat with your website visitors in real-time.
- WhatsApp: Manage your WhatsApp conversations within Gmail.
- Voice (Hiver-Aircall integration): Log and manage voice calls and voicemails inside Gmail.
5. Add the following details:
- Inbox name (e.g. Acme Support or Customer success)
- Select what you’ll use the inbox for
Once you’re done, click Next.
.png)
6. Connect your email
You’ll see two options to connect your email. Choose the one that matches how your email is currently configured.
.png)
| Inbox setup type | When to use it in Hiver |
| Sign in with a standard Gmail account | You have a regular Gmail or Google Workspace inbox with its own login credentials. |
| Connect a Google Group email (or an alias) | You use a Google Group to receive incoming emails (for example, support@ or sales@). |
Once you’ve selected your setup type:
- If you sign in with a standard Gmail account, complete the Google sign-in flow and grant Hiver access.
- If you connect a Google Group, enter the group’s email address (for example, support@yourcompany.com) and click Next.
7. Enter your teammates' email addresses to invite them to your Shared Inbox. Click Send Invites to confirm.
Note: If you connect a Google Workspace account, you can choose to import the last 100 emails so ongoing conversations are visible in your Shared Inbox. Imported emails appear as open and unassigned.
.png)
The Shared Inbox will appear in Gmail for assigned users and in your Admin Panel. Learn more about managing emails in your Shared Inbox.
Note: When you add a teammate to the Shared Inbox, all unresolved conversations and ‘Closed’ emails from the last 90 days will start syncing for the user. The sync duration may vary depending on the number of emails.
Setting up the Sender ID for your Google Group
If you’re connecting a Google Group email address, Gmail needs to finish a one-time setup before you can start sending emails from that address.
This process ensures your Group address (for example, support@yourcompany.com) appears under Send mail as in Gmail, and, by extension, in Hiver.
While Gmail completes this setup:
- You can continue using Hiver as usual.
- Once the setup is complete, your address will be available for sending and receiving in Hiver.
- Any new emails sent during the setup process will start flowing into your Shared Inbox once Gmail finishes.
- Your teammates can see new emails in Hiver during the setup.
This process is fully managed by Gmail and the duration can vary depending on your email history. If you have questions, reach out to support@hiverhq.com.
Set up additional Shared Inboxes
You can repeat this setup process to create more Shared Inboxes for other teams or channels. You can assign team members, set up workflows, and manage access permissions for each Shared Inbox.
Tip: Use clear and descriptive names for each inbox, for example, support@, hr@, or finance@. This helps teammates quickly identify which Shared Inbox they’re working in and keeps your workspace organized as you add more.
Frequently asked questions about Shared Inboxes
Do I need a separate Google account for the Shared Inbox?
No. You can use an existing Gmail inbox, a Google Group, or an alias as your Shared Inbox. You don’t need to create a new Google account unless you want a dedicated login for that address.
Can I assign emails to teammates in a Shared Inbox?
Yes. Assignment is one of Hiver's core features. You can manually assign emails or set up auto-assignment rules based on subject, sender, or round-robin rotation conditions. Learn more about automating workflows.
Will replying from a Shared Inbox use the shared address?
You can send replies and compose new emails from your Hiver Shared Inbox using your personal email address, the Shared Inbox's email address, or any alias you've set up in the Shared Inbox settings. Learn more about sending emails from Hiver.
Why can't I assign emails to a new user?
There are two common reasons:
- The user hasn't registered with Hiver yet: When you add a new user, they receive an email asking them to register. They must complete registration before they can be assigned emails.
- The user hasn't been added to a specific Shared Inbox: Adding someone to your Hiver account is separate from adding them to individual Shared Inboxes. Make sure you've added them to the specific inbox where you want to assign emails.
Why aren't emails showing up for a newly added user?
If a teammate you just added isn't seeing emails in their Gmail, check these three things:
- Confirm they're added to the Shared Inbox: Adding someone to your Hiver account doesn't automatically add them to specific Shared Inboxes. Verify they've been added as a member of the inbox in question.
- Historical email limits: Hiver syncs historic emails for new users up to 90 days back or 10,000 emails (whichever comes first). If you need to sync beyond these limits, contact support@hiverhq.com about purchasing an add-on for extended sync capabilities.
Why aren’t my emails syncing?
Here are a few reasons why your emails might not sync.
For Shared Labels:
If emails in your Shared Label aren't syncing and you have a large volume of old emails, contact support@hiverhq.com with an approximate count. They'll provide a time estimate for the sync.
New emails and old emails sync independently, so new emails will continue to sync regardless of old email status.
You can control whether old emails sync for each Shared Label in the Hiver Admin Panel under Shared Label → Edit → Advanced Options → Sync old emails.
For Google Groups or alias-based Shared Inboxes:
Email syncing relies on the primary user, the person who originally created the Shared Inbox connection. Sync issues occur when:
- The primary user is removed from the group or leaves the organization.
- The primary user changes their subscription settings.
- The primary user changes posting permissions.
- The primary user has a Gmail filter, spam rule, or inbox setting that is preventing emails from landing in their inbox. Check their filters and spam folder to make sure nothing is auto-archiving or deleting relevant messages.
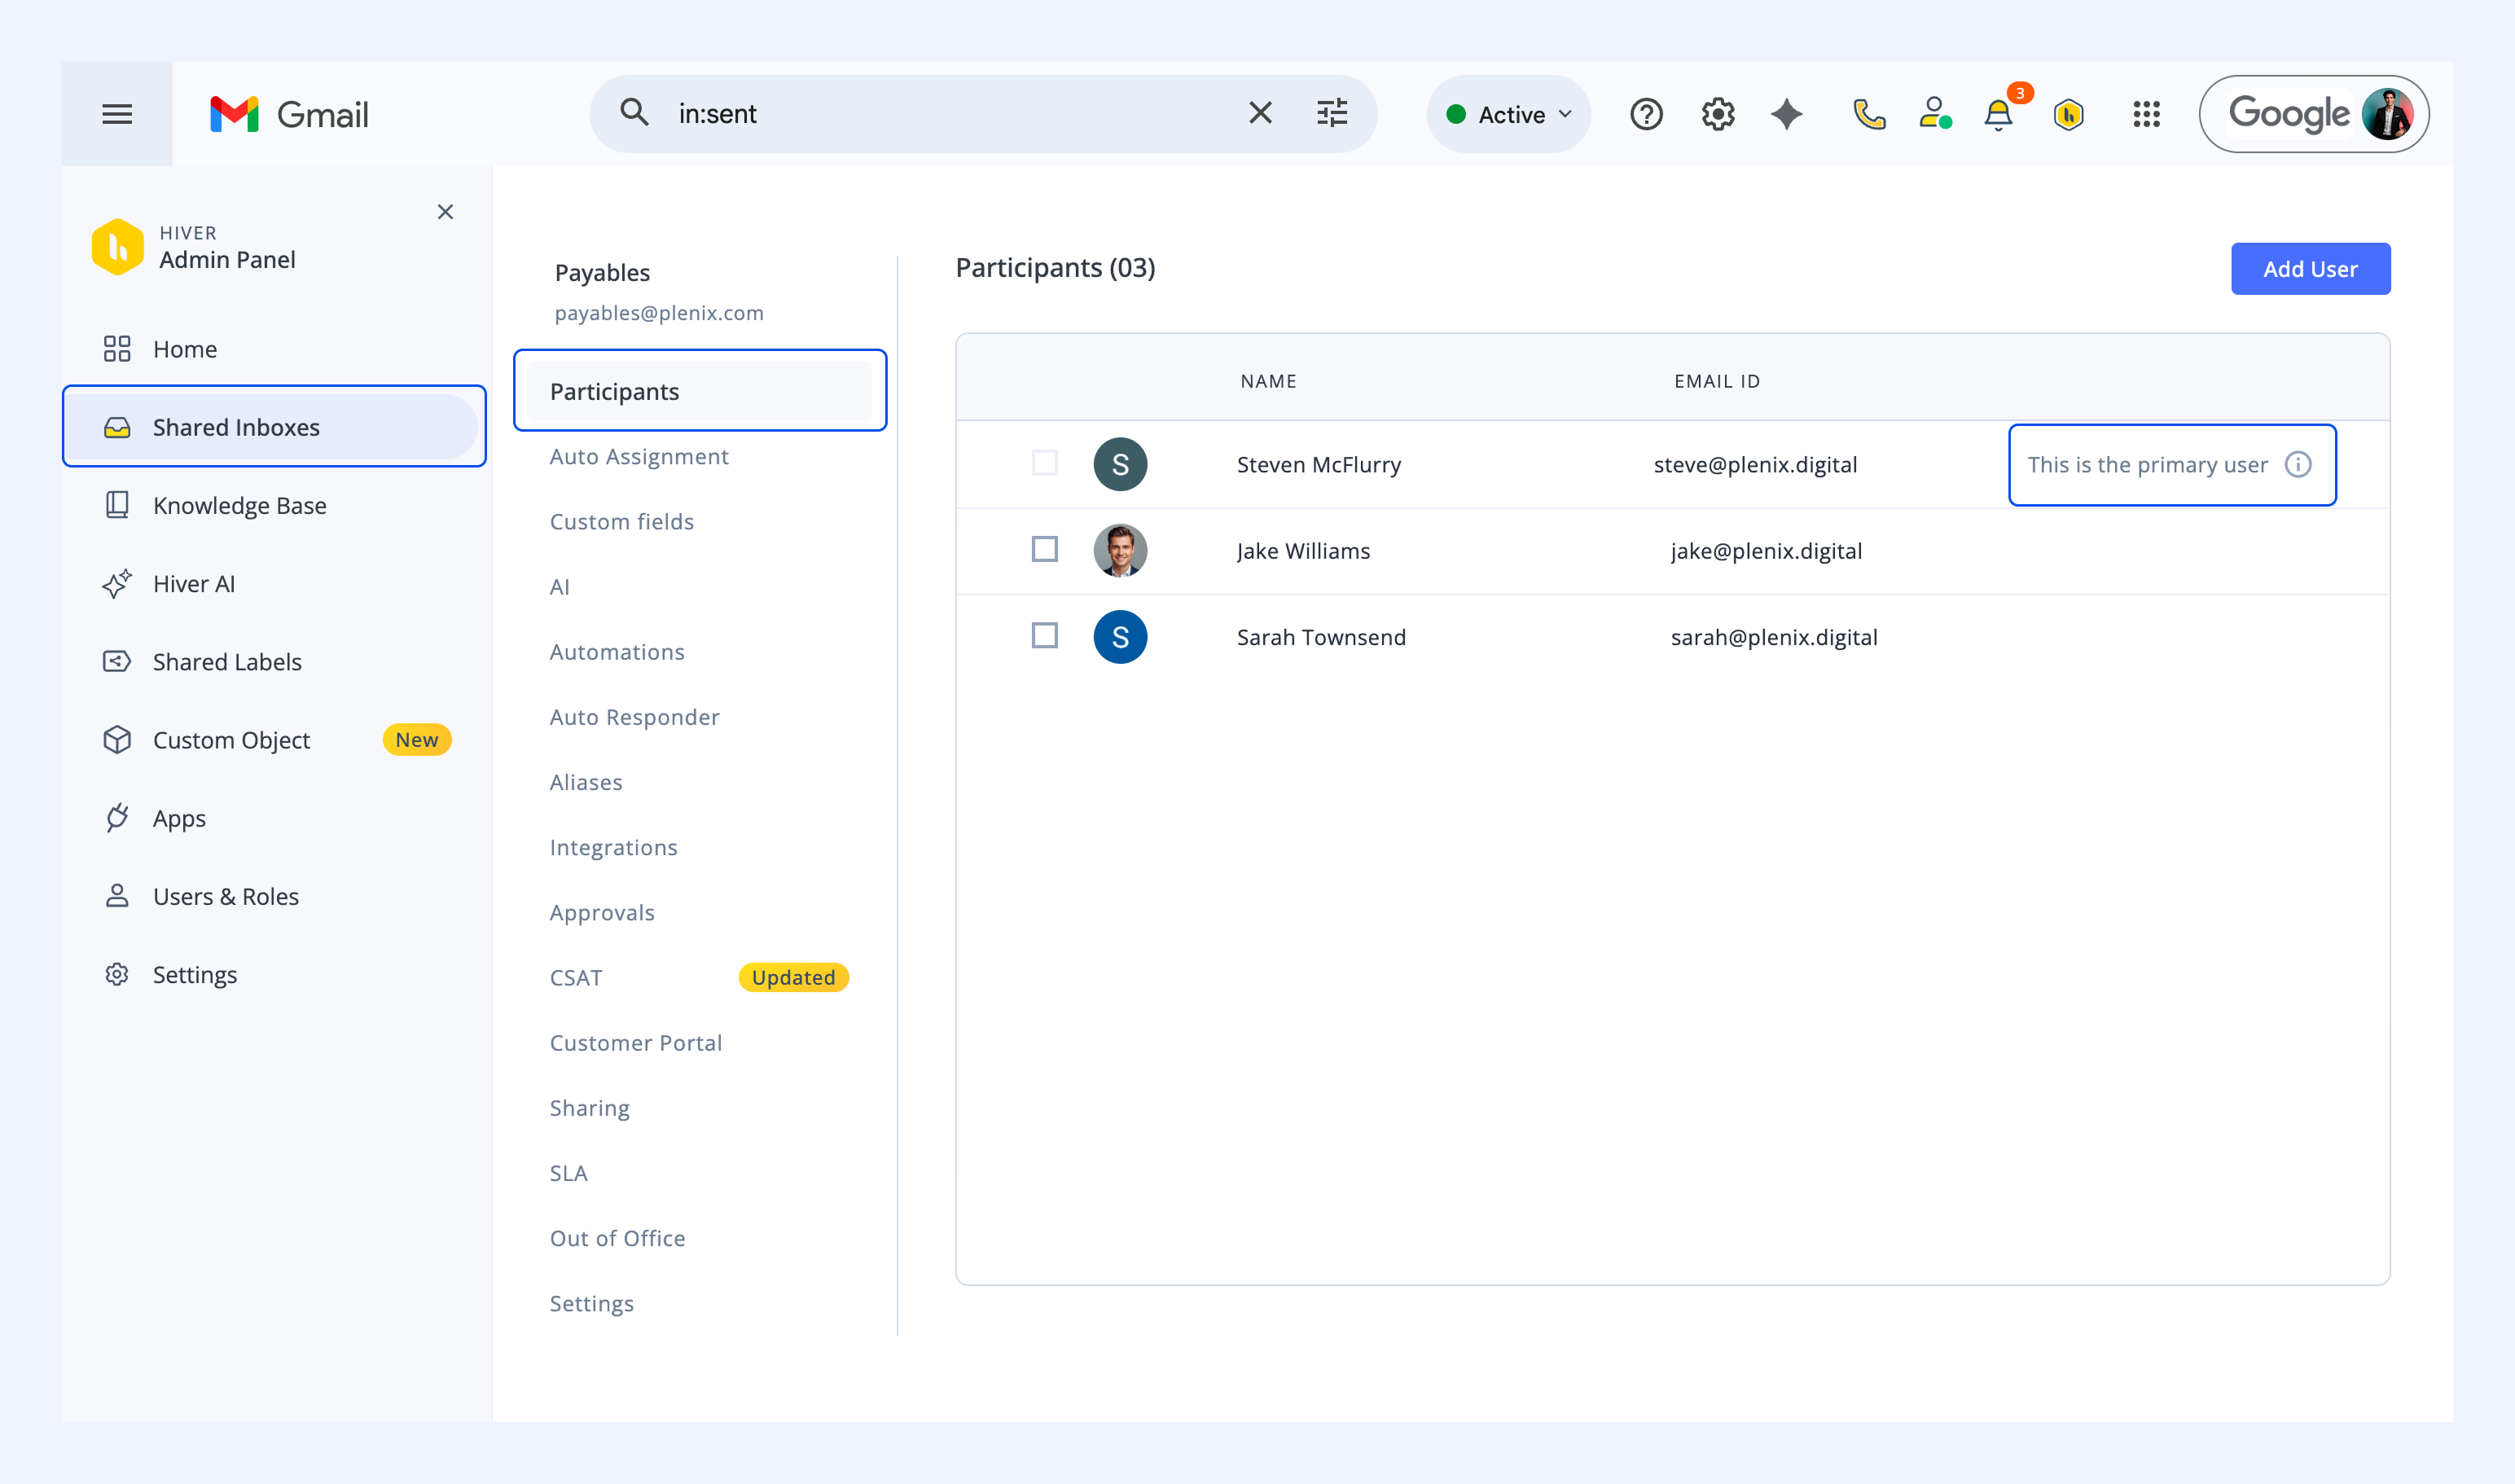
To identify your primary user, go to Admin Panel → Shared Inboxes, and select your Shared Inbox.
In the Participants tab, the primary user will be highlighted in the participant list.
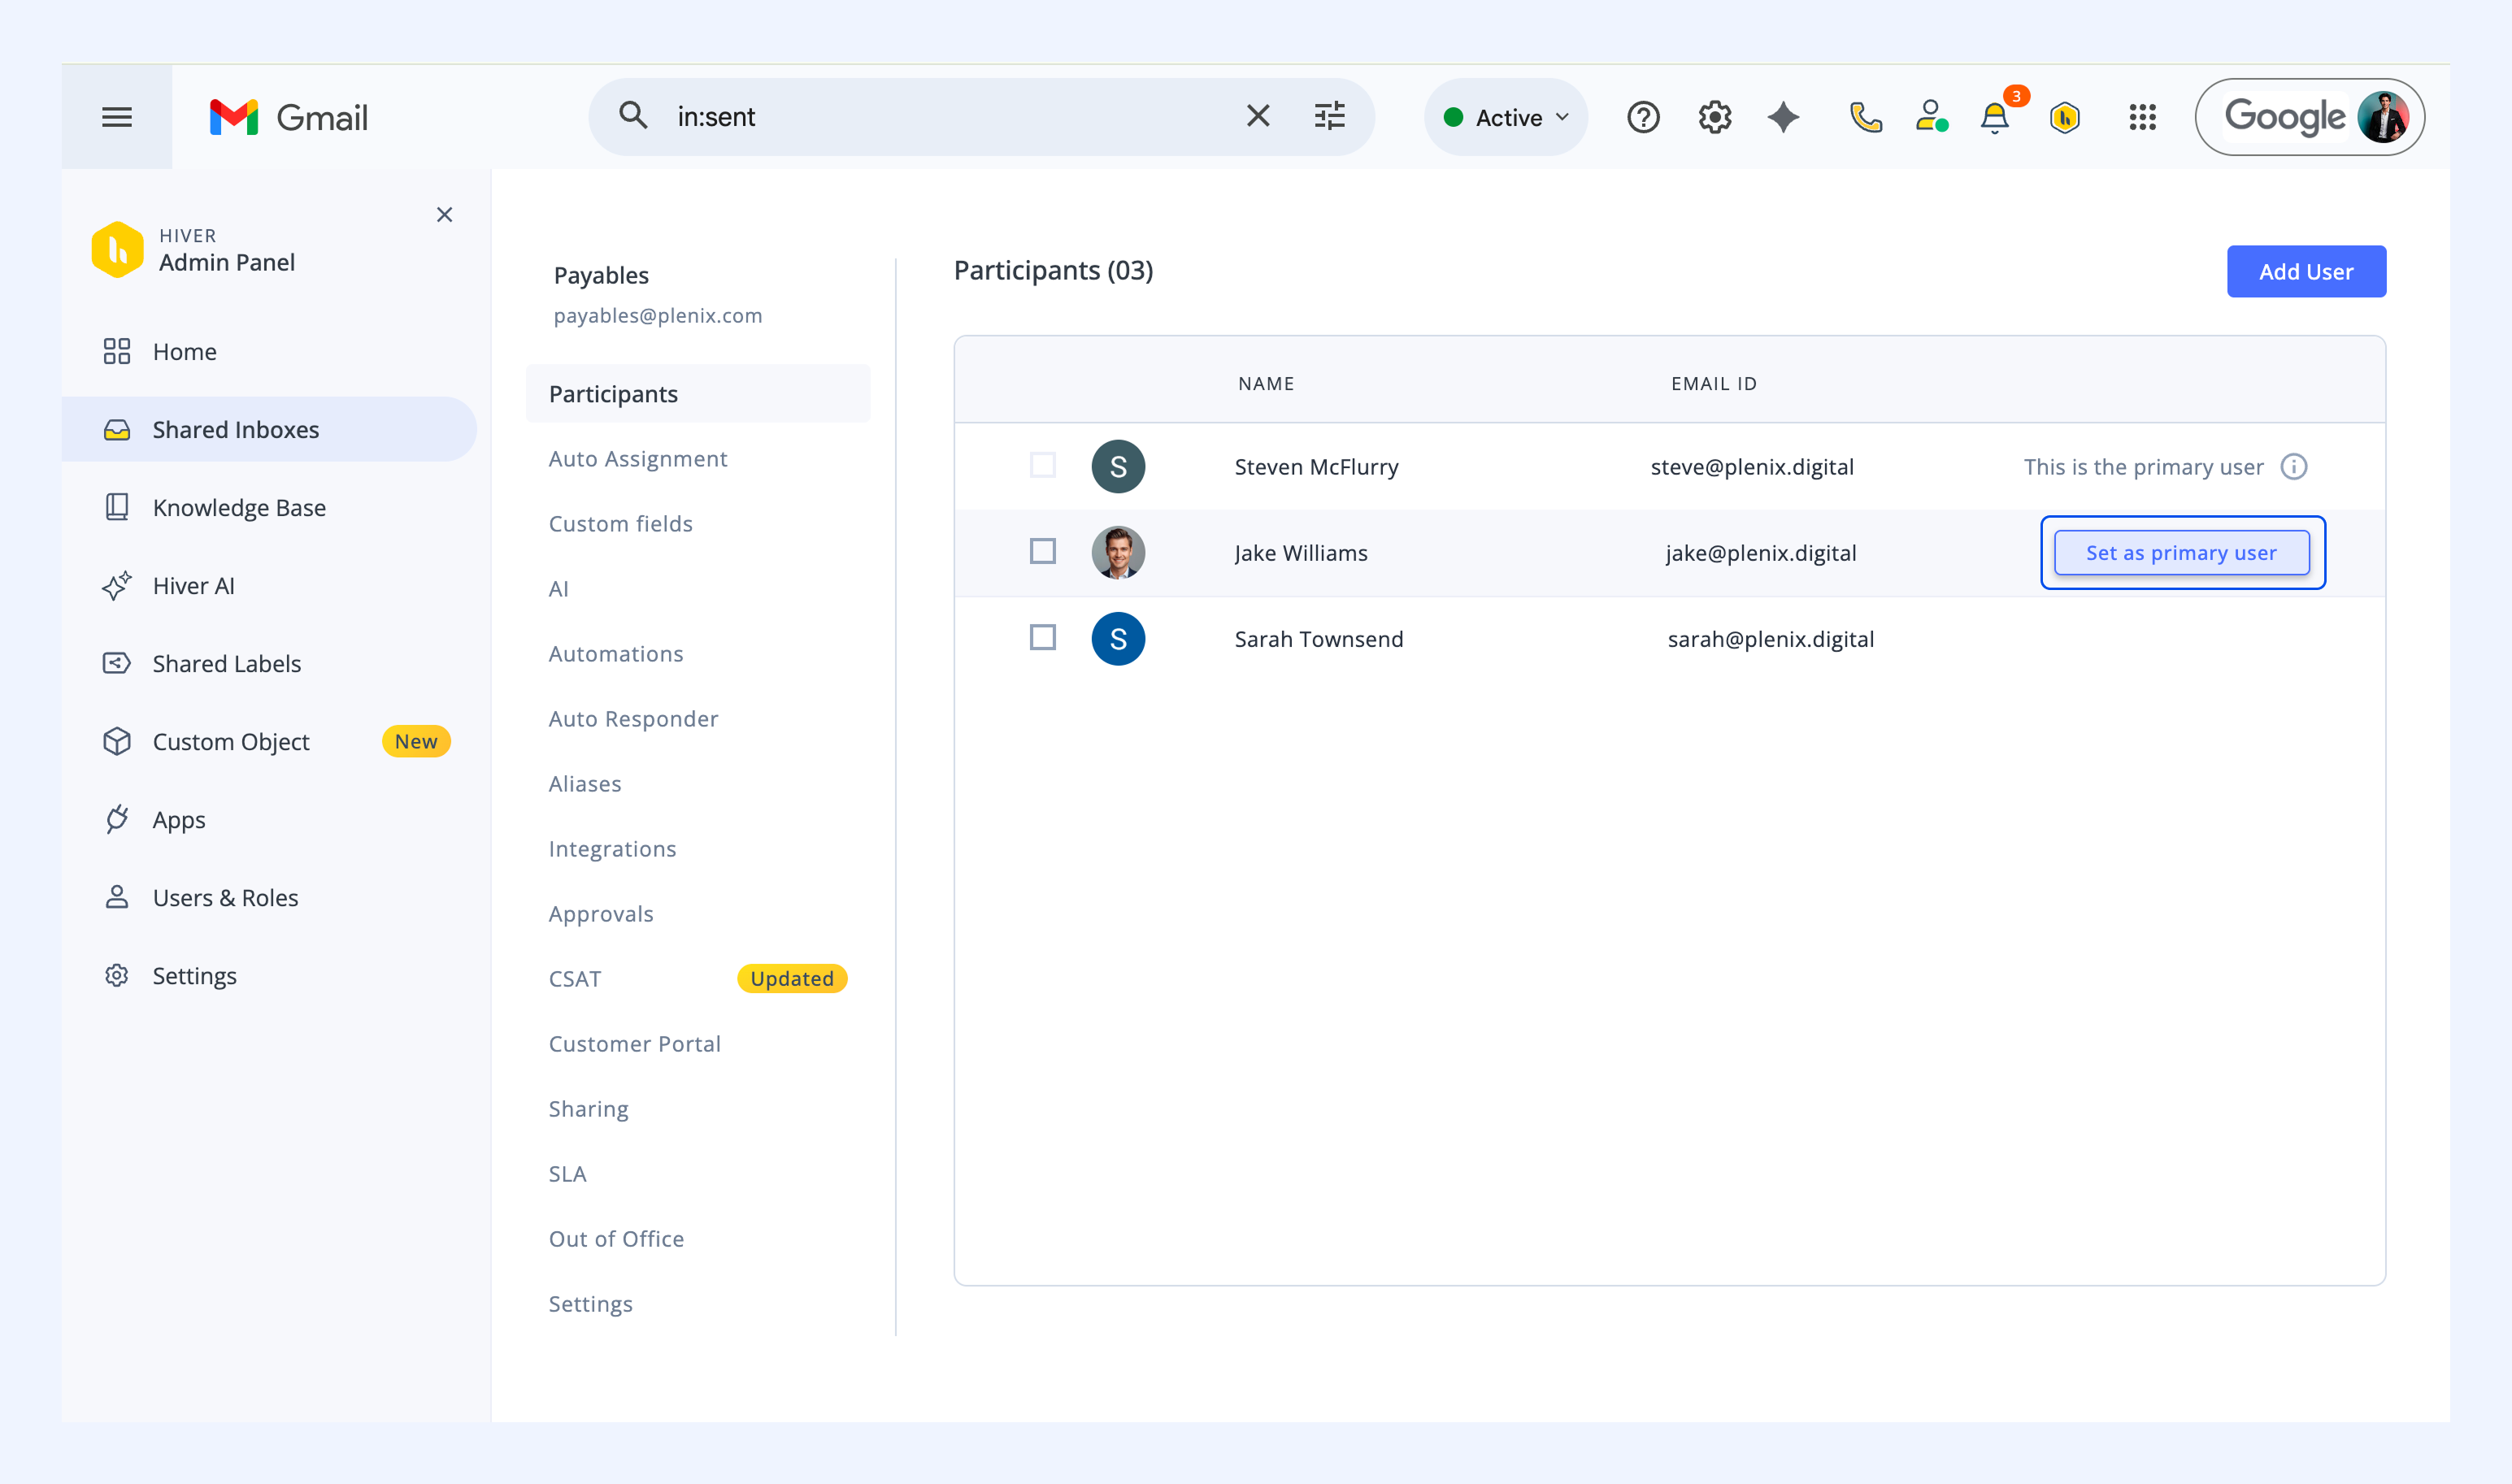
You can update the primary user by hovering over any participant in the Admin Panel and clicking Set as primary user. Make sure the new primary user has the correct Google Group settings configured, as listed in Prerequisites.
If you're still experiencing sync issues after checking these settings, contact support@hiverhq.com for assistance.
Can I change the email address of my Shared Inbox?
To change the email address associated with your Shared Inbox, please contact our support team at support@hiverhq.com. They'll help you update the email address while preserving your inbox settings and conversation history.
Can I add both my primary email and alias to the same Shared Inbox?
No. Hiver automatically detects aliases and treats them as a single account to prevent syncing issues. You'll get a notification if an alias is detected. If you think Hiver incorrectly identified an account as an alias, contact support@hiverhq.com.
Why does a member see “access lost to the Shared Inbox that you are part of”?
This happens when the Hiver admin is logged out of Hiver. While the admin is logged out, members lose access to the Shared Inbox and can’t assign emails to it.
To fix it:
1. Ask your Hiver admin to sign in to Hiver again and re-authenticate their account.
2. Once the admin is signed in, ask the affected member to hard refresh Gmail.