Getting started with Tickets
Tickets help you log customer requests as they come in and track them through to resolution.
Use Tickets when a request needs more than a quick reply, for example, when it requires investigation, approvals, collaboration with another team, or multiple follow-ups.
With Tickets, you can:
- Record key details about a customer request
- Track progress and share updates with customers from one place
- Collaborate work across teams without losing context
- Search and reference requests using a Ticket ID
Note: Tickets are currently available as a part of our early access program. To get this feature enabled on your account, reach out to support@hiverhq.com.
When to use Tickets
Tickets are useful when requests need to be tracked independently of a conversation or when teams receive requests from multiple sources. You can use Tickets to:
1. Log issues on behalf of customers
Sometimes support requests do not begin with a customer message. For instance, a customer calls the billing team saying they were charged twice for an order.
In this case, you can create a Ticket and start tracking the issue immediately with details like:
- Order ID
- Refund amount
- Priority
- Payment method
The billing team can then investigate, track progress, and resolve the request.
2. Track Web Form or Customer Portal submissions
Customers often submit refunds, IT access, feature, or onboarding requests through forms on a company’s website or customer portal.
Tickets help convert these submissions into trackable work items that teams can assign, manage, and resolve.
For example, refund-related requests can go to the billing inbox while bug reports and feature requests can be routed to the support inbox.
3. Manage requests from multiple sources
Support teams often receive requests from different systems and channels, such as:
- Phone calls
- Web Forms
- Customer Portals
- Internal escalations
Tickets provide one consistent way to track requests across channels and teams. This helps teams:
- Assign ownership
- Track progress
- Maintain request details in one place
- Share context across teams
Prerequisites
Tickets are available by default in all Email Inboxes. To set up and manage Tickets, you need:
- Admin access in Hiver
- At least one Email Shared Inbox
Setting up Ticket Forms
A Ticket Form is the form your team uses to create a Ticket. By default, a Ticket Form captures the following details:
- Title and description of the request
- Contact associated with the Ticket
- Connected Shared Inbox
- Custom Fields associated with the Ticket
All Custom Fields will be available to Tickets by default. You need to make a field available to Ticket Forms so it shows up when creating Tickets.
To add Custom Fields to a Ticket Form,
1. Go to Admin Panel → Shared Inboxes → Email Inbox, select an inbox and choose Custom Fields.
2. Open or create a Custom Field with the required details.
3. Under Availability settings, enable Show in Ticket Forms.
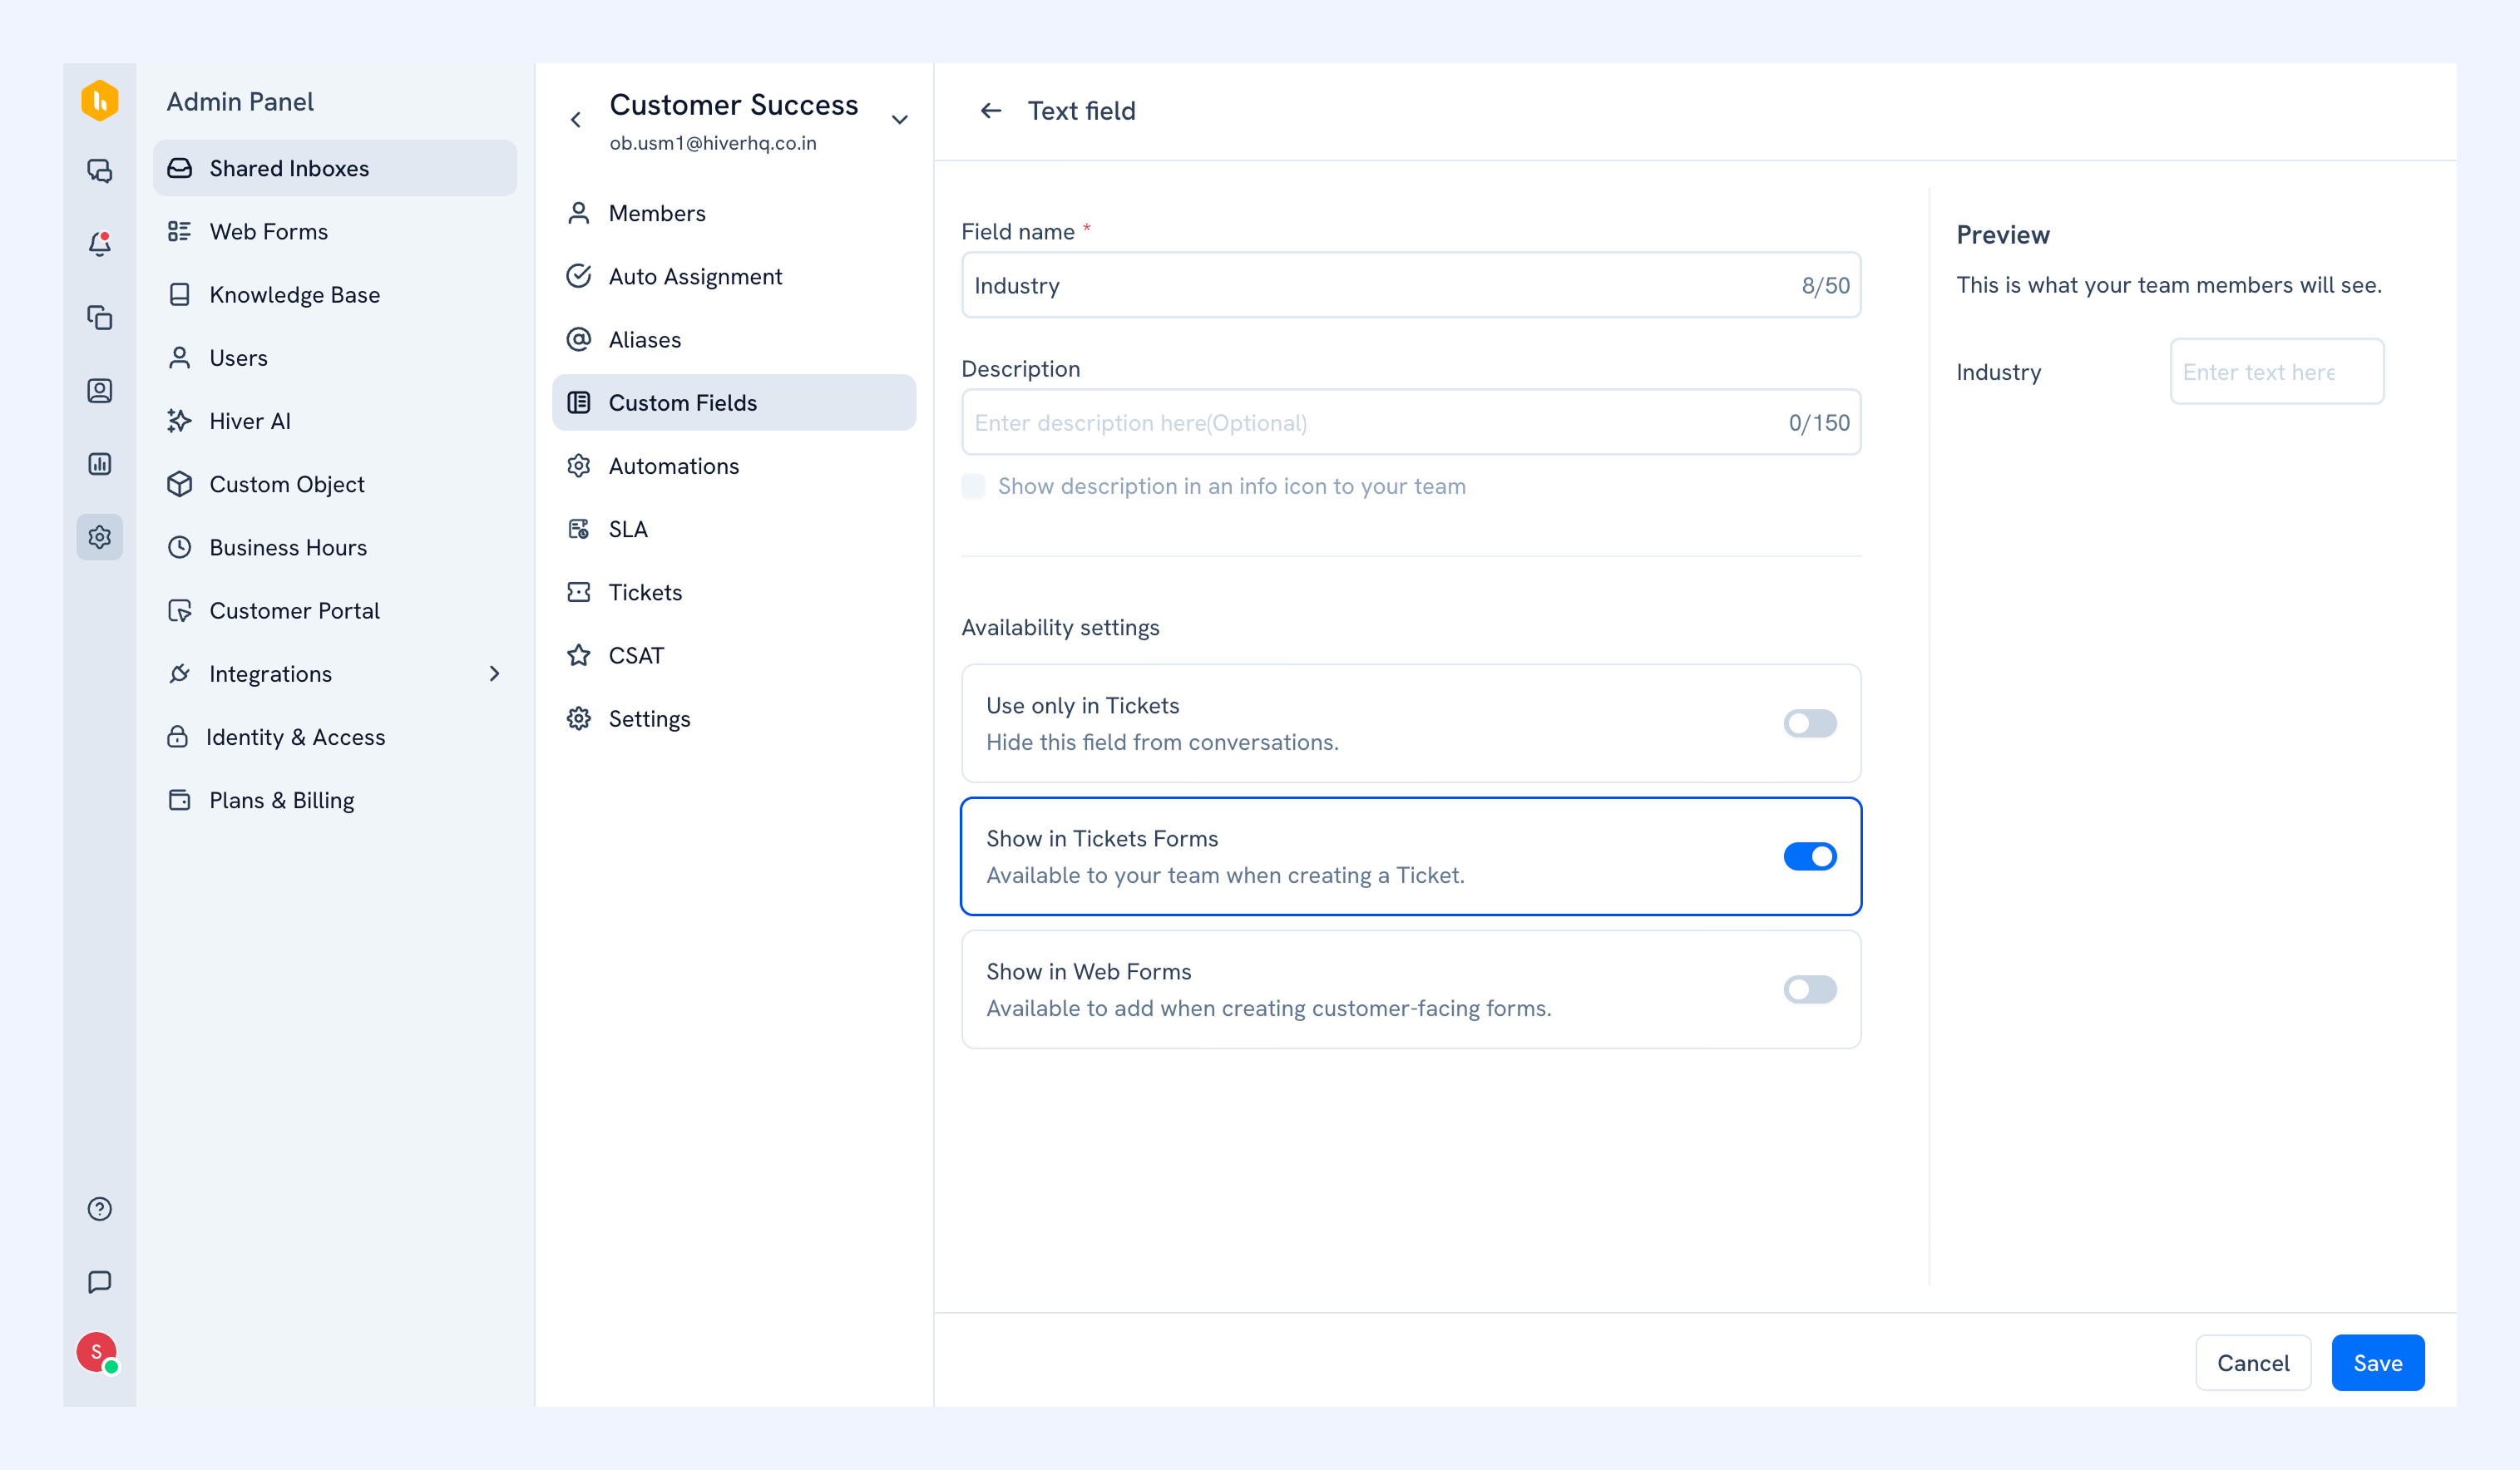
4. To use the Custom Field only in Tickets, enable Use only in Tickets.
5. Click Save once done.
Note: Fields are inbox-specific, which means a Ticket Form can only use fields created for that inbox. For instance, if you create a field under the Billing inbox, that field can only appear in Ticket Forms associated with the Billing inbox. This allows each team to collect information relevant to their workflow.
Creating Tickets
From scratch
To log a new Ticket:
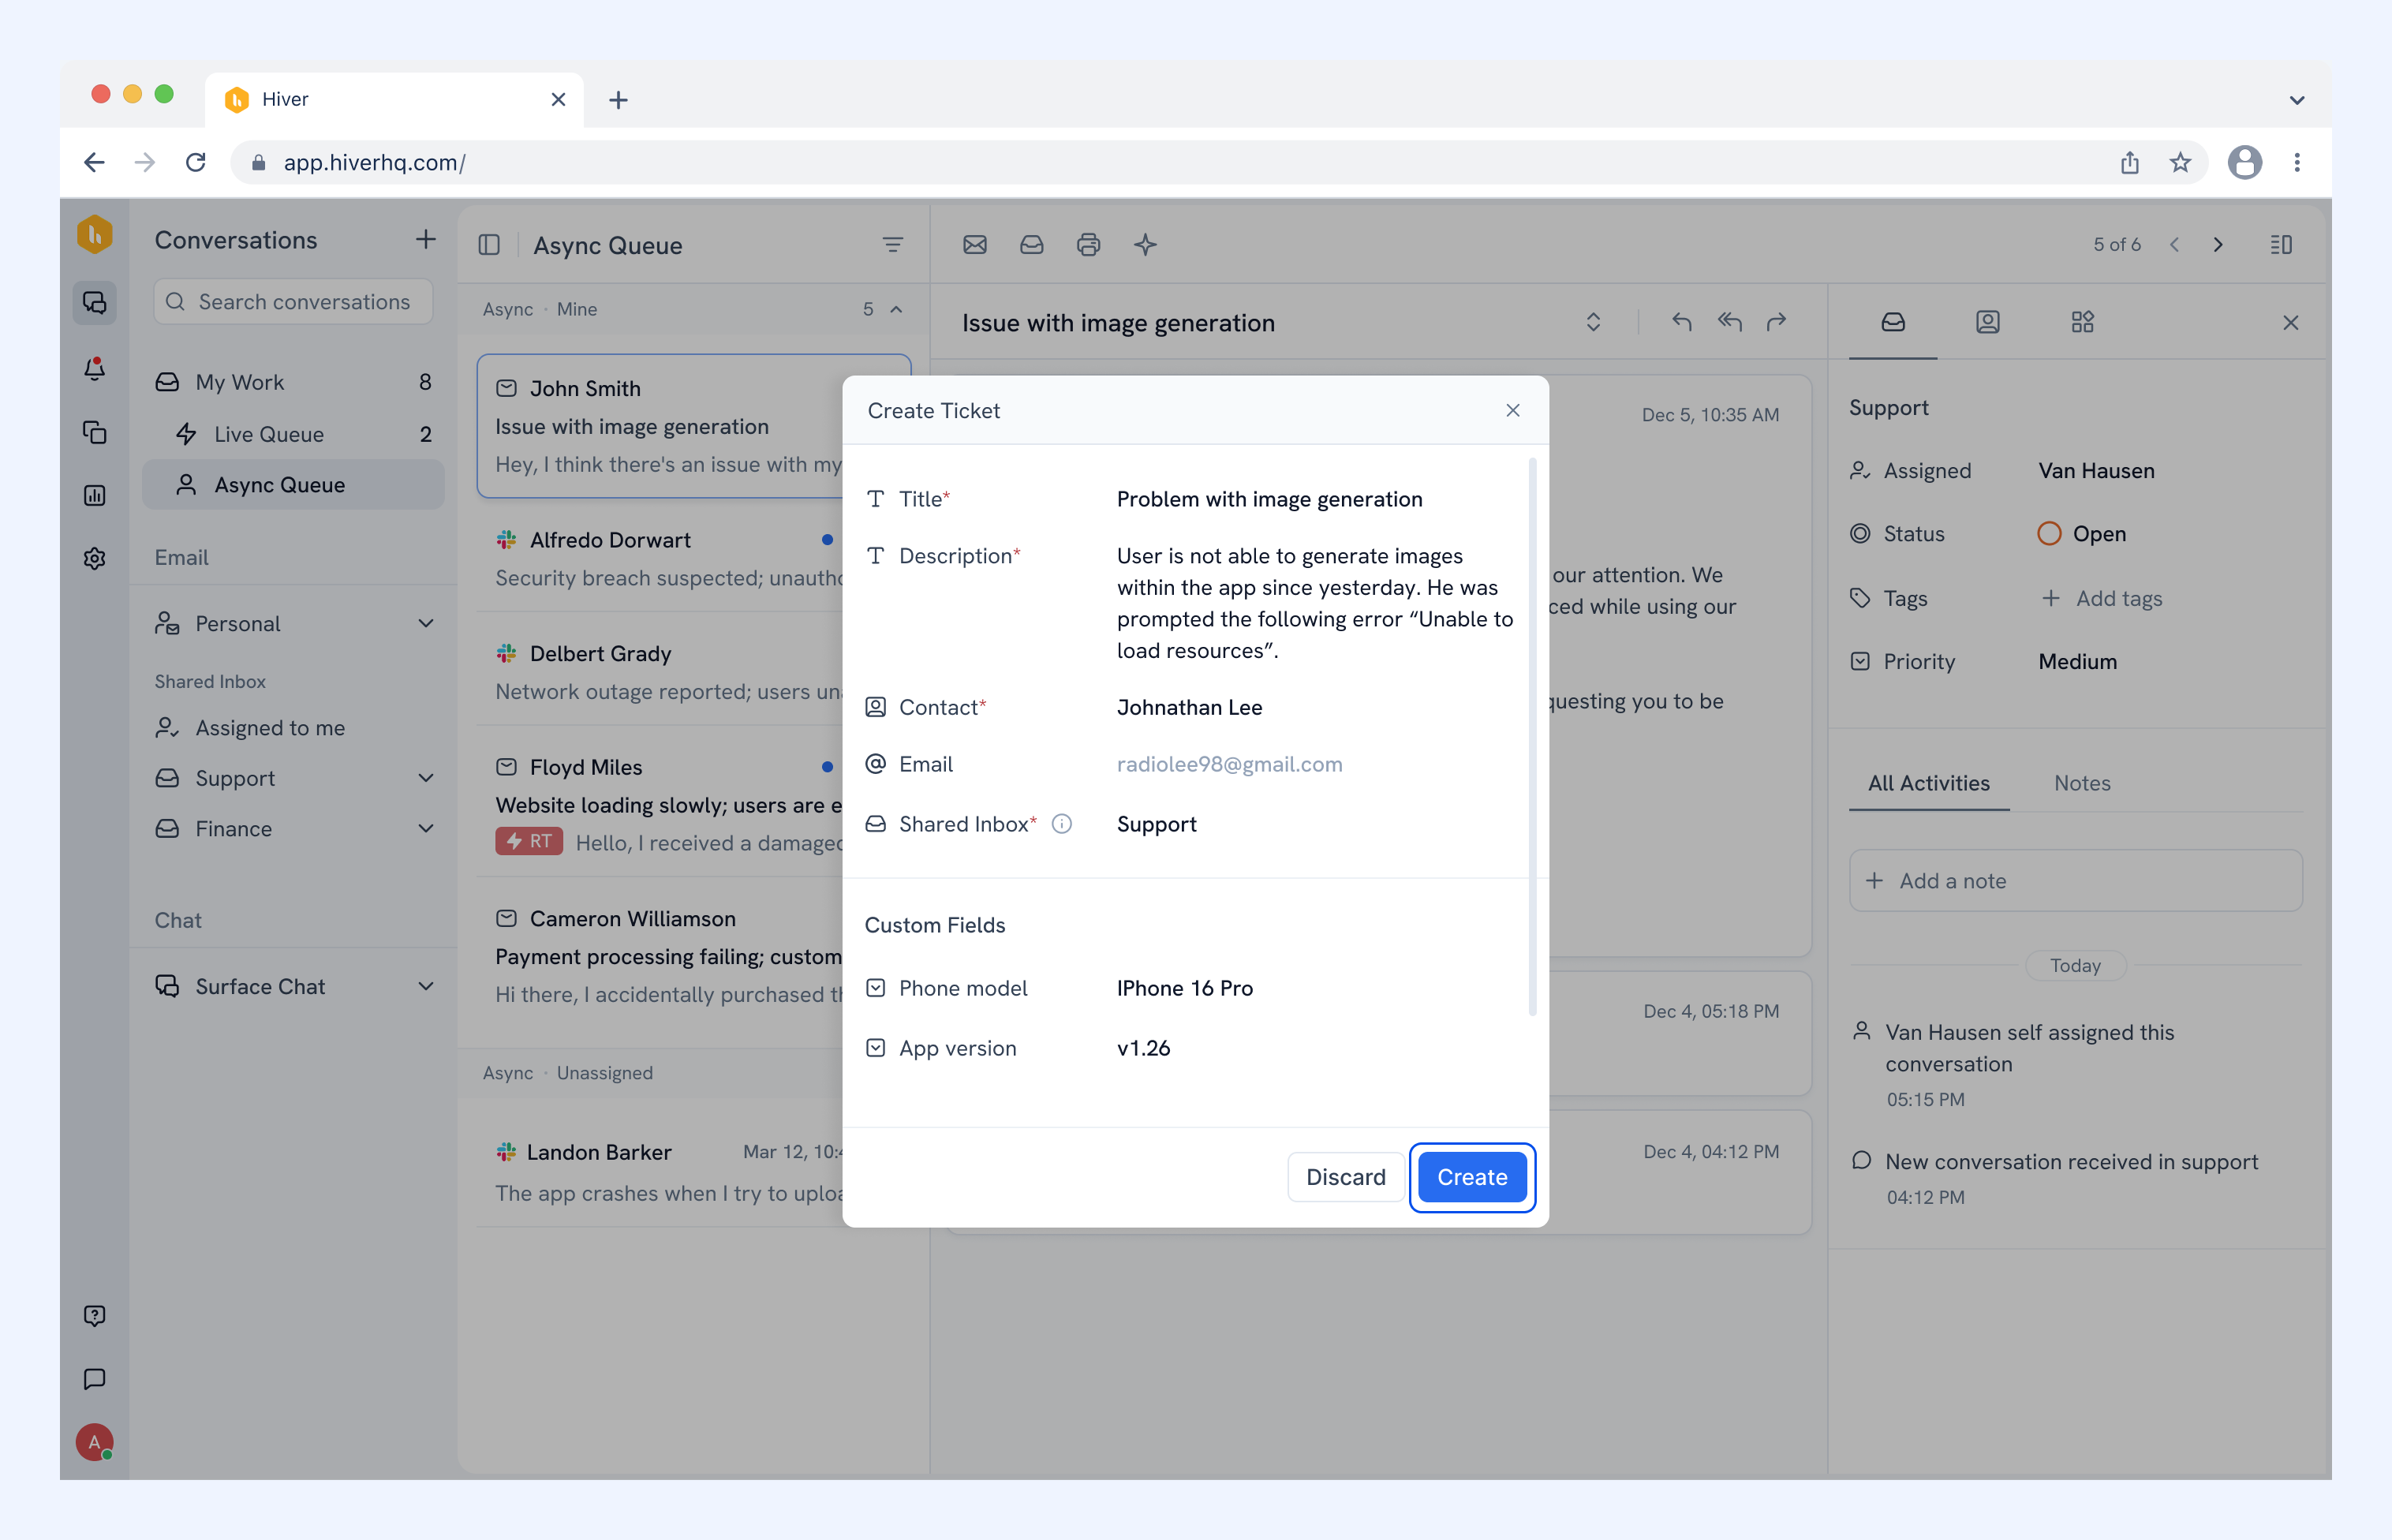
1. Click the + button in the Conversations tab and select Create Ticket.
.png)
2. Fill in the Ticket title and description.
3. Select the contact you want to create the Ticket for.
.png)
4. Choose the Shared Inbox you want to add the Ticket to.
.png)
5. Fill in the Custom Fields that appear and click Create.
From Web Forms or Customer Portal
Whenever a visitor fills in a Web Form, the submission is automatically captured as a Ticket and routed to the right inbox. Learn more about setting up Web Forms.
.png)
Converting conversations into Tickets
To convert a conversation into a Ticket,
1. Click the Convert to Ticket icon.
.png)
2. In the Ticket Form, add a description, fill any additional Custom Fields, and click Create.
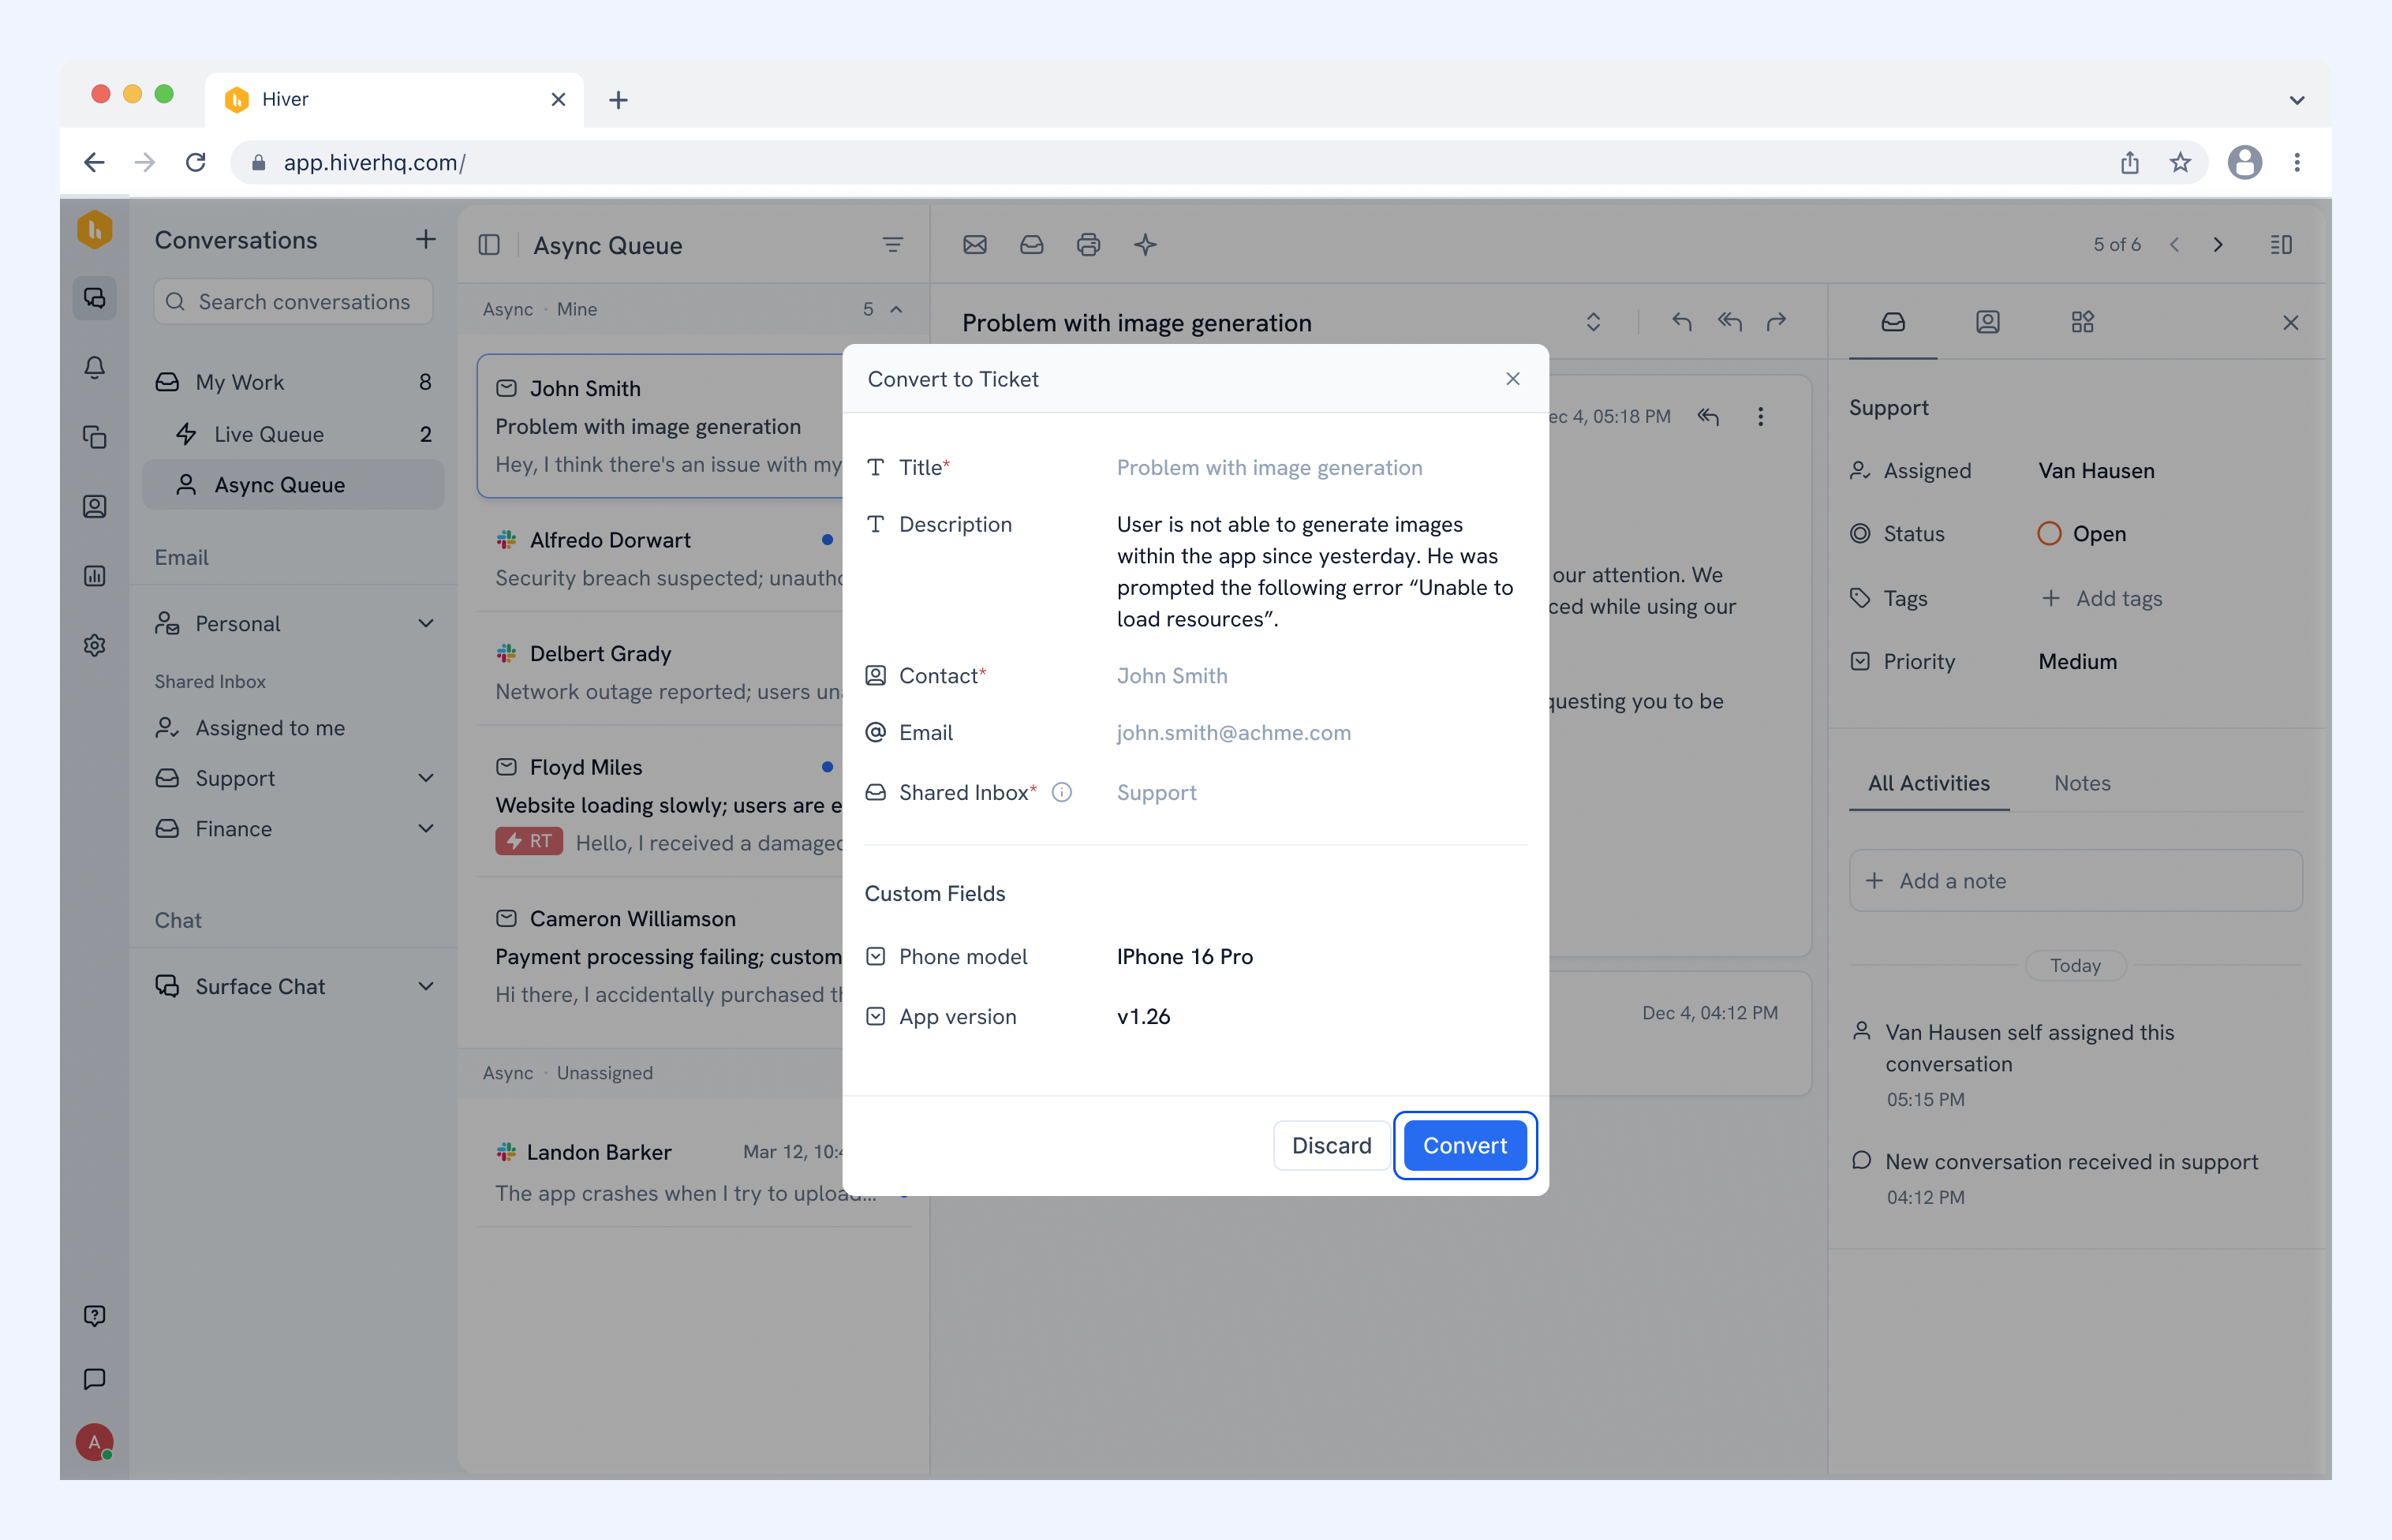
Note:
- By default, the Ticket title, customer’s name and email address, and Shared Inbox are automatically filled using details from the conversation.
- If the conversation exists in multiple Shared Inboxes, the inbox selection depends on where you initiate the conversion:
- From My Work: You can choose which Shared Inbox to create the Ticket in.
- From other views: The Shared Inbox you’re currently viewing is selected by default.
Managing Ticket settings
To manage Ticket settings, go to Admin Panel → Shared Inboxes → Email Inbox, select an inbox, and open Tickets.
From here, you choose to enable:
- Email notifications: Automatically send customers an email when a Ticket is created.
- Convert inbound conversations into Tickets: Automatically convert all new incoming conversations into Tickets.
.png)
Customizing Ticket email notifications
You can customize which Ticket details are included in the notification email, such as:
- Ticket title
- Ticket ID
- Status
- Assignee
- Custom Fields
To customize the notification:
1. Click the Customize email notification section.
2. Select the details you want to include. You can also add a message to accompany the ticket details.
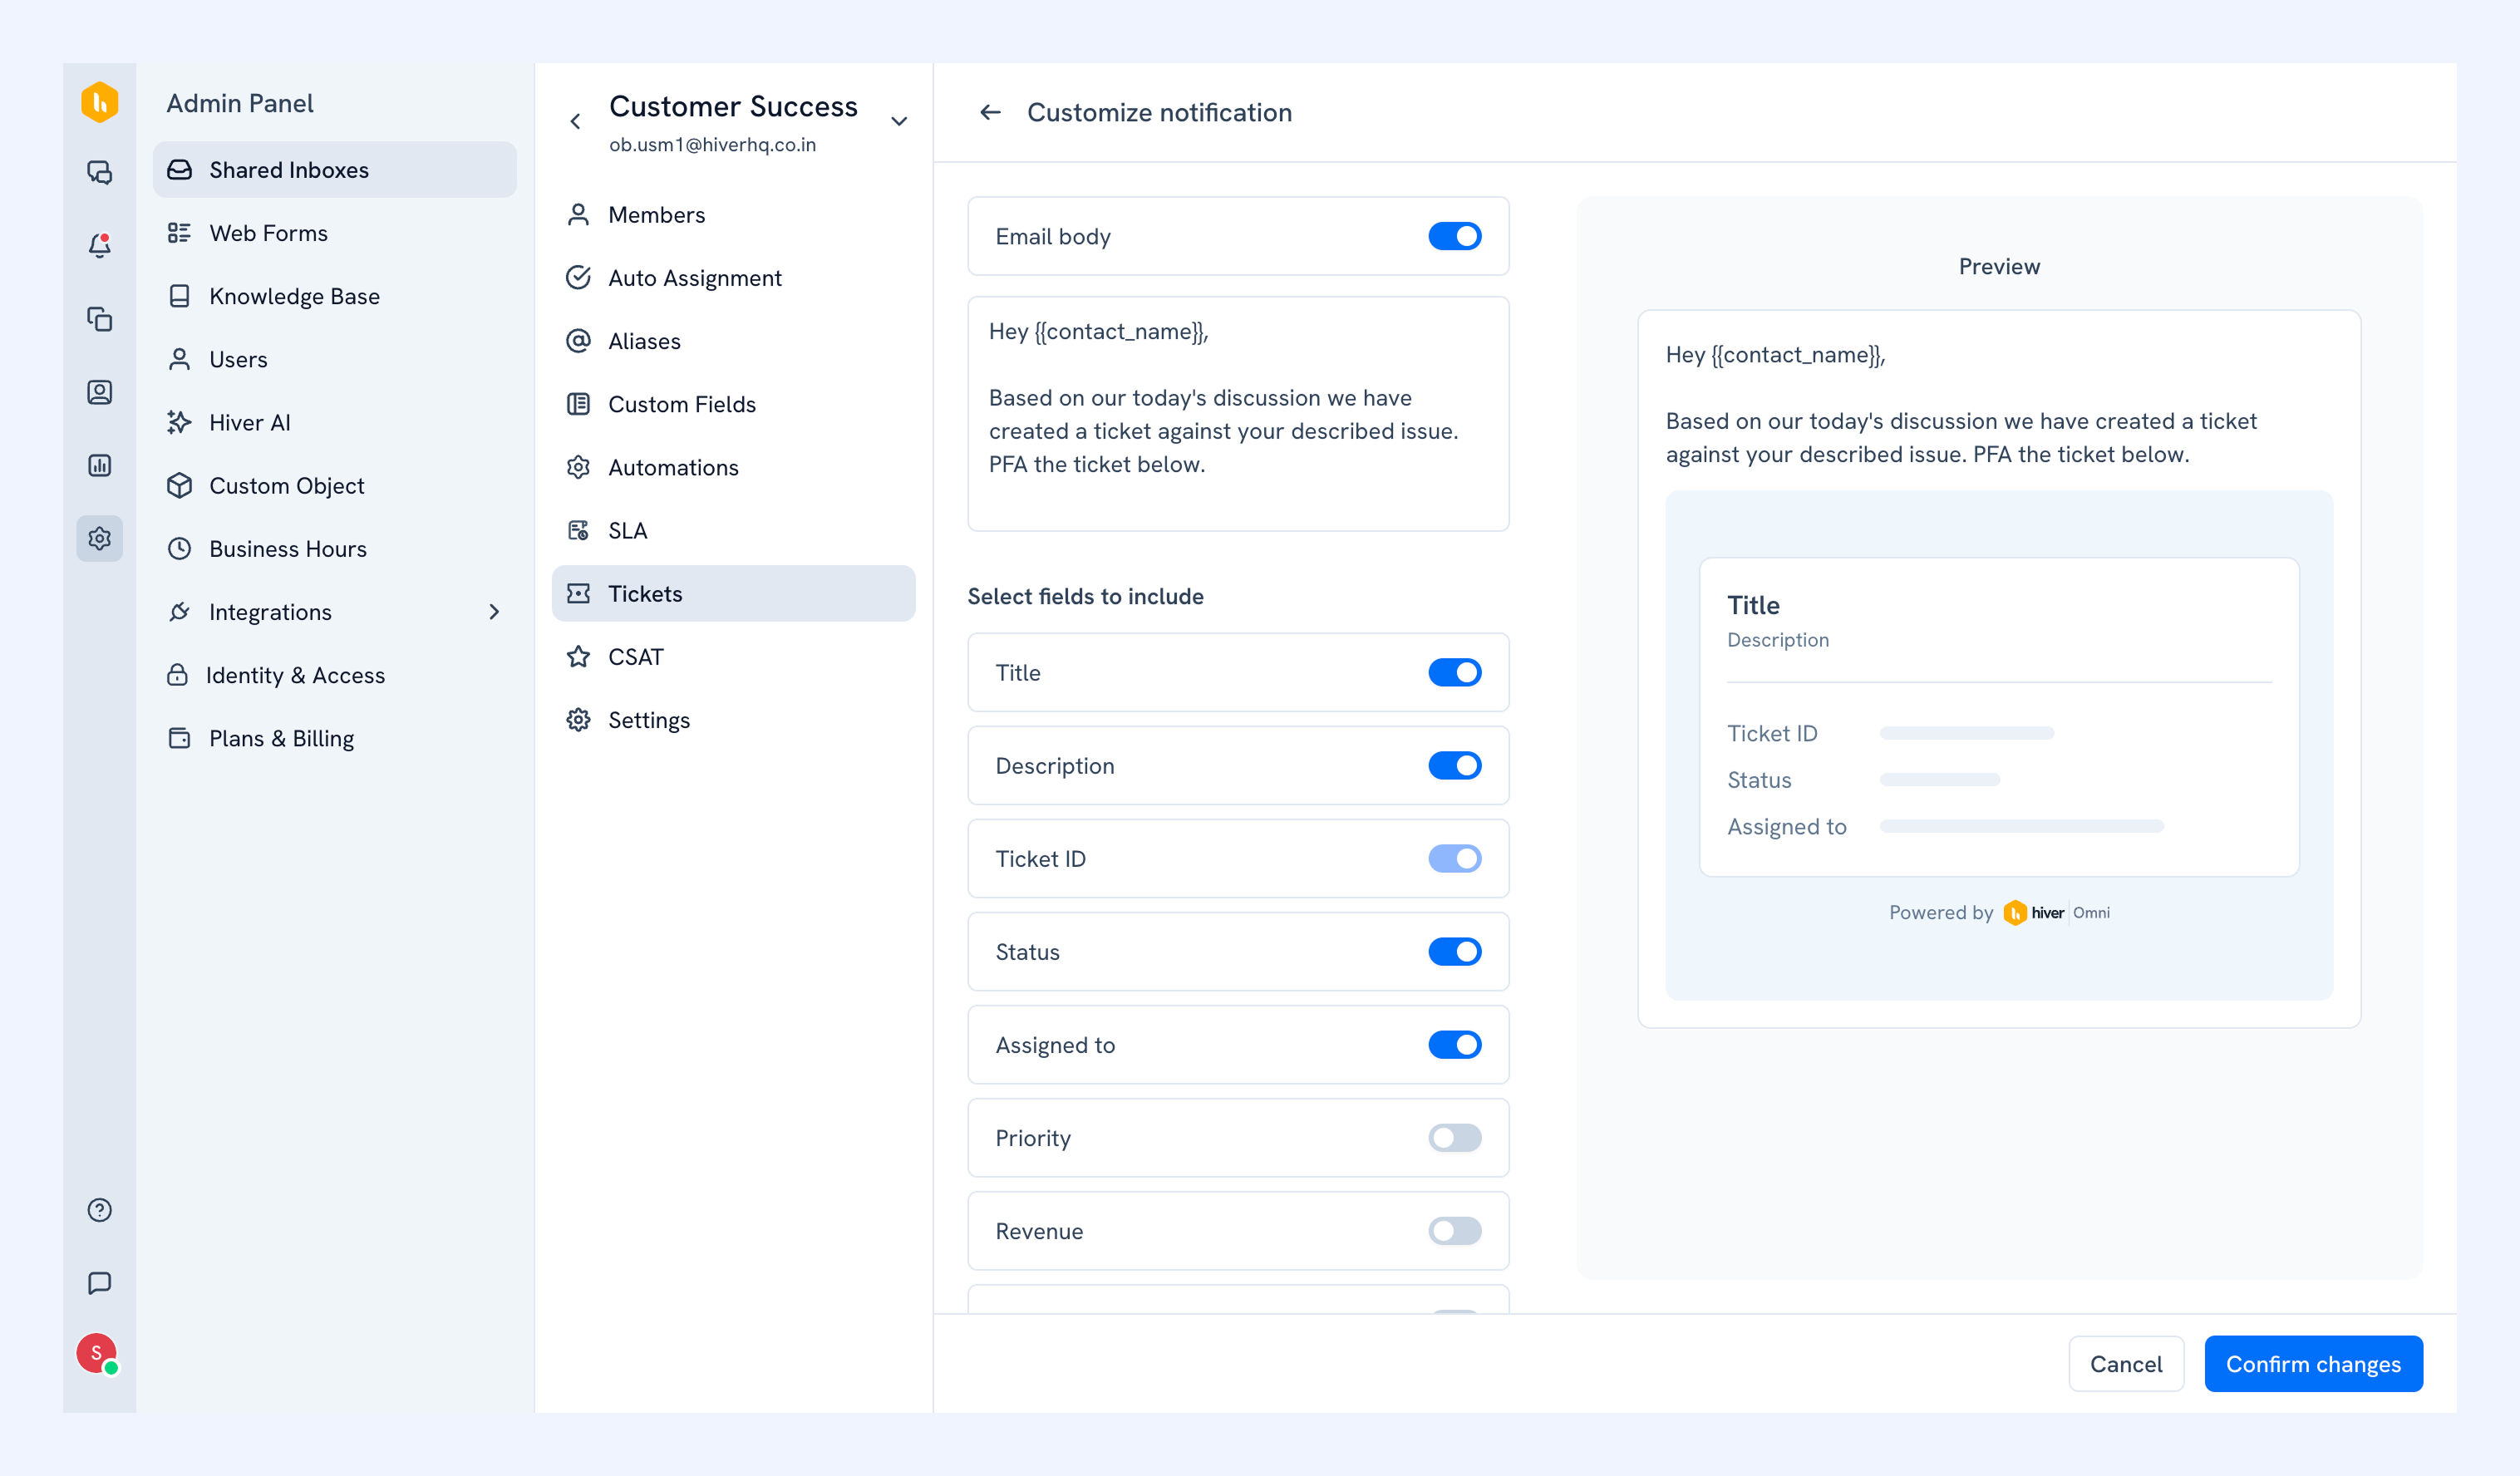
3. Click Confirm changes once done.
Accessing Tickets
You can access Tickets from My Work, or by going to the following Views:
- Tickets: All Tickets received by your team
- Mine: All Tickets and conversations assigned to you
- Team: All Tickets and conversations your team has received
You can also filter conversations by Tickets.
.png)
If you want to send a follow-up to a customer, you can reply directly from the Ticket. Replies sent from a Ticket are treated as outbound messages.
Note: Newest replies appear at the top of a Ticket by default. You can change this from Basic Settings.
Related articles
FAQs
Q. Can a Ticket exist without a conversation?
Yes. Tickets can be created manually by agents even when no customer conversation exists, such as for phone calls, walk-ins, or internal escalations.
Q. Are Tickets tied to a Shared Inbox?
Yes. Every Ticket is associated with a Shared Inbox. The inbox determines which team manages the Ticket and which Custom Fields are available in the Ticket Form.
Q. Can different teams have different Ticket Forms?
Yes. Ticket Forms use Custom Fields configured for a specific inbox, so each team can collect information relevant to their workflow.
Q. Can customers receive email updates for Tickets?
Yes. Admins can enable automatic email notifications when Tickets are created and customize which Ticket details are included in those emails.
Q. Can agents reply to customers from a Ticket?
Yes. Agents can send follow-ups directly from a Ticket. Replies are treated as outbound messages.
Q. Can Web Form submissions automatically create Tickets?
Yes. Web Form submissions can be captured as Tickets so teams can route, assign, and track customer requests more efficiently.