Zoho CRM Integration with Hiver
Zoho CRM is a comprehensive customer relationship management platform that helps businesses manage sales, marketing, and customer support in one place. It offers a complete view of customer relationships and helps teams automate everyday tasks, improve communication, and close deals faster.
By connecting Zoho CRM with Hiver, your team can view contact and deal details directly within Gmail without switching between tabs or losing context. This integration brings your CRM data into your inbox so you can respond faster and work more efficiently.
Why integrate Zoho CRM with Hiver
- Access CRM context instantly: View contact and deal details right beside your email conversations.
- Respond faster: Eliminate the time spent on switching between tabs and ensure every reply is backed by accurate customer data.
- Stay aligned across teams: Give sales, support, and account managers a shared view of customer history.
Supported capabilities
This integration allows you to access essential Zoho CRM data and take quick actions directly from your inbox:
- View CRM details in conversations: See key contact and deal information within Hiver’s Apps panel.
- Access contact details: View name, email, phone number, and associated account without leaving your inbox.
- View deal information: Check deal name, amount, and related records right inside Gmail.
- Open records in Zoho CRM: Use direct links to view or edit records in Zoho CRM when you need more context.
Coming soon:
- Search Zoho CRM records within Hiver's right panel
- Create and update contact and deal information from Hiver
Prerequisites
Before setting up the Zoho CRM integration, ensure you have:
- Admin access in Hiver
- A Zoho CRM account with administrator access
- Active Zoho CRM subscription (Professional, Enterprise, or Ultimate edition)
Setting up the Hiver and Zoho integration
Step 1: Start setup in Hiver
- Go to Admin panel → Integrations → Apps → Zoho.
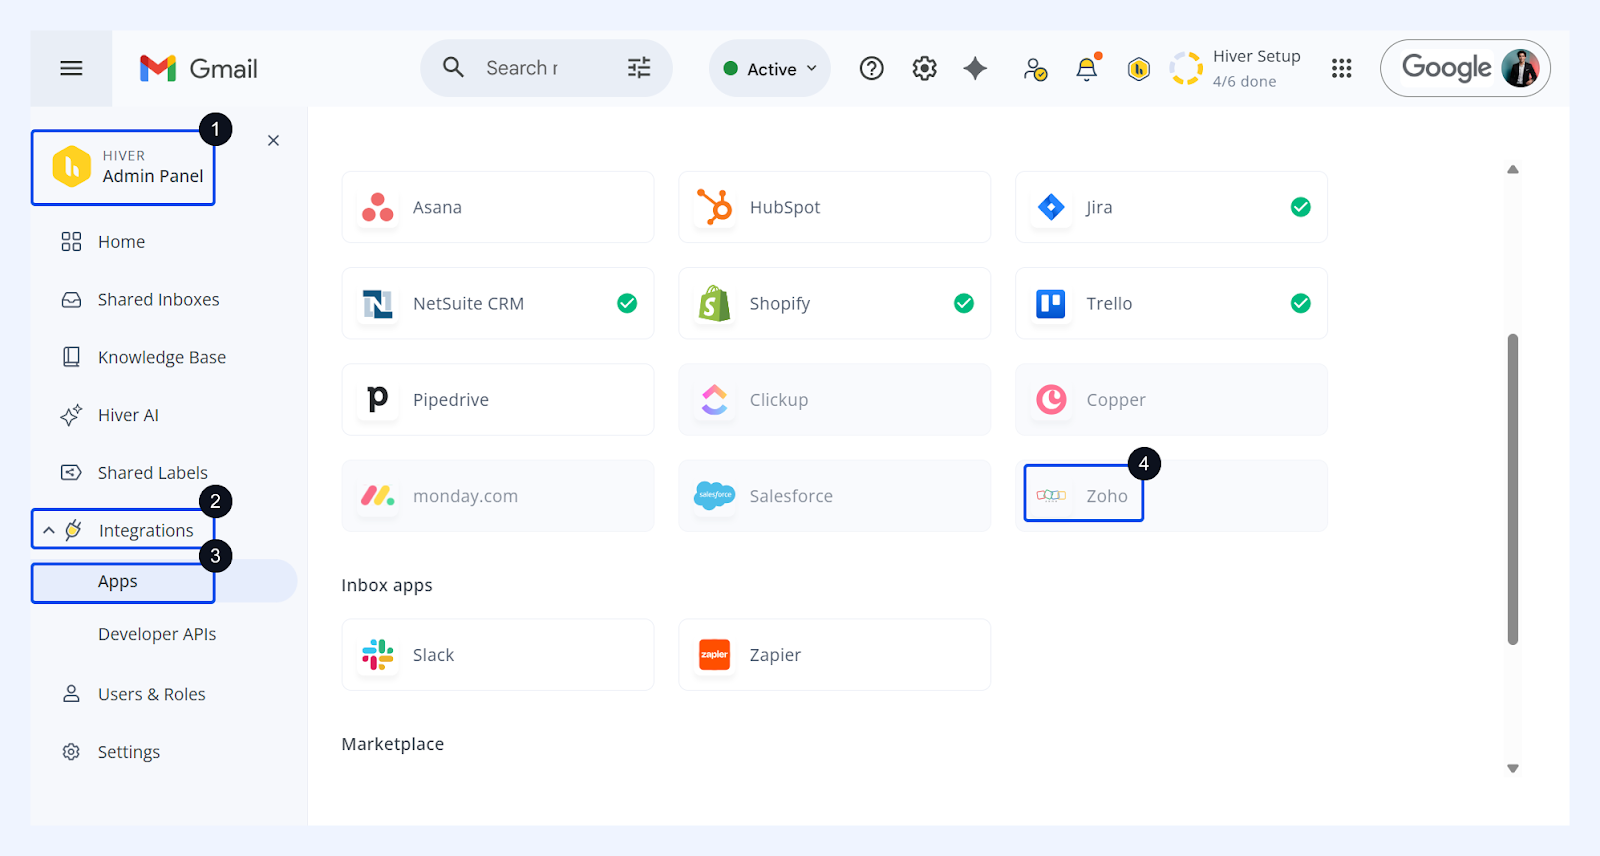
2. Go through the capabilities of the Zoho App and click Start setup whenever you’re ready.
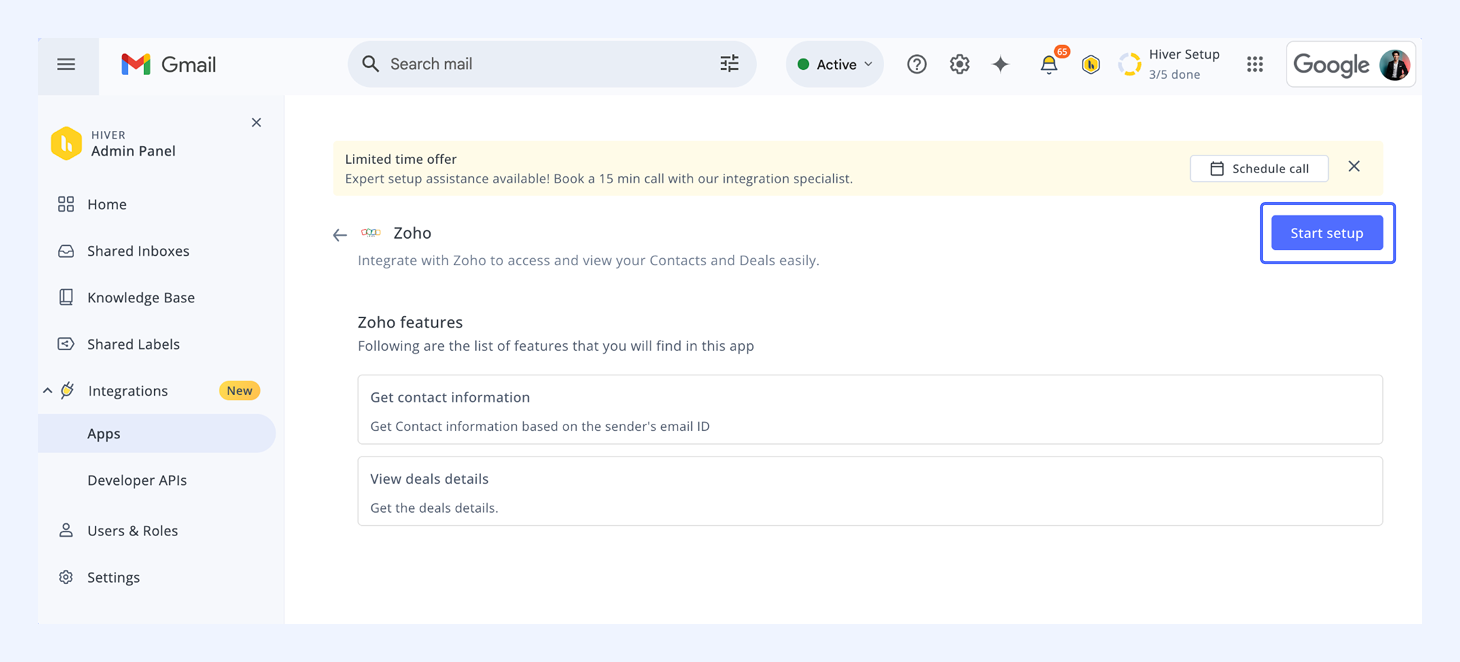
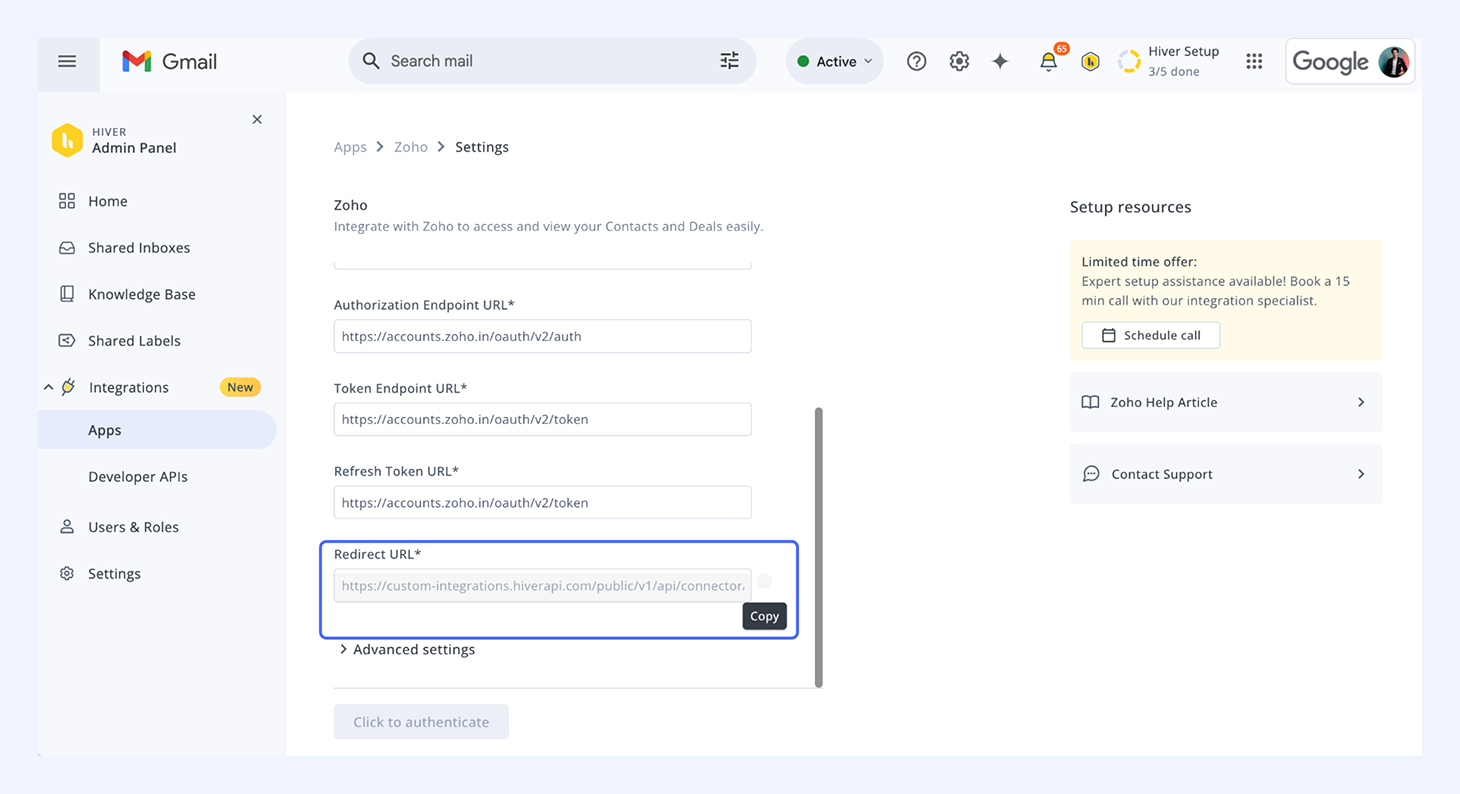
3. You’ll reach the Settings page, where you’ll see the following details:
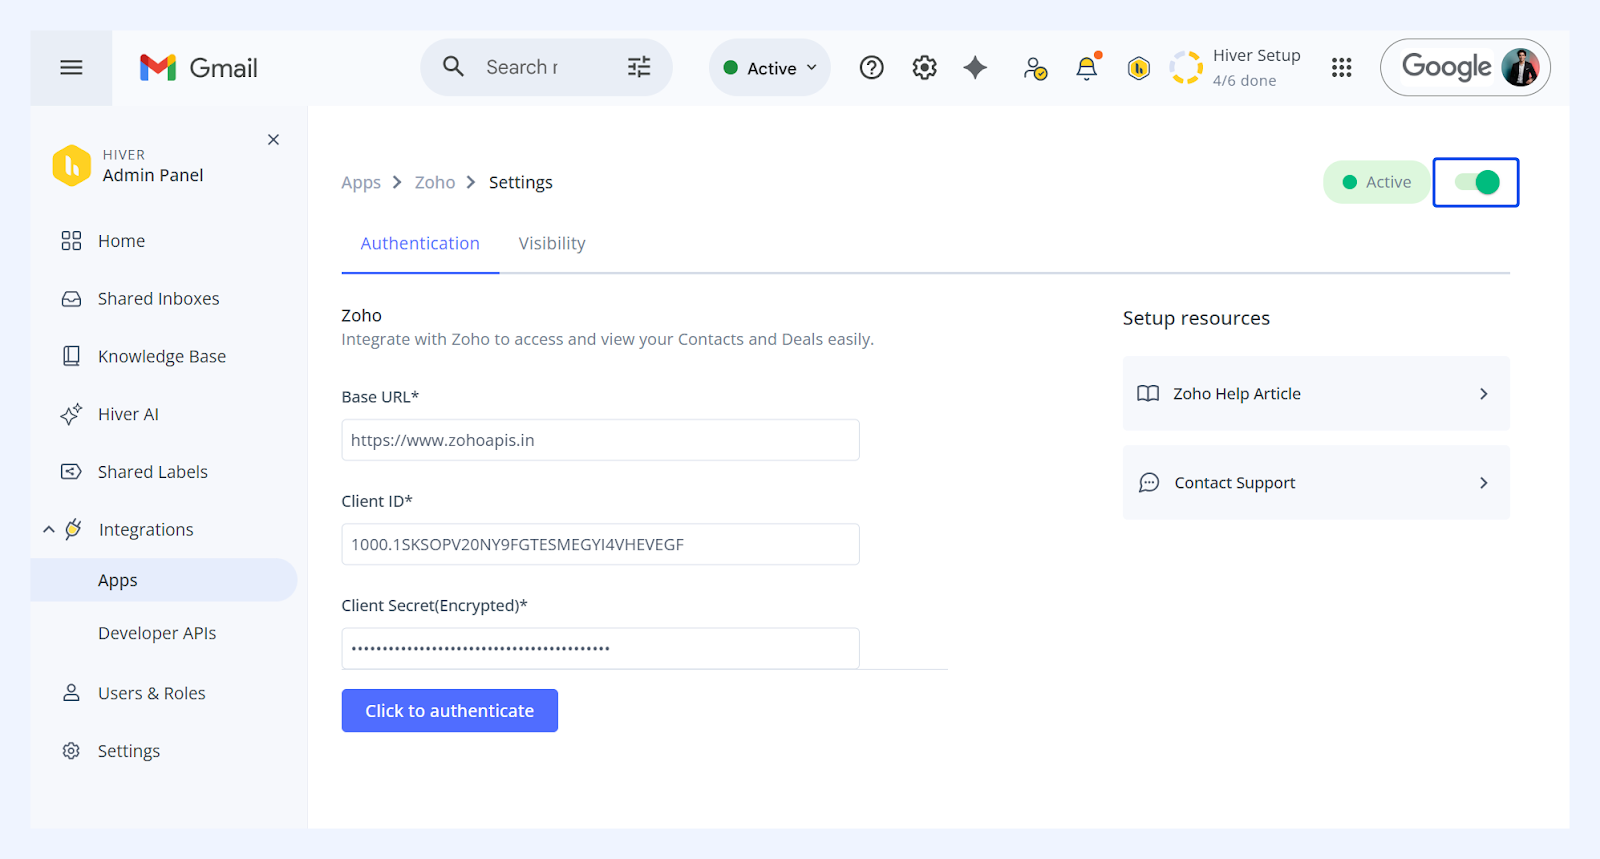
- Client ID
- Client Secret
- Redirect URL - copy this. You’ll need it when creating your app in Zoho CRM.
Step 2: Get your client credentials from Zoho CRM
You’ll now create an app in Zoho’s API console to obtain your Client ID and Client Secret.
- Log in to your Zoho CRM account as an administrator.
- Click the Settings (gear icon) in the top-right corner.
- Under Developer Hub, select APIs and SDKs.
- At the top, choose SDKs.
- Under Server-side SDKs, click Register New Client.
- Select Server-based Applications as the client type.
- Fill in the following details:
- Client Name: Hiver Integration
- Homepage URL: Your company website URL
- Authorized Redirect URIs: Paste the Redirection URL copied from Hiver
- Click Create.
- You’ll receive a Client ID and Client Secret - copy both.
Step 3: Complete the setup in Hiver
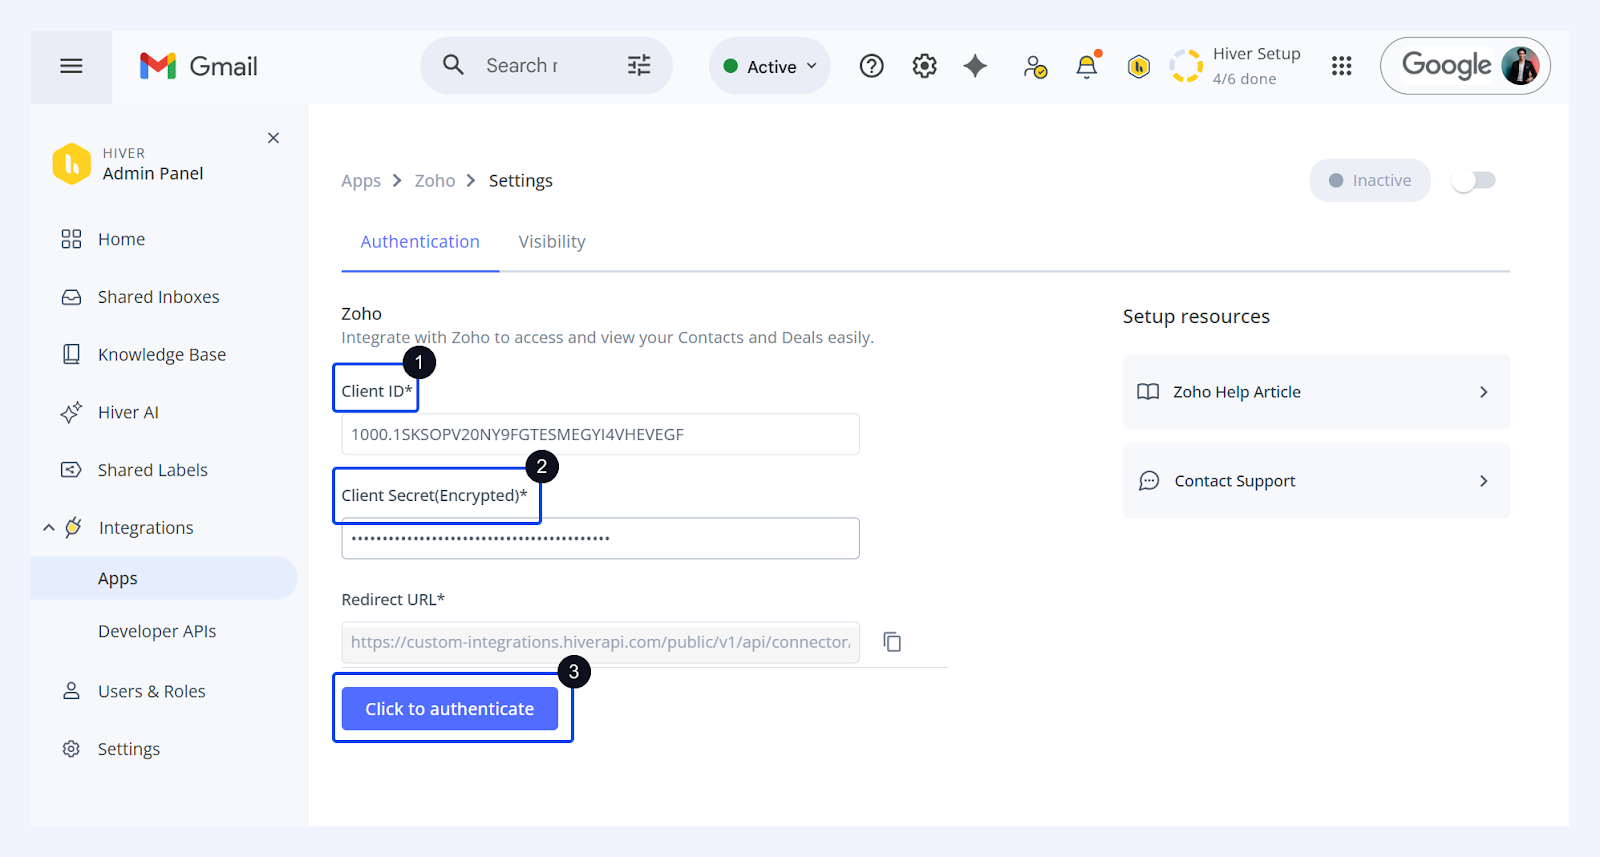
- Go back to the Zoho CRM App settings page in Hiver.
- Enter the Client ID and Client Secret you just copied.
- Select Click to authenticate to connect Zoho CRM and Hiver.
4. You’ll be redirected to Zoho CRM’s authorization page.
5. Review the requested permissions and click Accept.
6. After authorization, you’ll be redirected back to Hiver.
Step 4: Configure Zoho in Hiver for your team
Once the authentication is successful:
- Locate Zoho CRM under the list of installed apps.
- Turn on the toggle to enable the app.
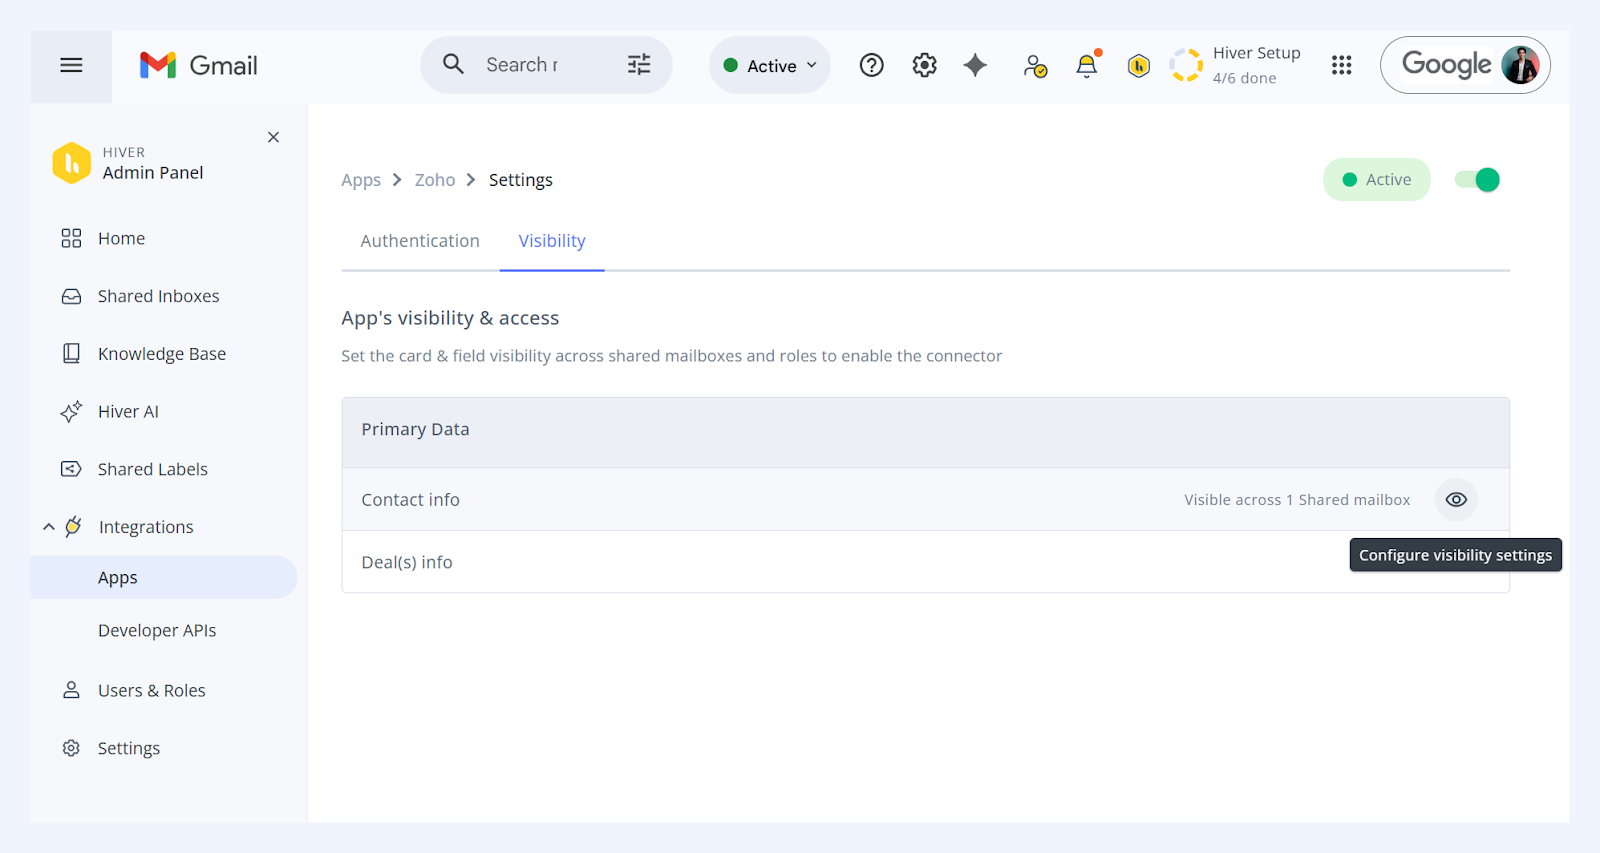
3. In the Visibility tab, you’ll see two cards available:
- Contact info
- Deal(s) info
4. To manage visibility, click the Configure visibility settings icon (eye icon) next to each card.
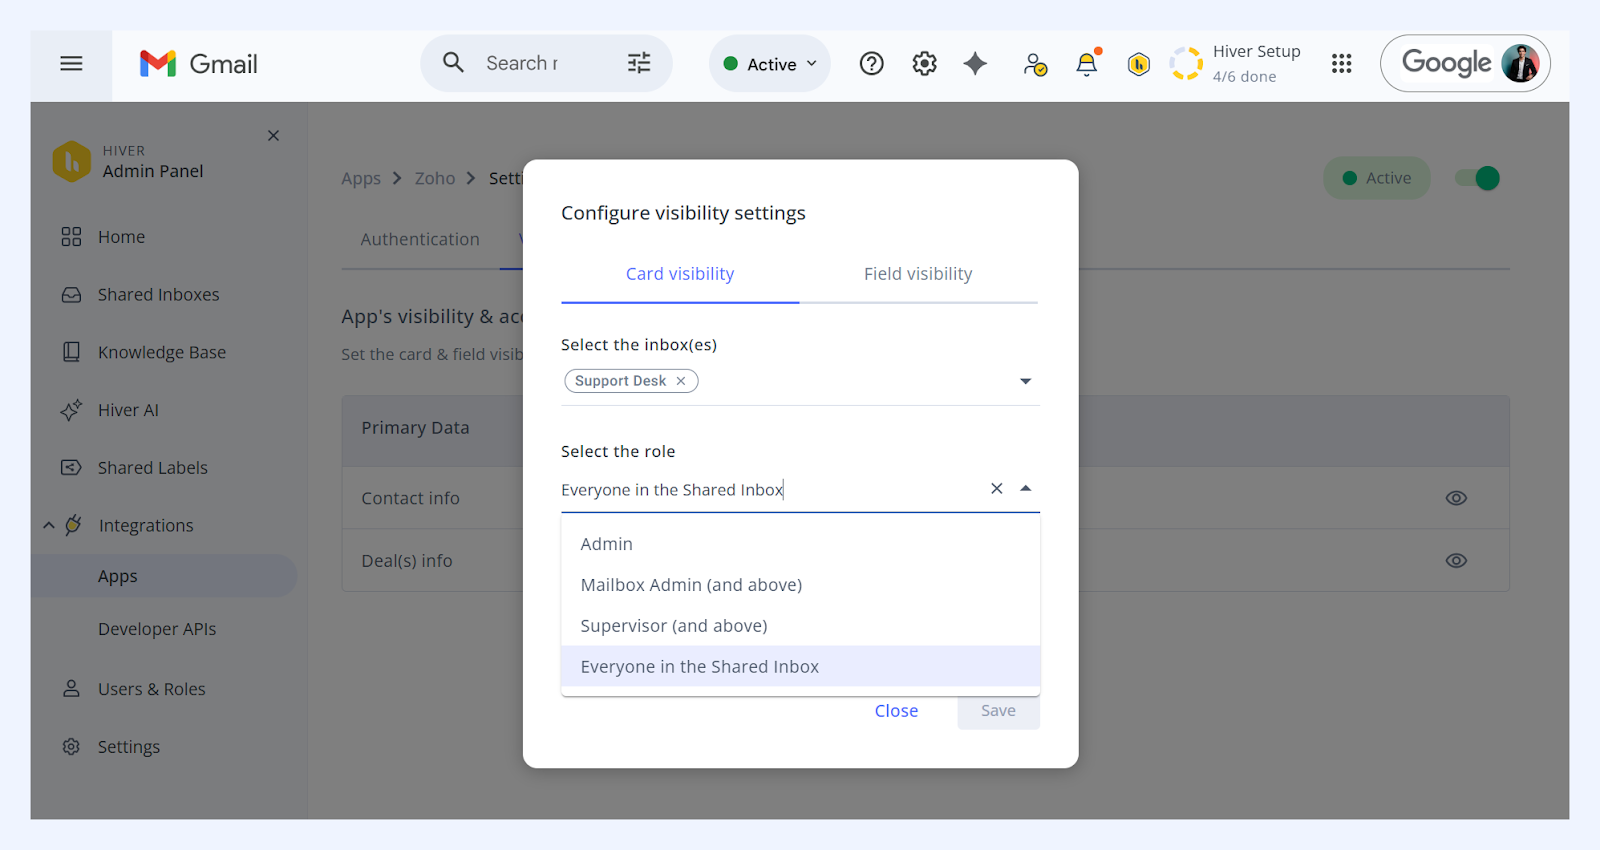
5. In the Card visibility tab, choose where to enable these cards and and for whom.
6. In the Field visibility tab, select which fields you’d like to show in each card.
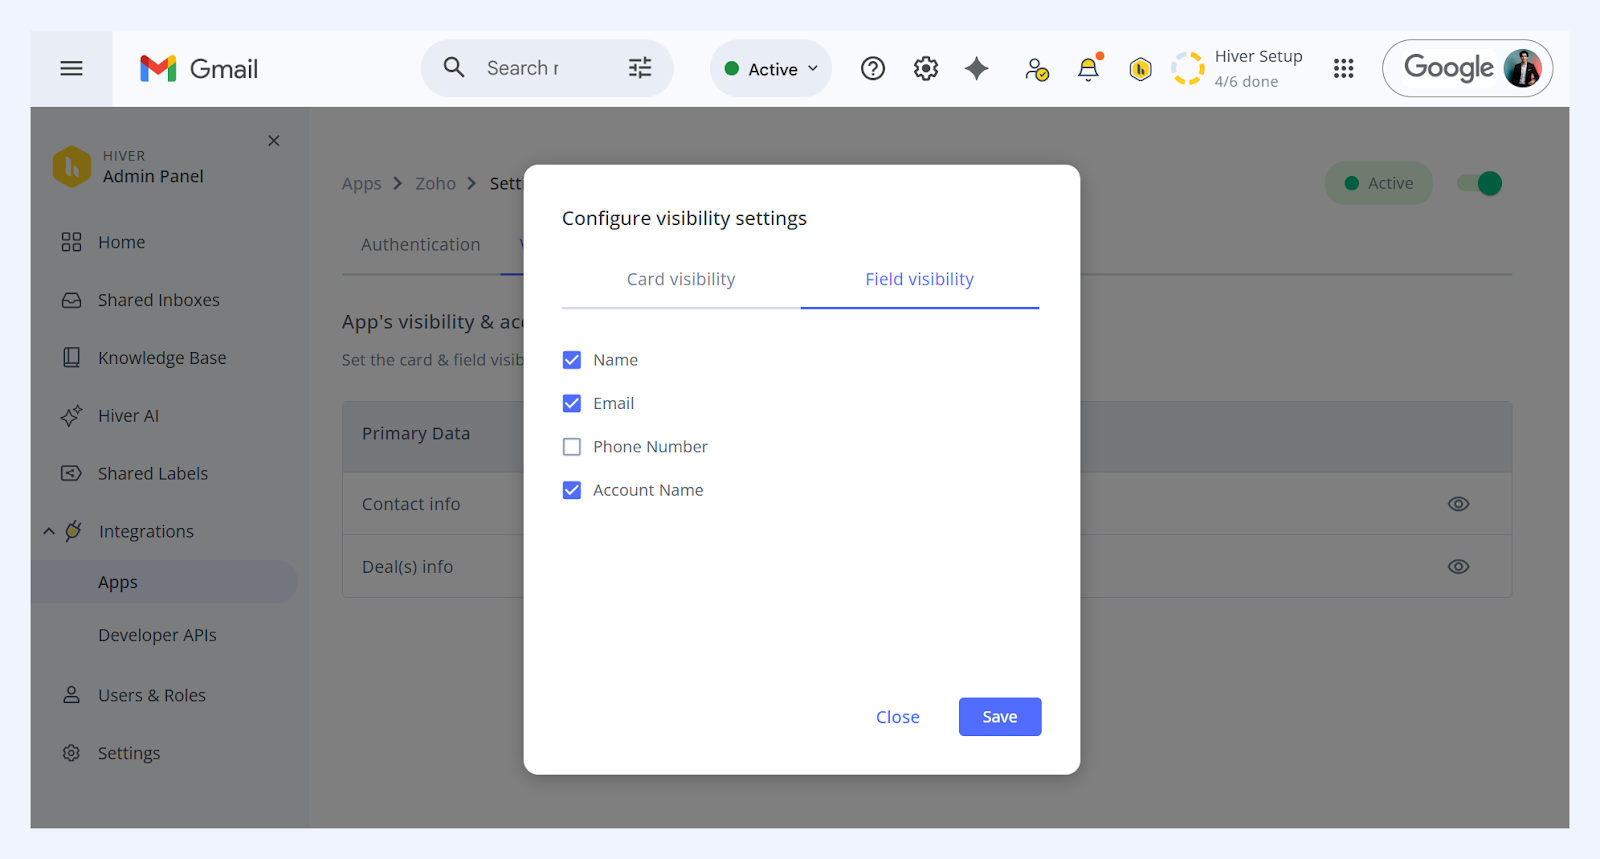
7. Click Save to confirm.
Using the Zoho CRM integration in Hiver
Once enabled, the Zoho CRM integration provides quick access to relevant contact and deal information directly within your email workflow.
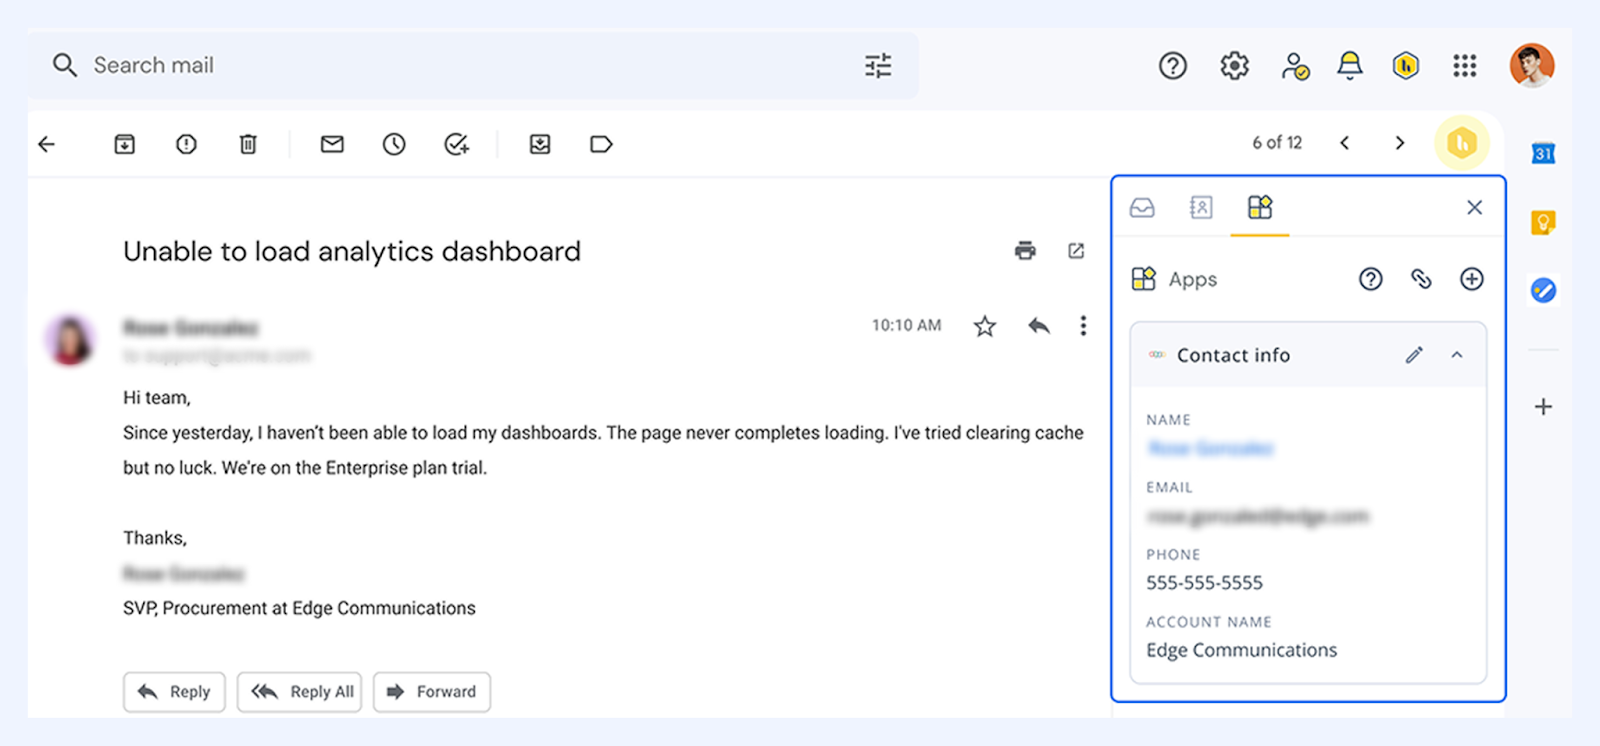
- Within the Apps tab, you will be able to see the cards for the details you’ve configured:
- Contact info
- Deal info
- Contact data is automatically matched based on the email address in the conversation.
- Deal information linked to the contact is displayed in a clean, organized format.
- Click on any direct link to open the full record in Zoho CRM for more detailed information or advanced operations.
Need help?
If you encounter any issues during setup or have questions about using the Zoho CRM App, please contact Hiver Support. Our team is available 24/7 to assist you with setup, configuration, and troubleshooting.
Next steps
Salesforce Integration with Hiver