Using Custom Fields
Custom Fields allow you to add relevant data to your email conversations based on your business requirements. You can use Custom Fields to categorize customer issues, assign priority levels, or create custom statuses to improve your email workflow.
Here's what Custom Fields can offer your team:
- Capture relevant data that matters specifically for your business.
- Organize and structure information for quick reference.
- Extract meaningful insights to make informed decisions.
Prerequisites
Custom Fields are available on all Hiver plans, however, there are limits to how many Custom Fields you can create and use, depending on your specific plan:
- Growth: 2 Custom Fields
- Pro: 10 Custom Fields
- Elite: Unlimited Custom Fields
Setting up Custom Fields
Follow these steps to set up your first Custom Field:
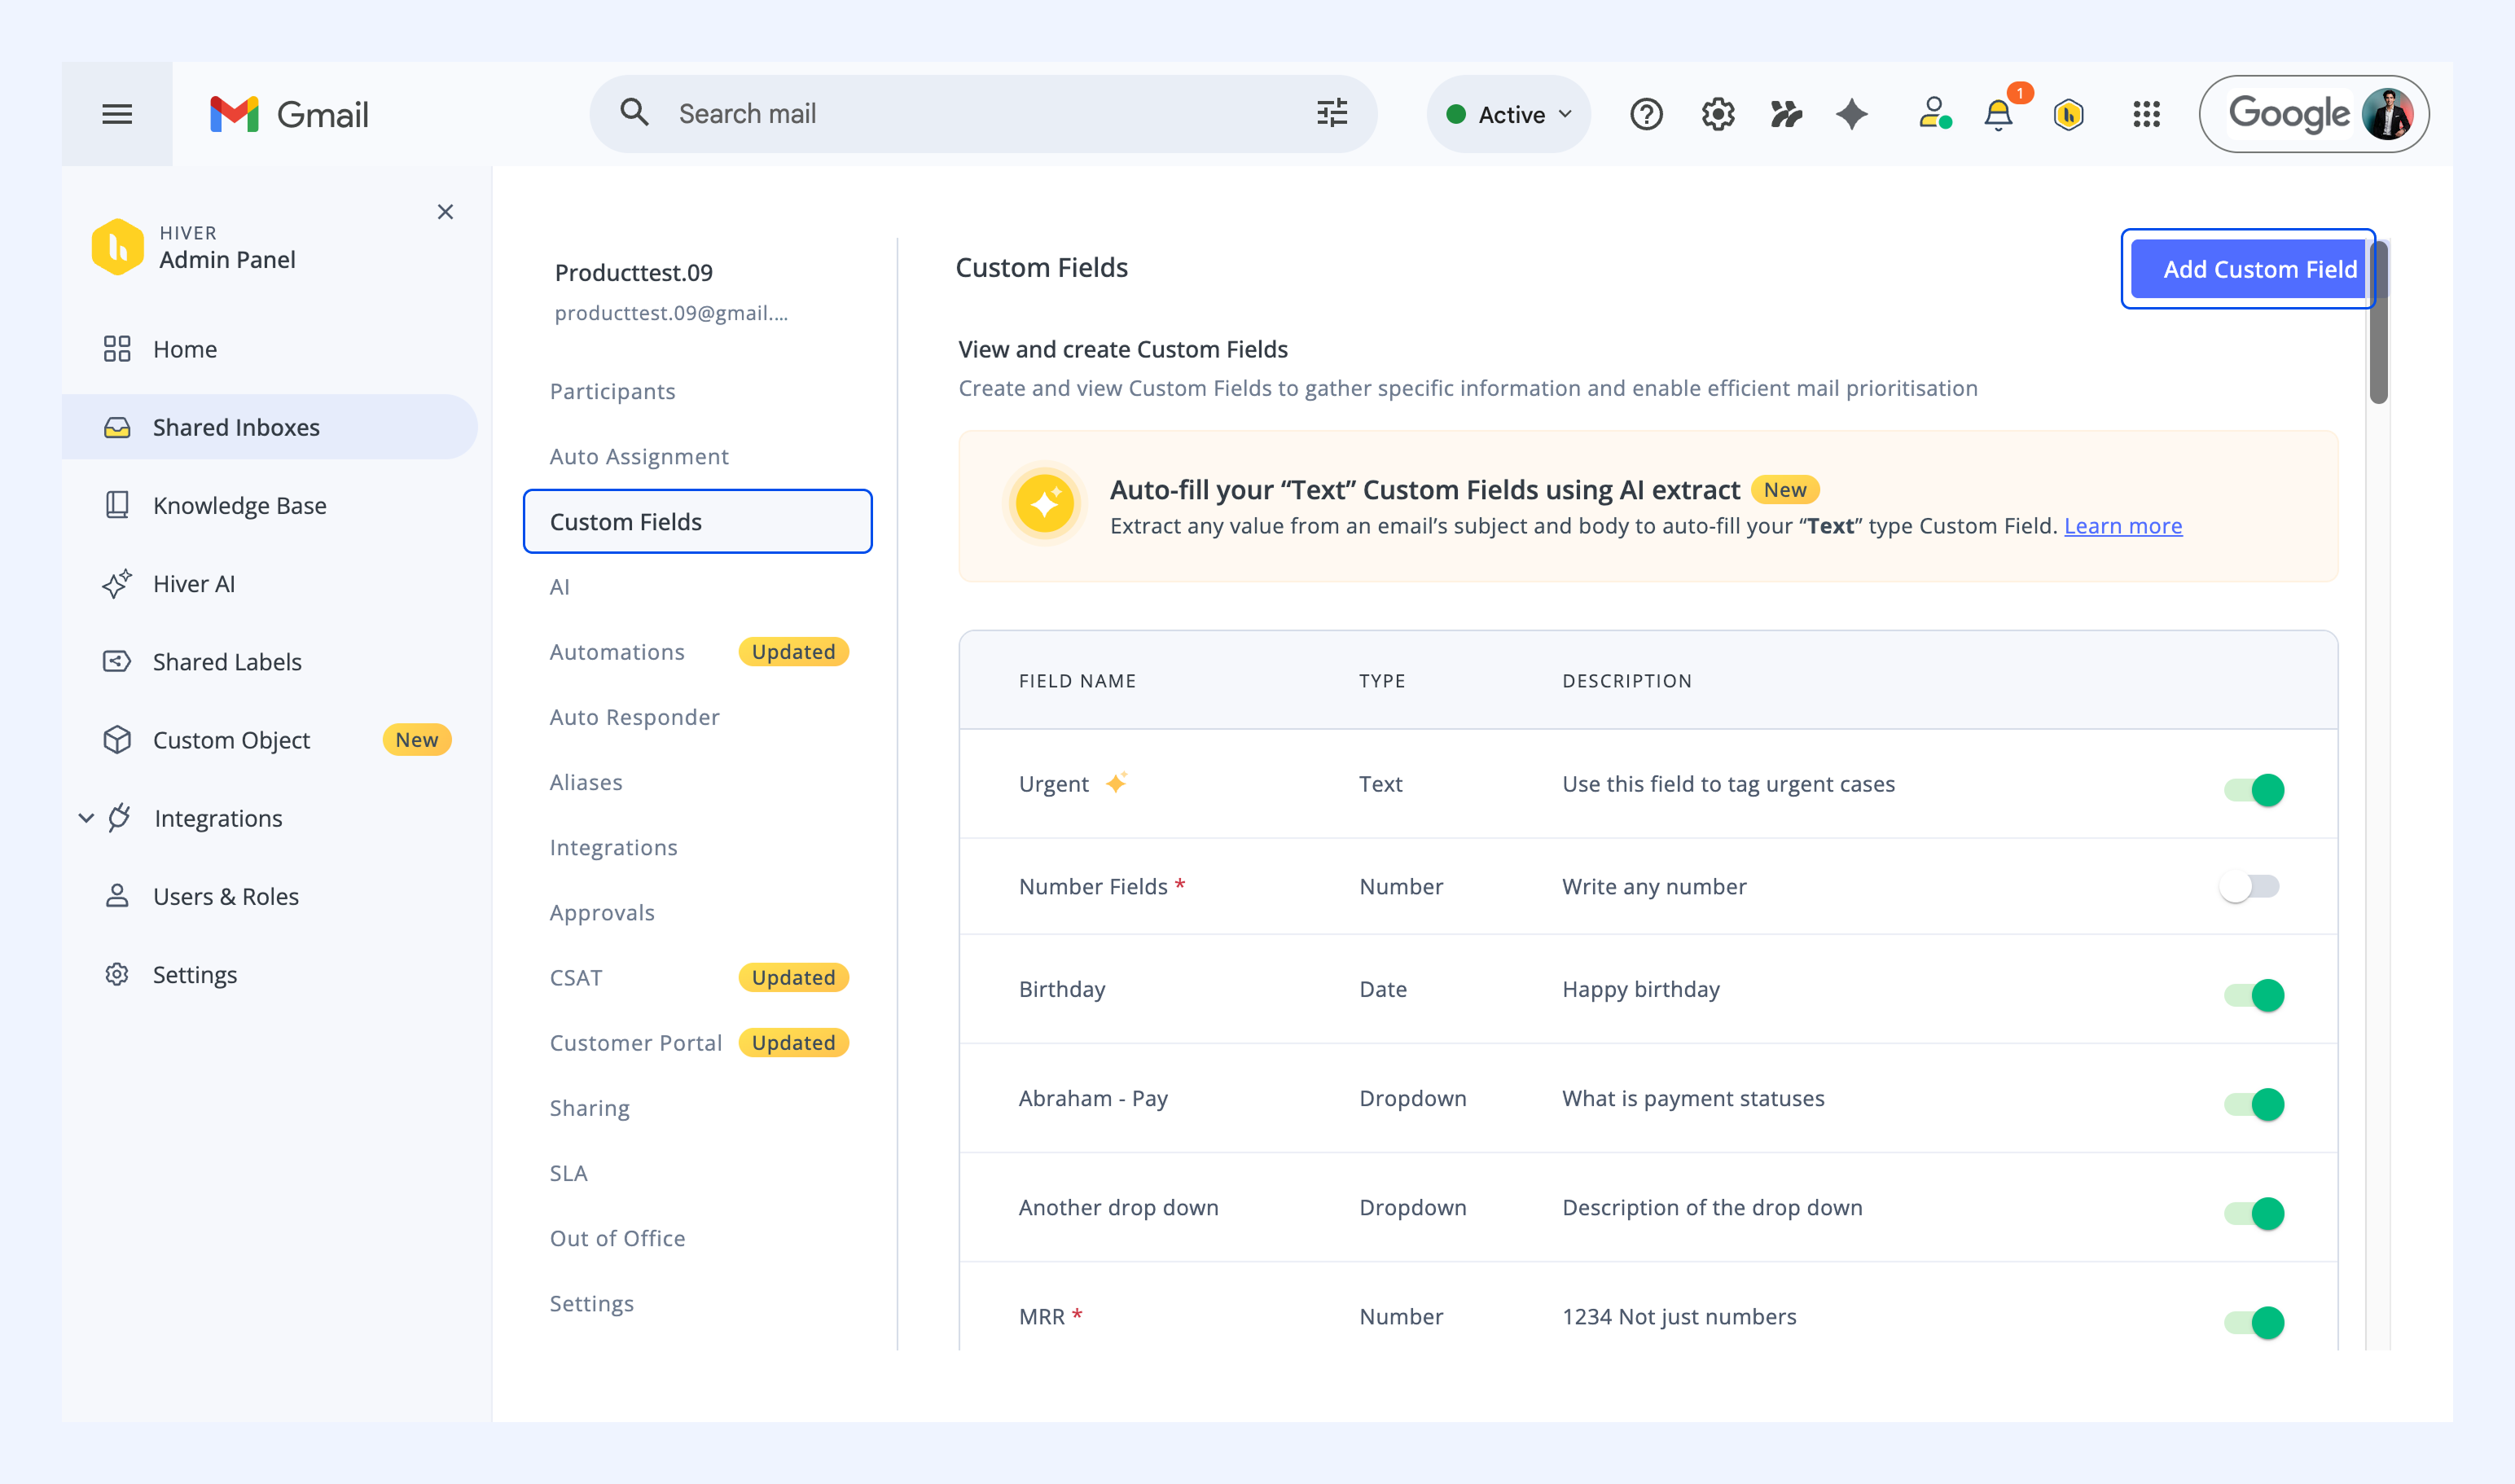
1. Go to Admin panel → Shared Inbox → Select the Inbox.
2. Find Custom Fields and select the Add Custom Field button.
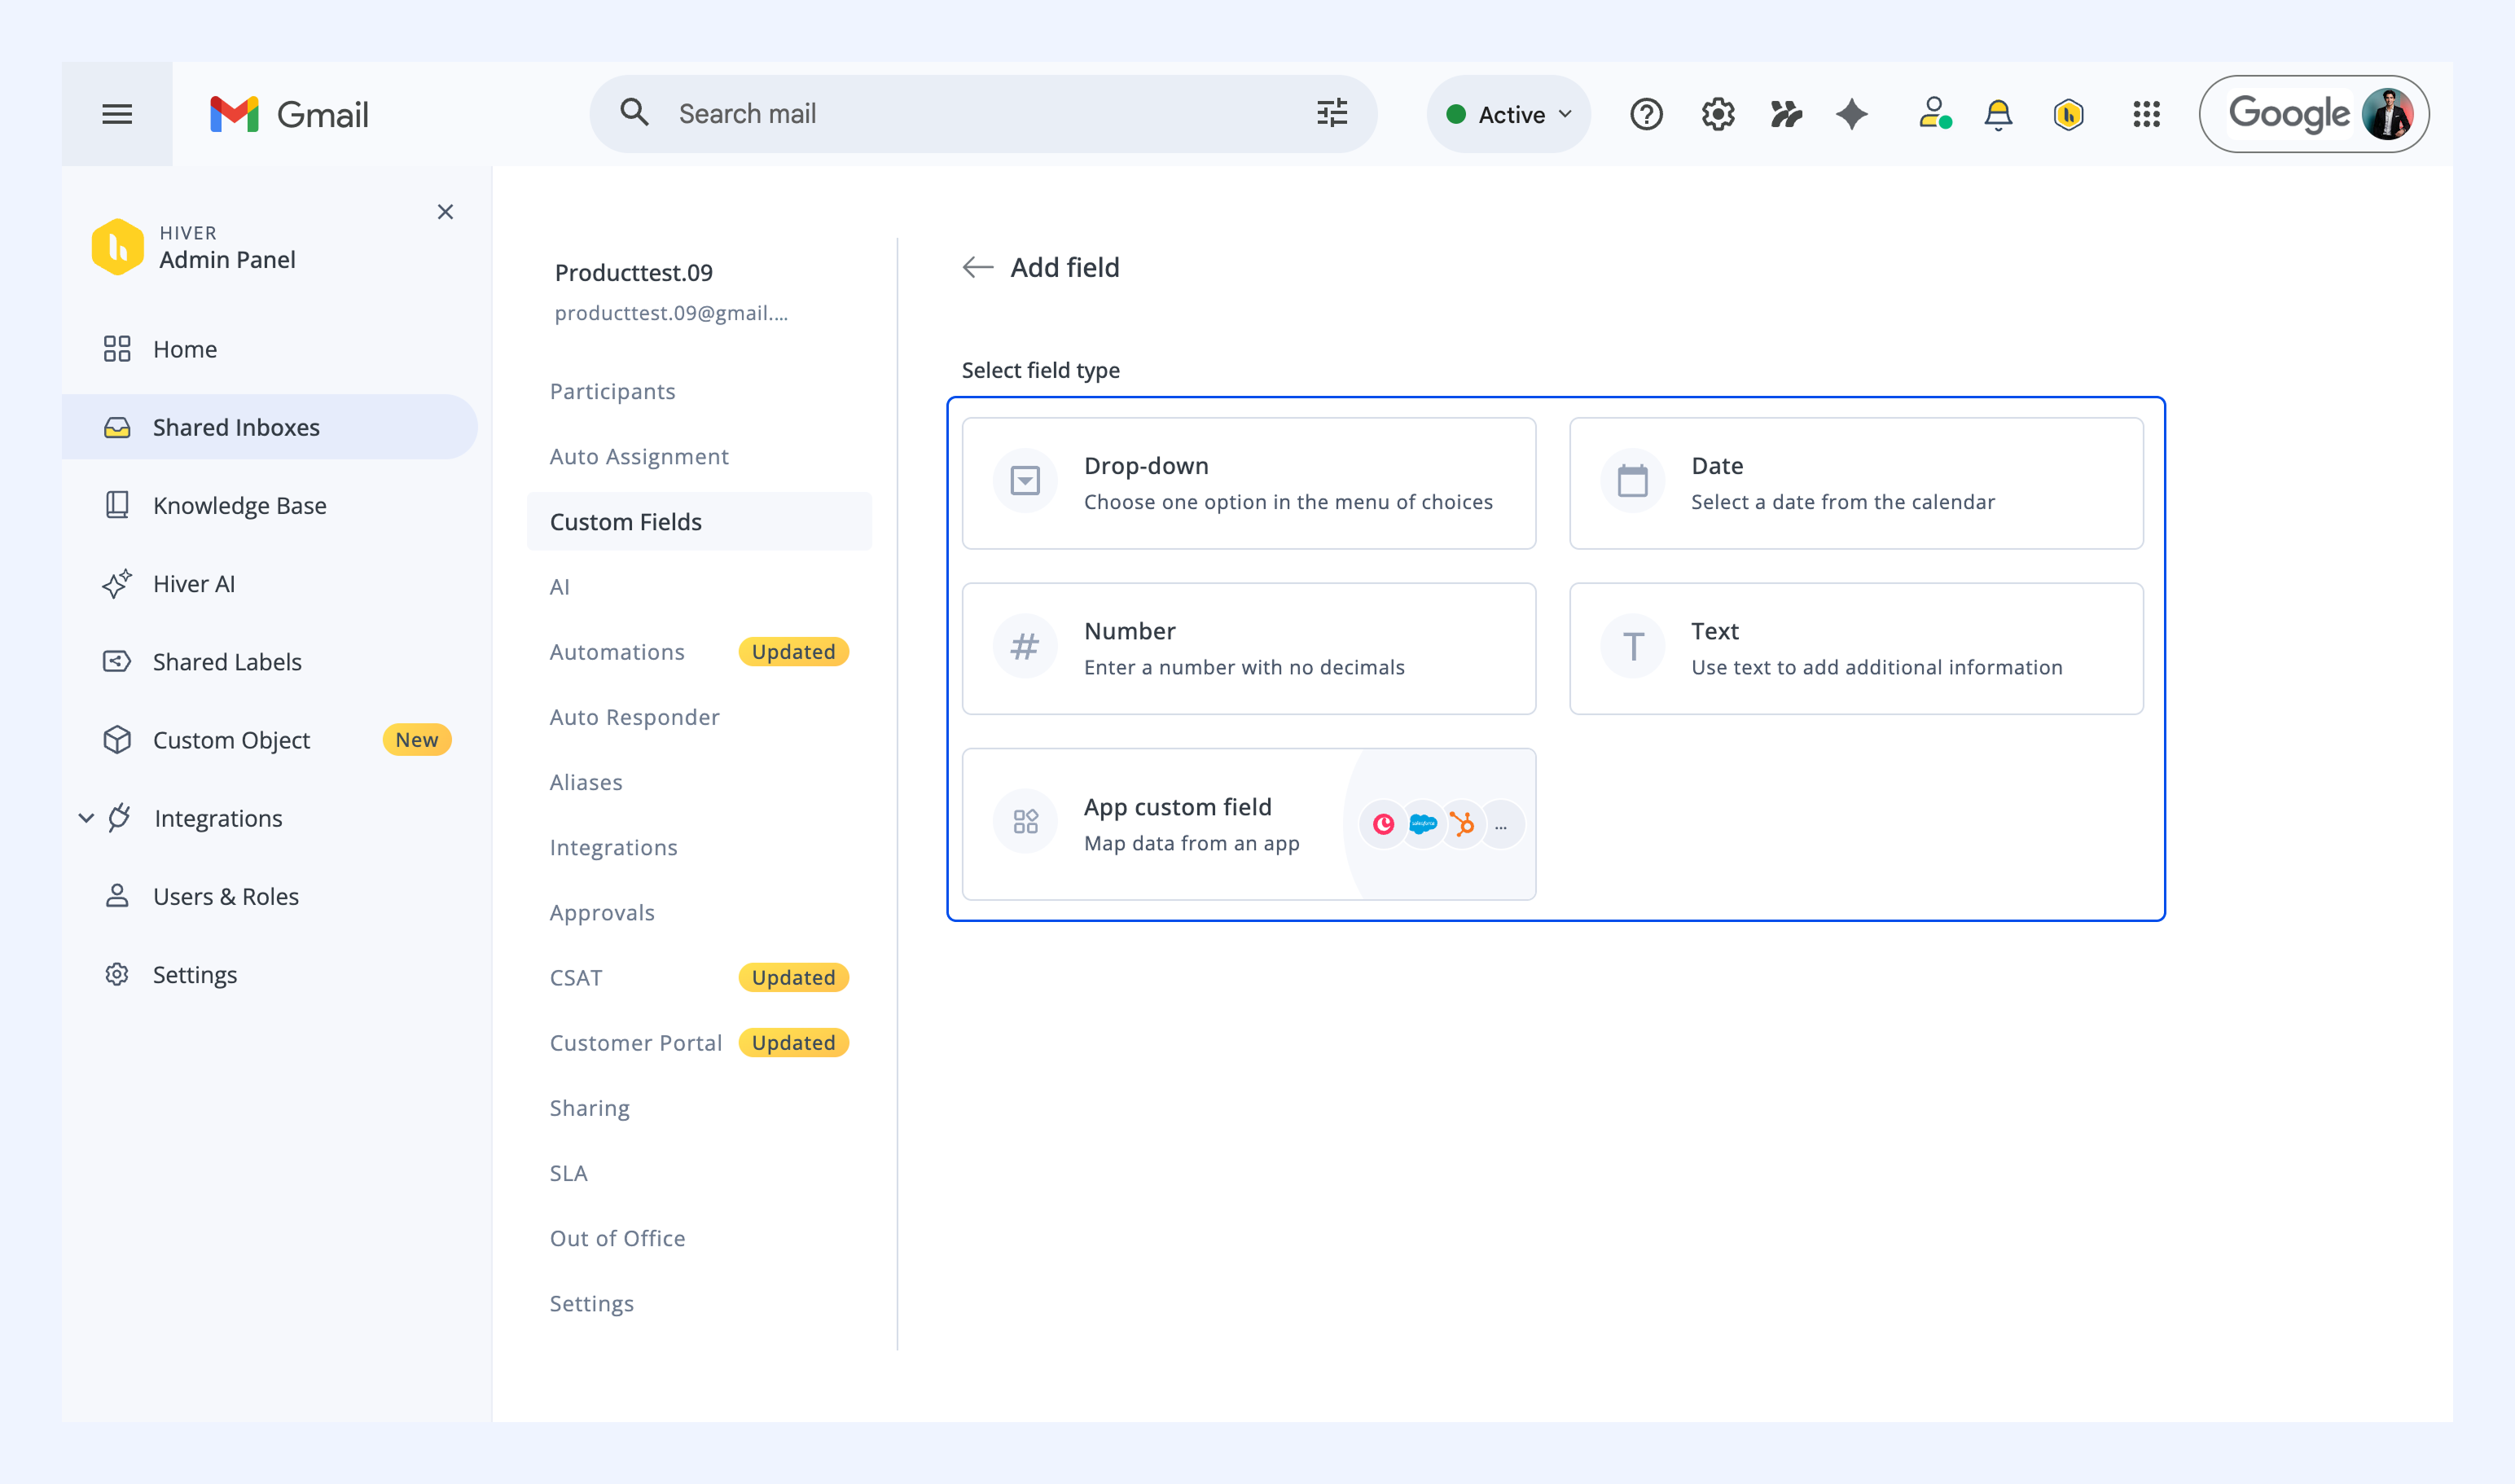
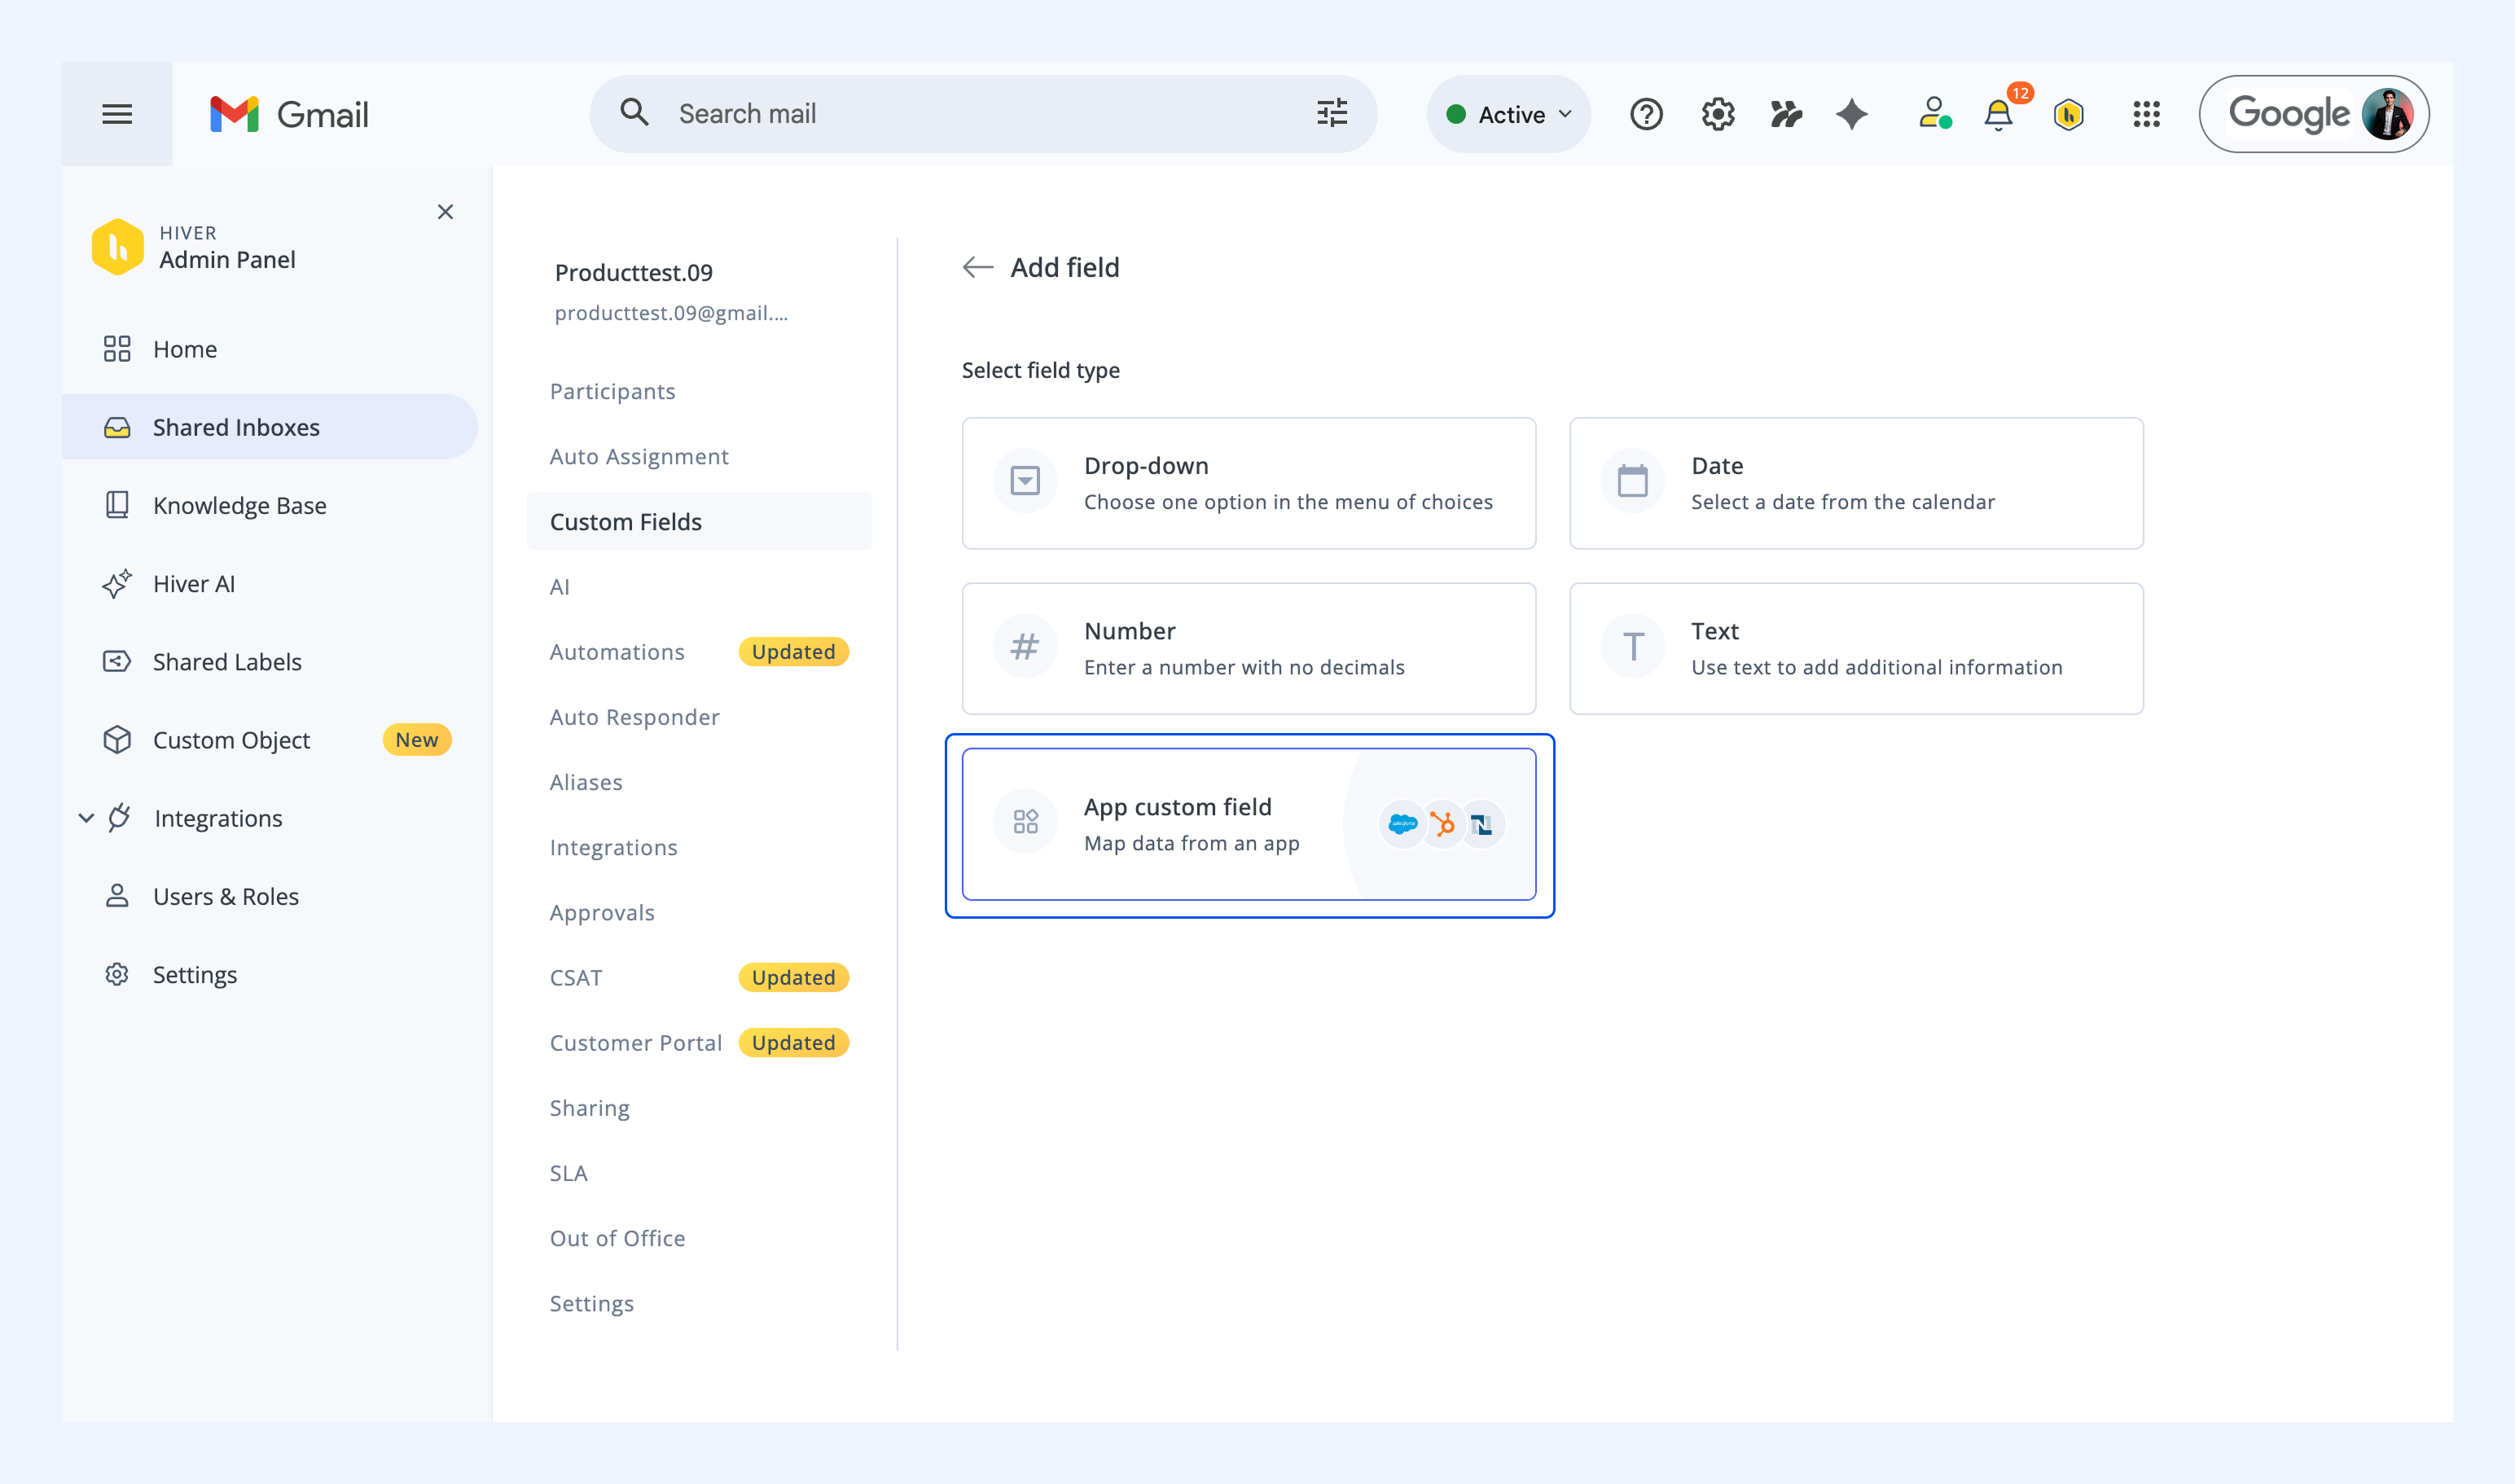
3. Choose your field type and fill in the relevant details. Here are the different options available:
- Dropdown: Create a list of predefined options for your team to pick from. For example, set up a Priority field with High, Medium, and Low.
- Number: Use this field type when you need to collect numeric information, like customer IDs or account numbers.
- Date: Use date fields to track time-sensitive information like follow-ups, so deadlines stay visible to your team.
- Text: Use text fields to collect written input, like detailed comments or customer feedback.
- App custom field: Pull data from a connected app directly into the Custom Field. Use this when the field value is available in a CRM and you want it visible in Hiver without manual entry.
Note: App custom fields is currently in an early access program. To enable it for your account, reach out to us at support@hiverhq.com.
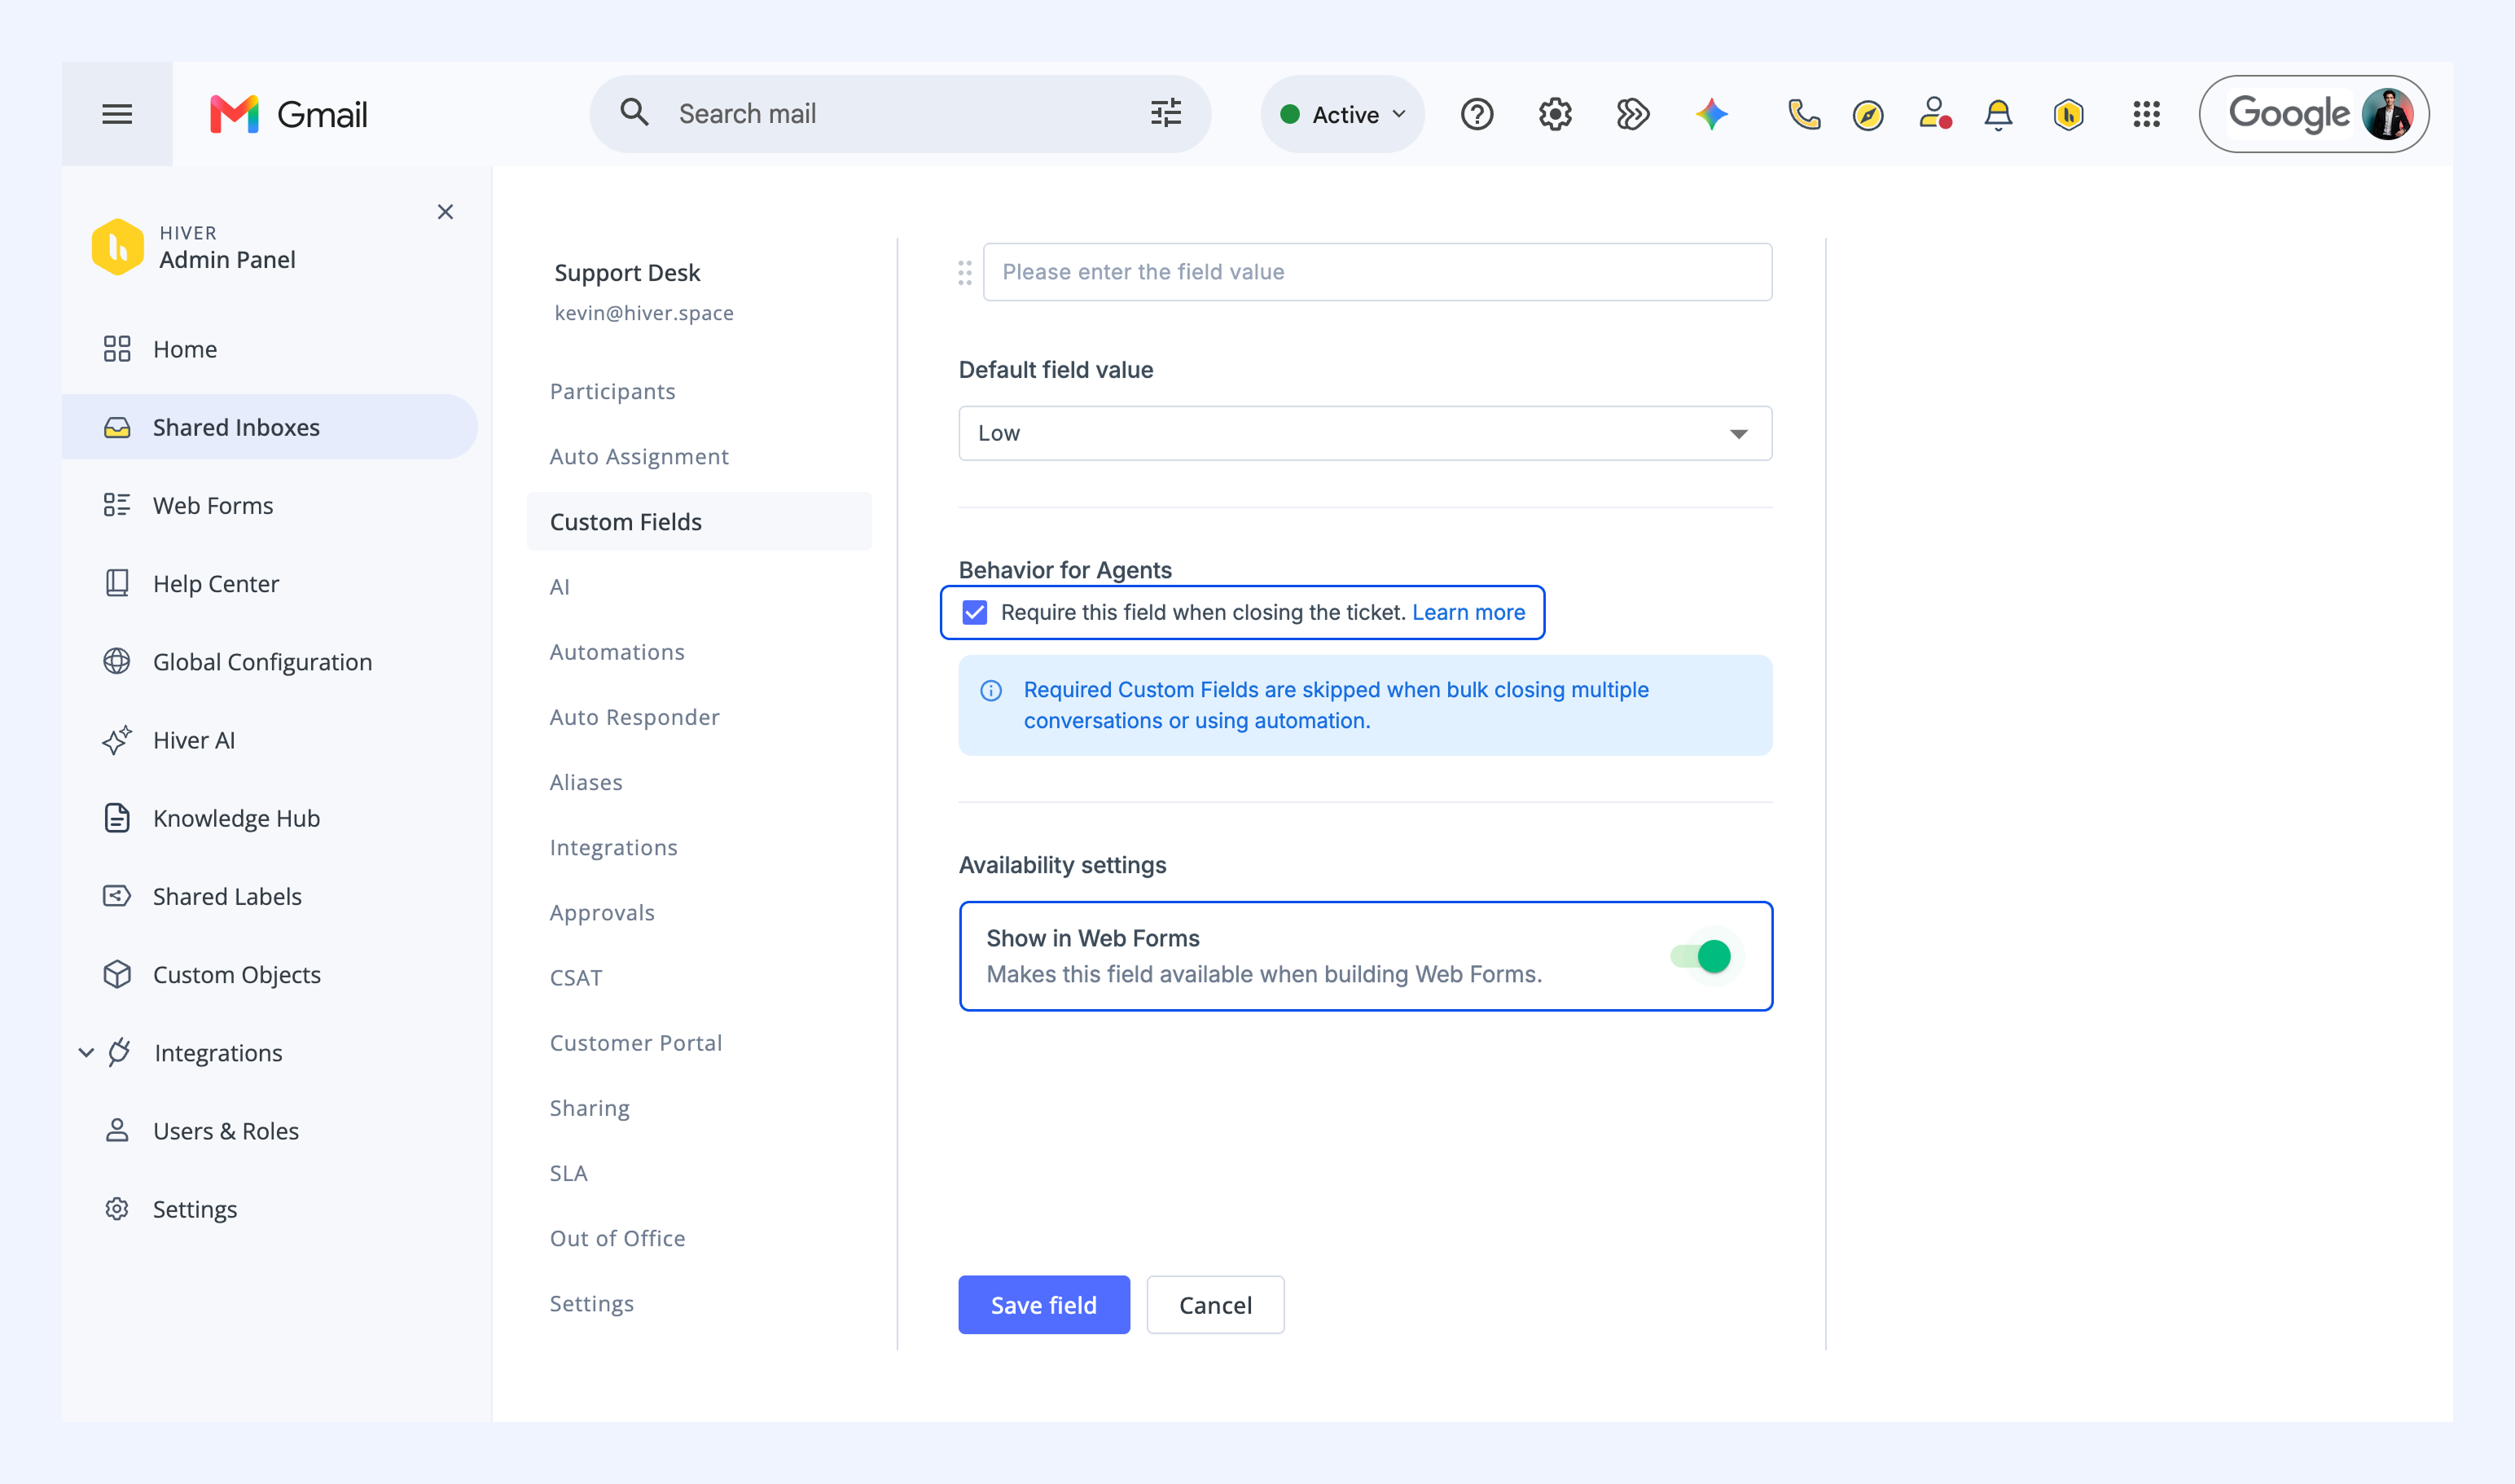
4. To make a field mandatory, check Require this field when closing the ticket. Team members will need to fill it before they can close the ticket.
Note:
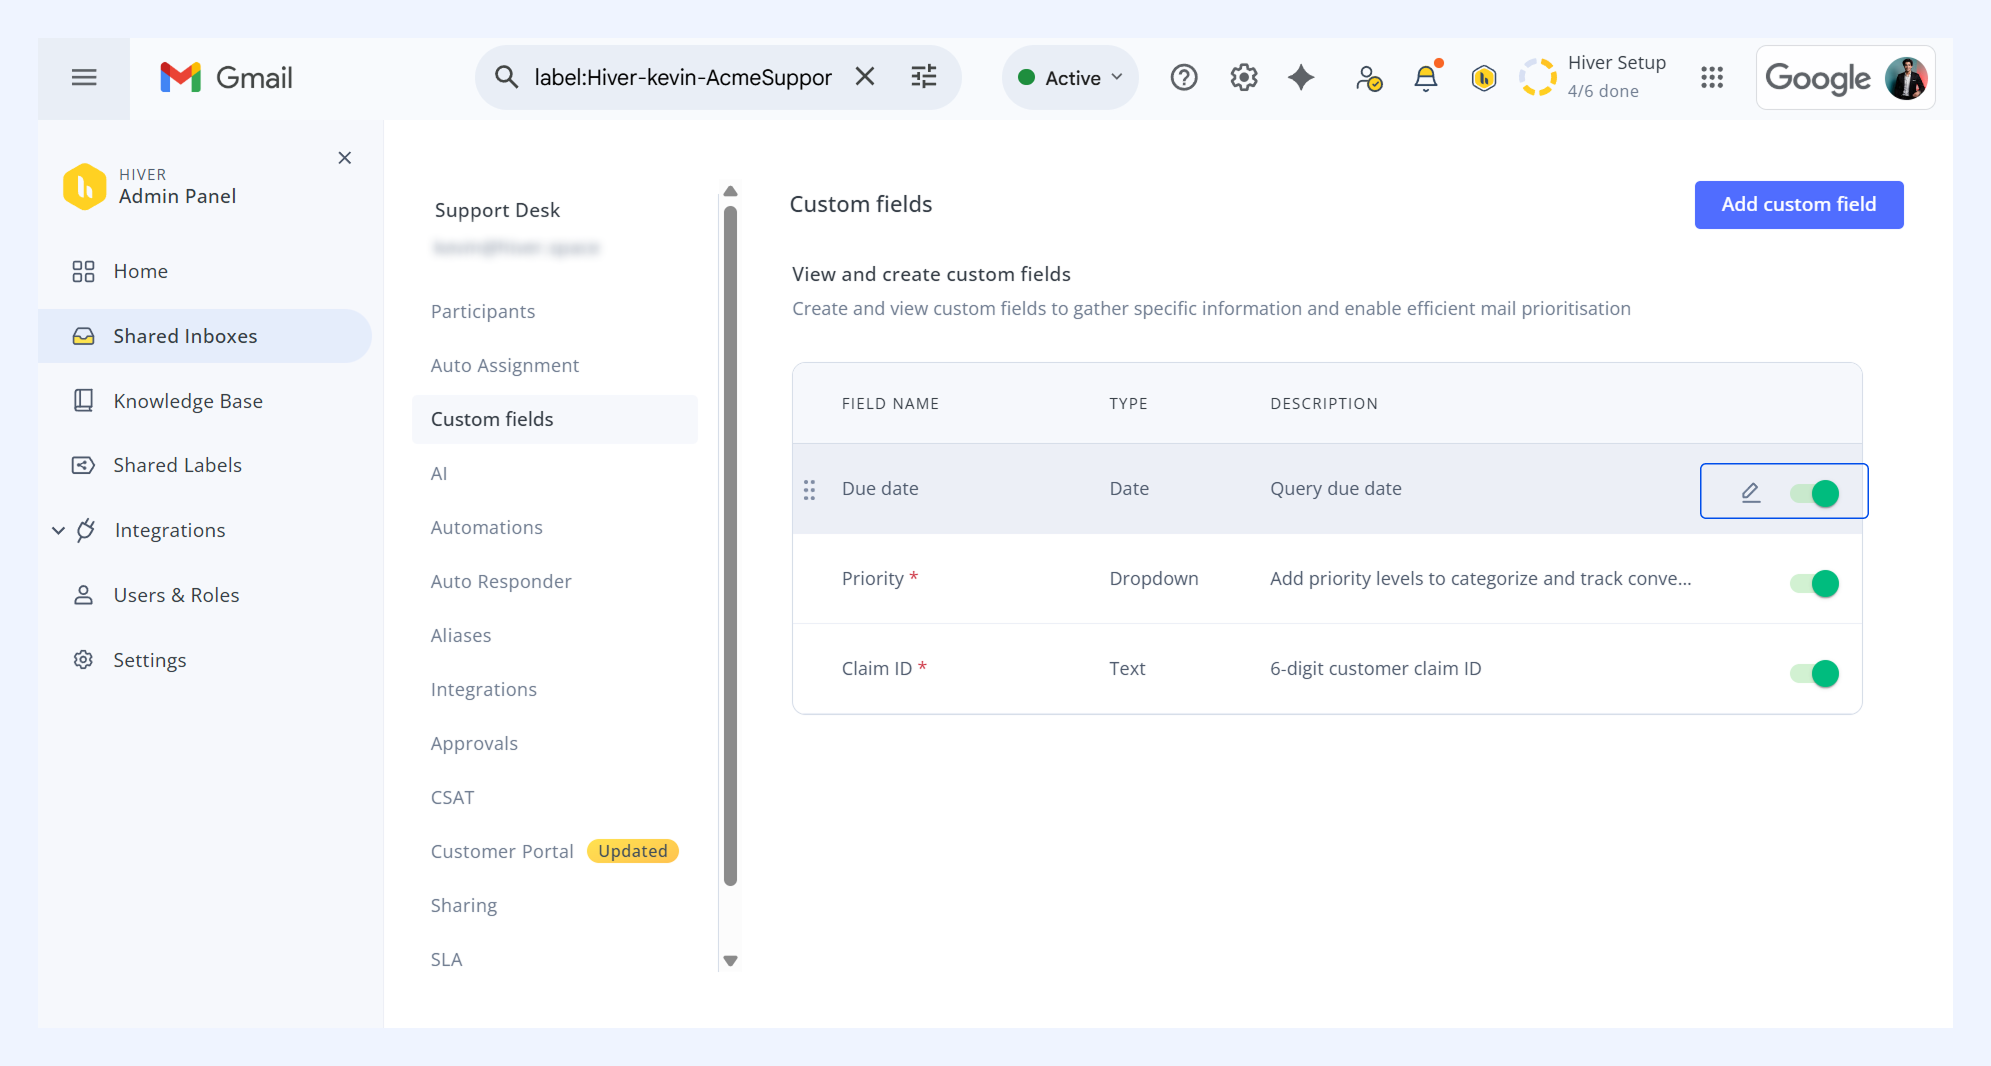
- Mandatory fields show a red asterisk (*) in the Custom Fields list view.
- Turn on Show in Web Forms under Availability settings to make a Custom Field available when building a Web Form. Learn more about creating Web Forms.
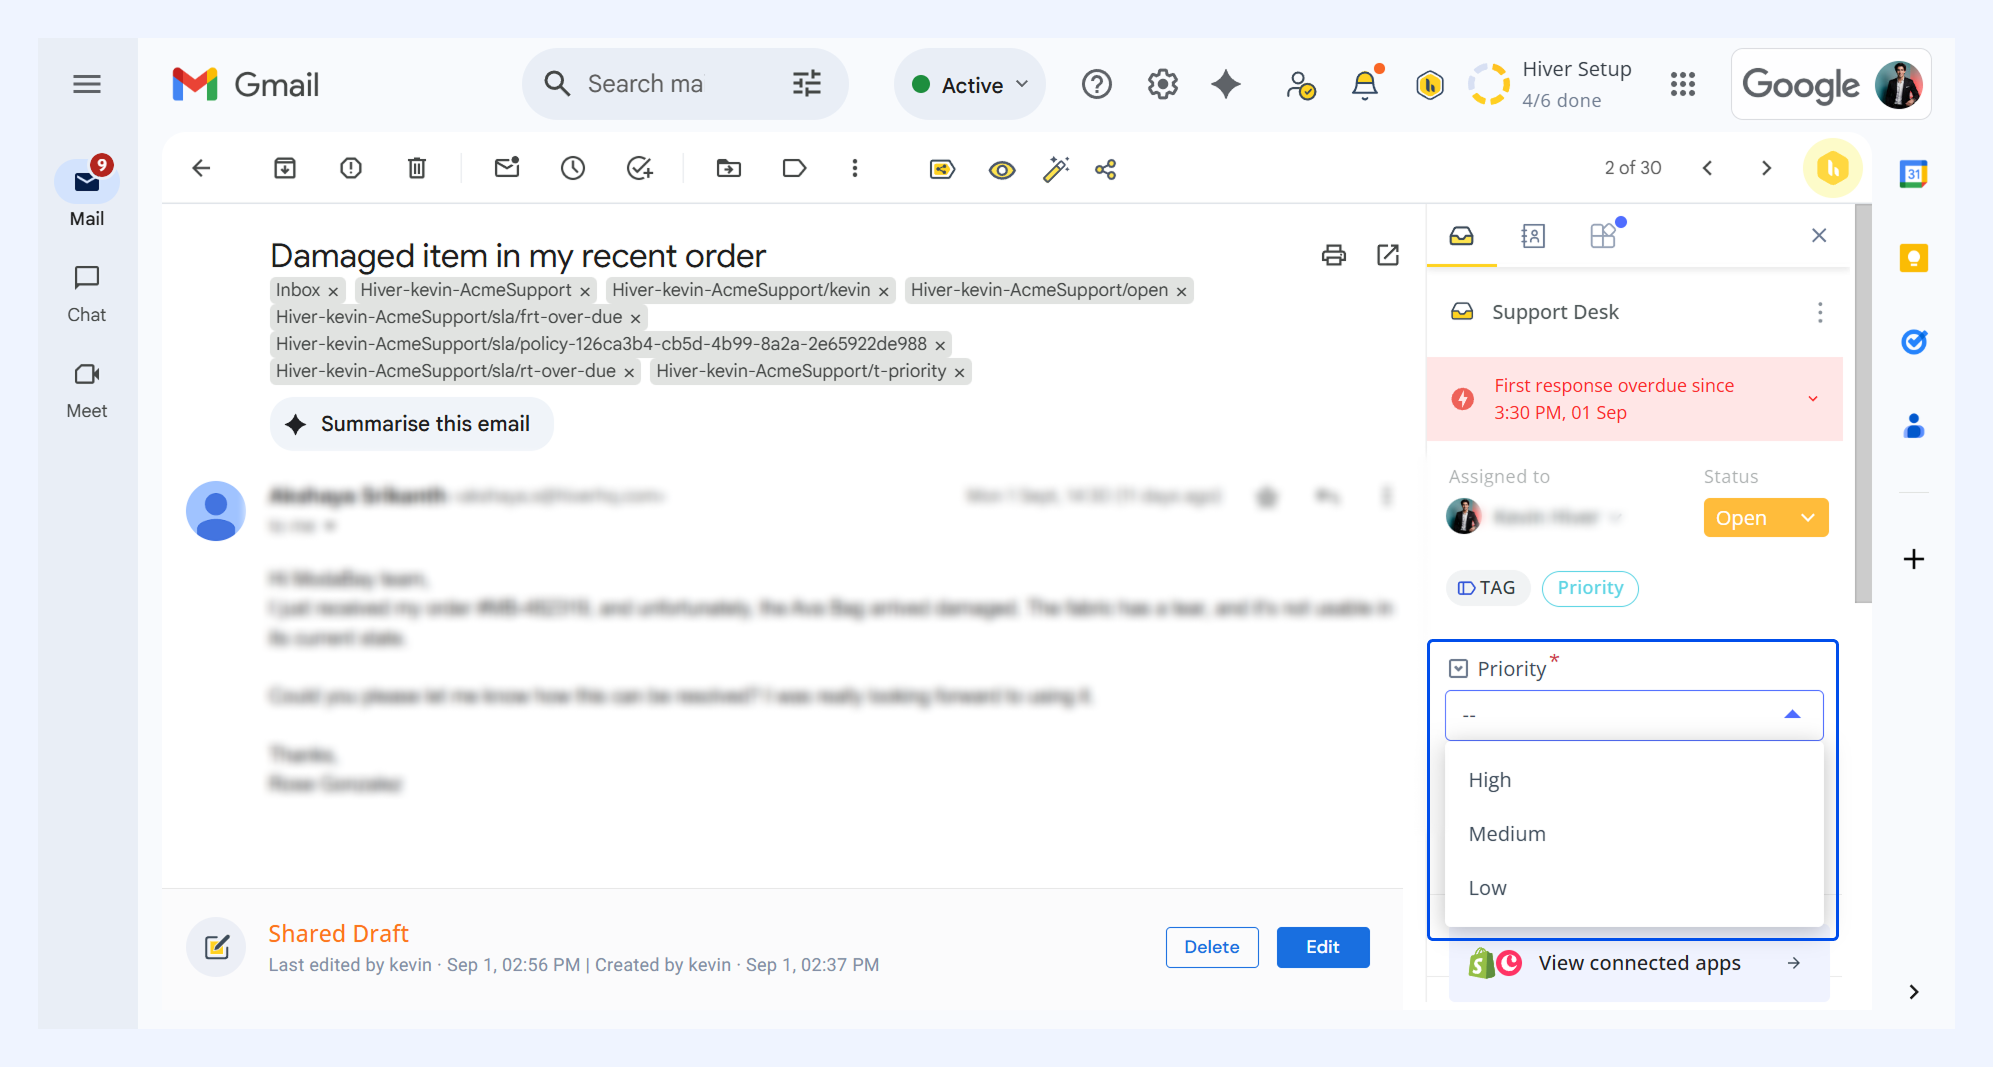
5. Click Save field. Your Custom Field is set up and ready to use.
When you open a conversation, you'll find the Custom Field on the right panel.
Setting up an app custom field
App custom fields pull customer data from a connected app directly into your conversations. Hiver fetches the information and shows it right beside the conversations as Custom Fields, so your team doesn't have to switch.
Note: You can set up app custom fields for Salesforce, Copper, HubSpot, and NetSuite.
To set up app custom fields:
1. Choose App custom field as the field type.
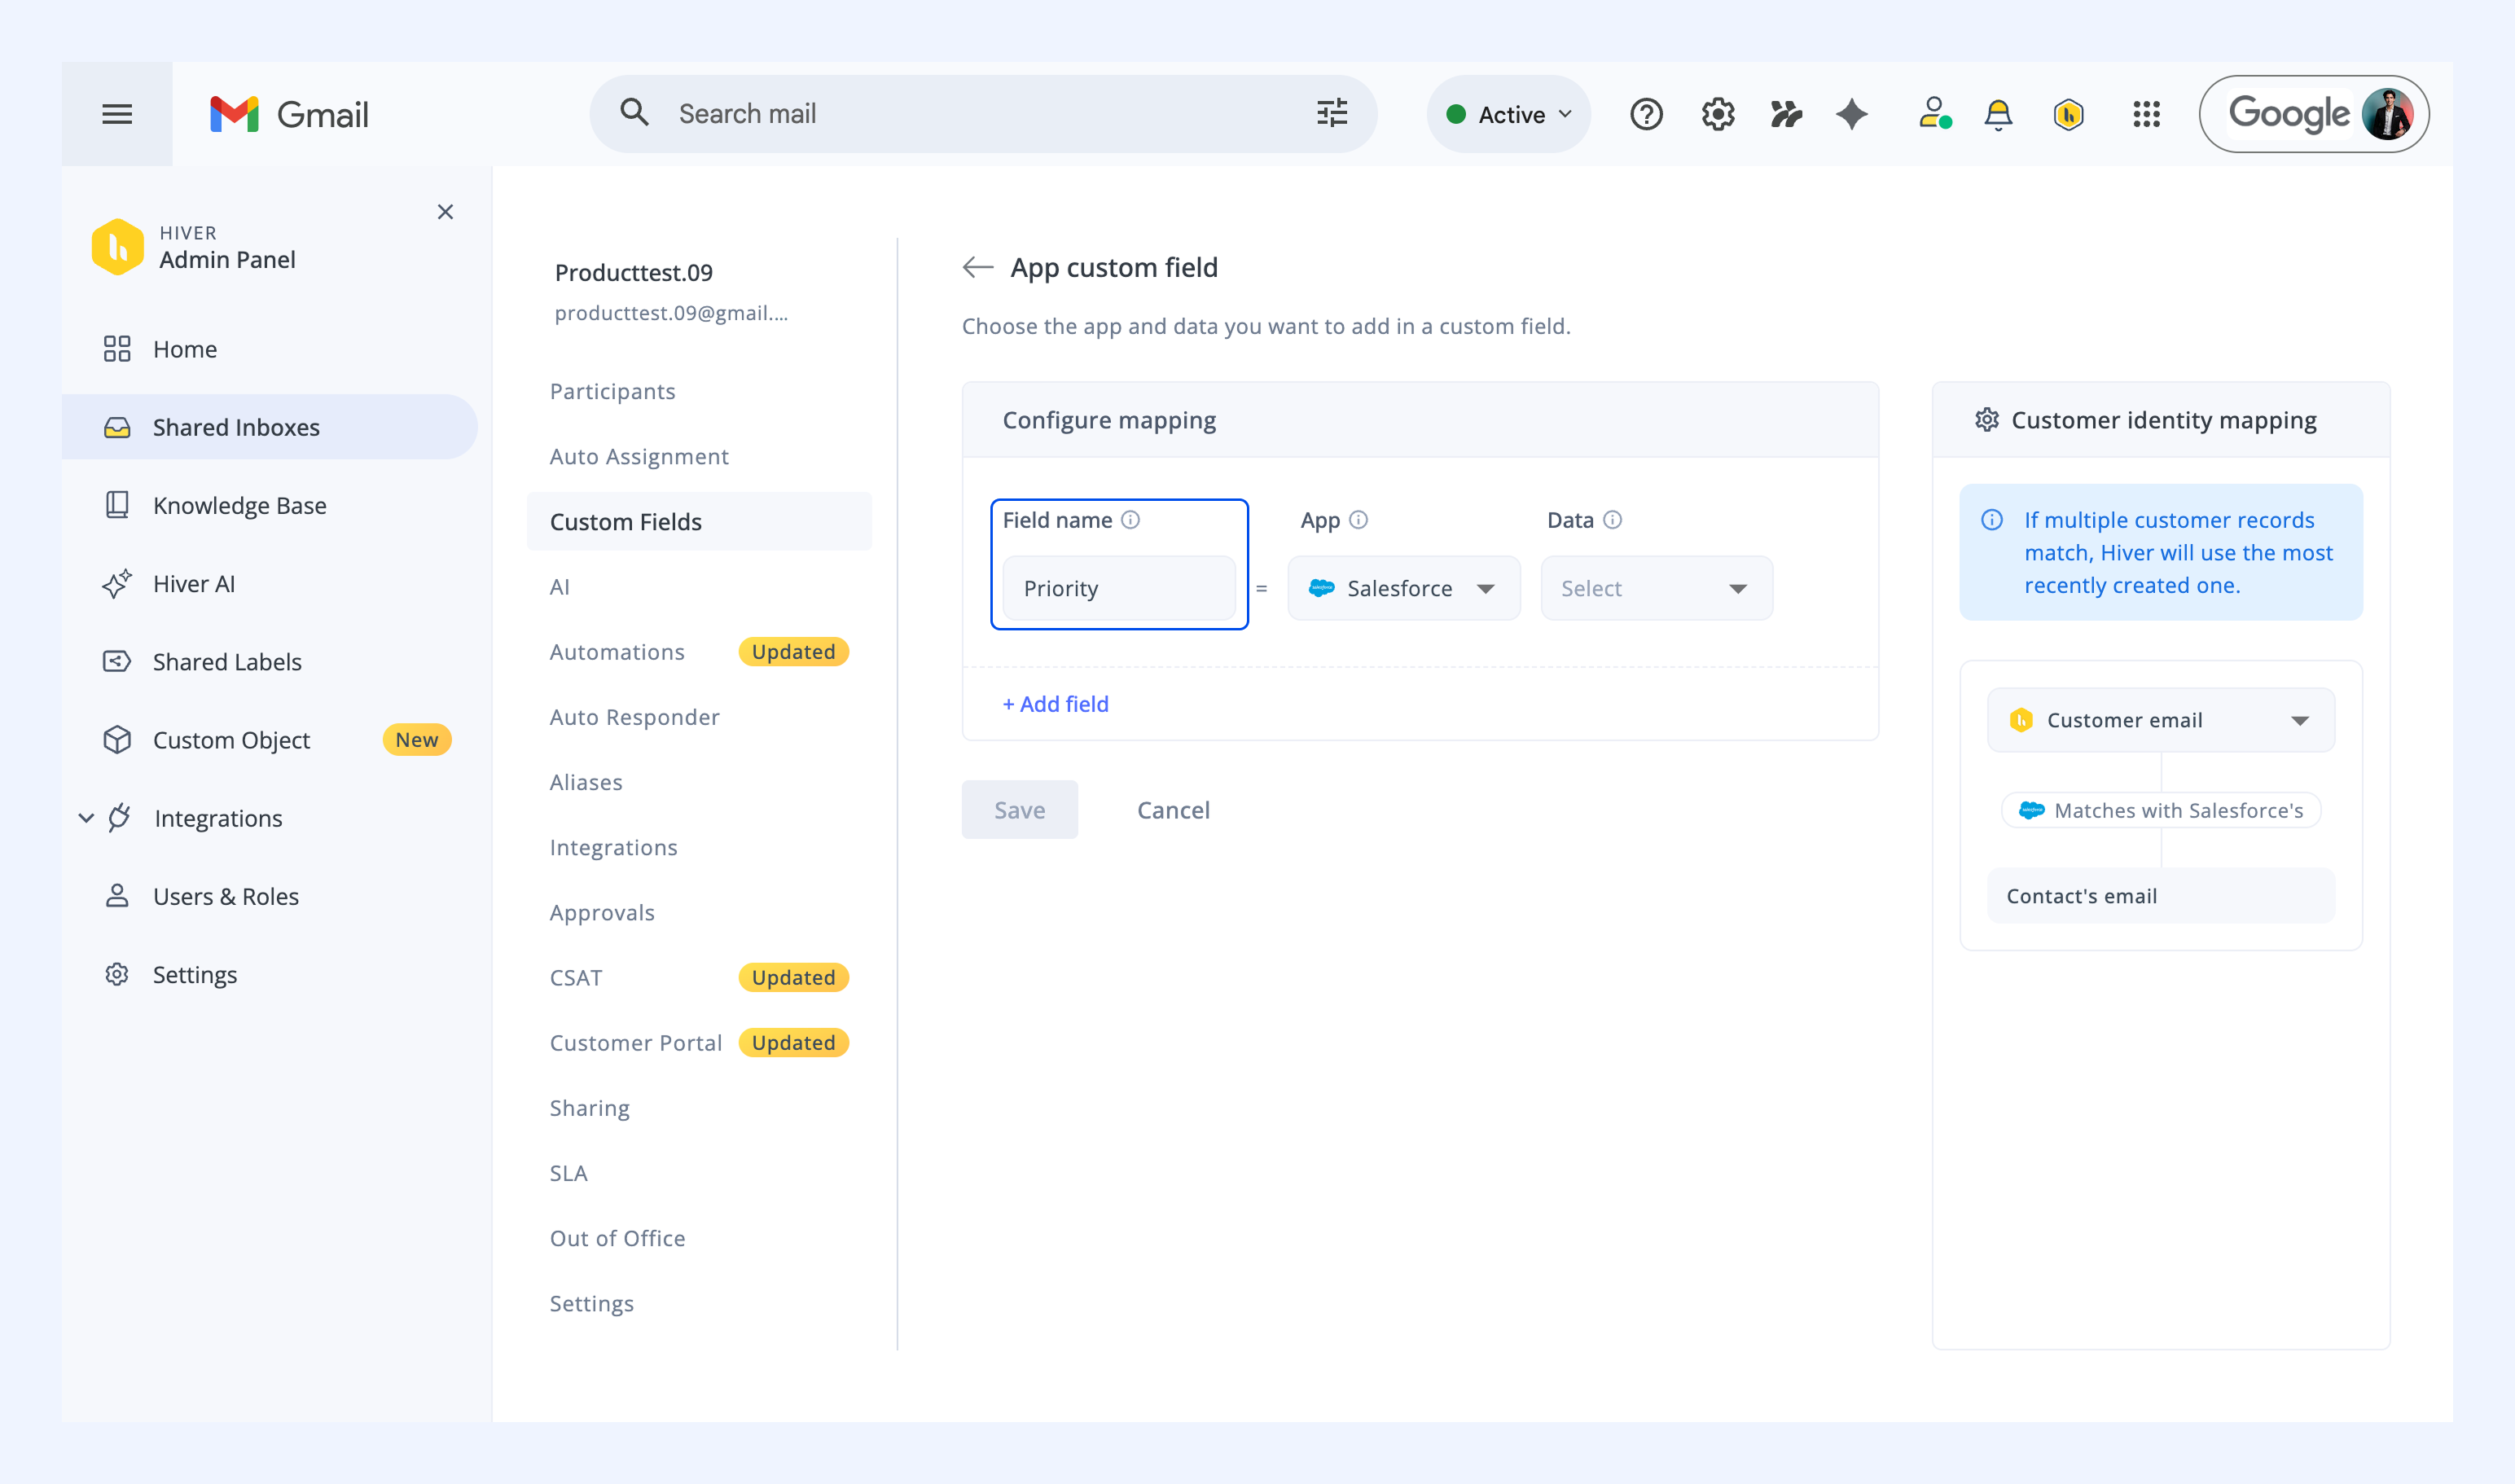
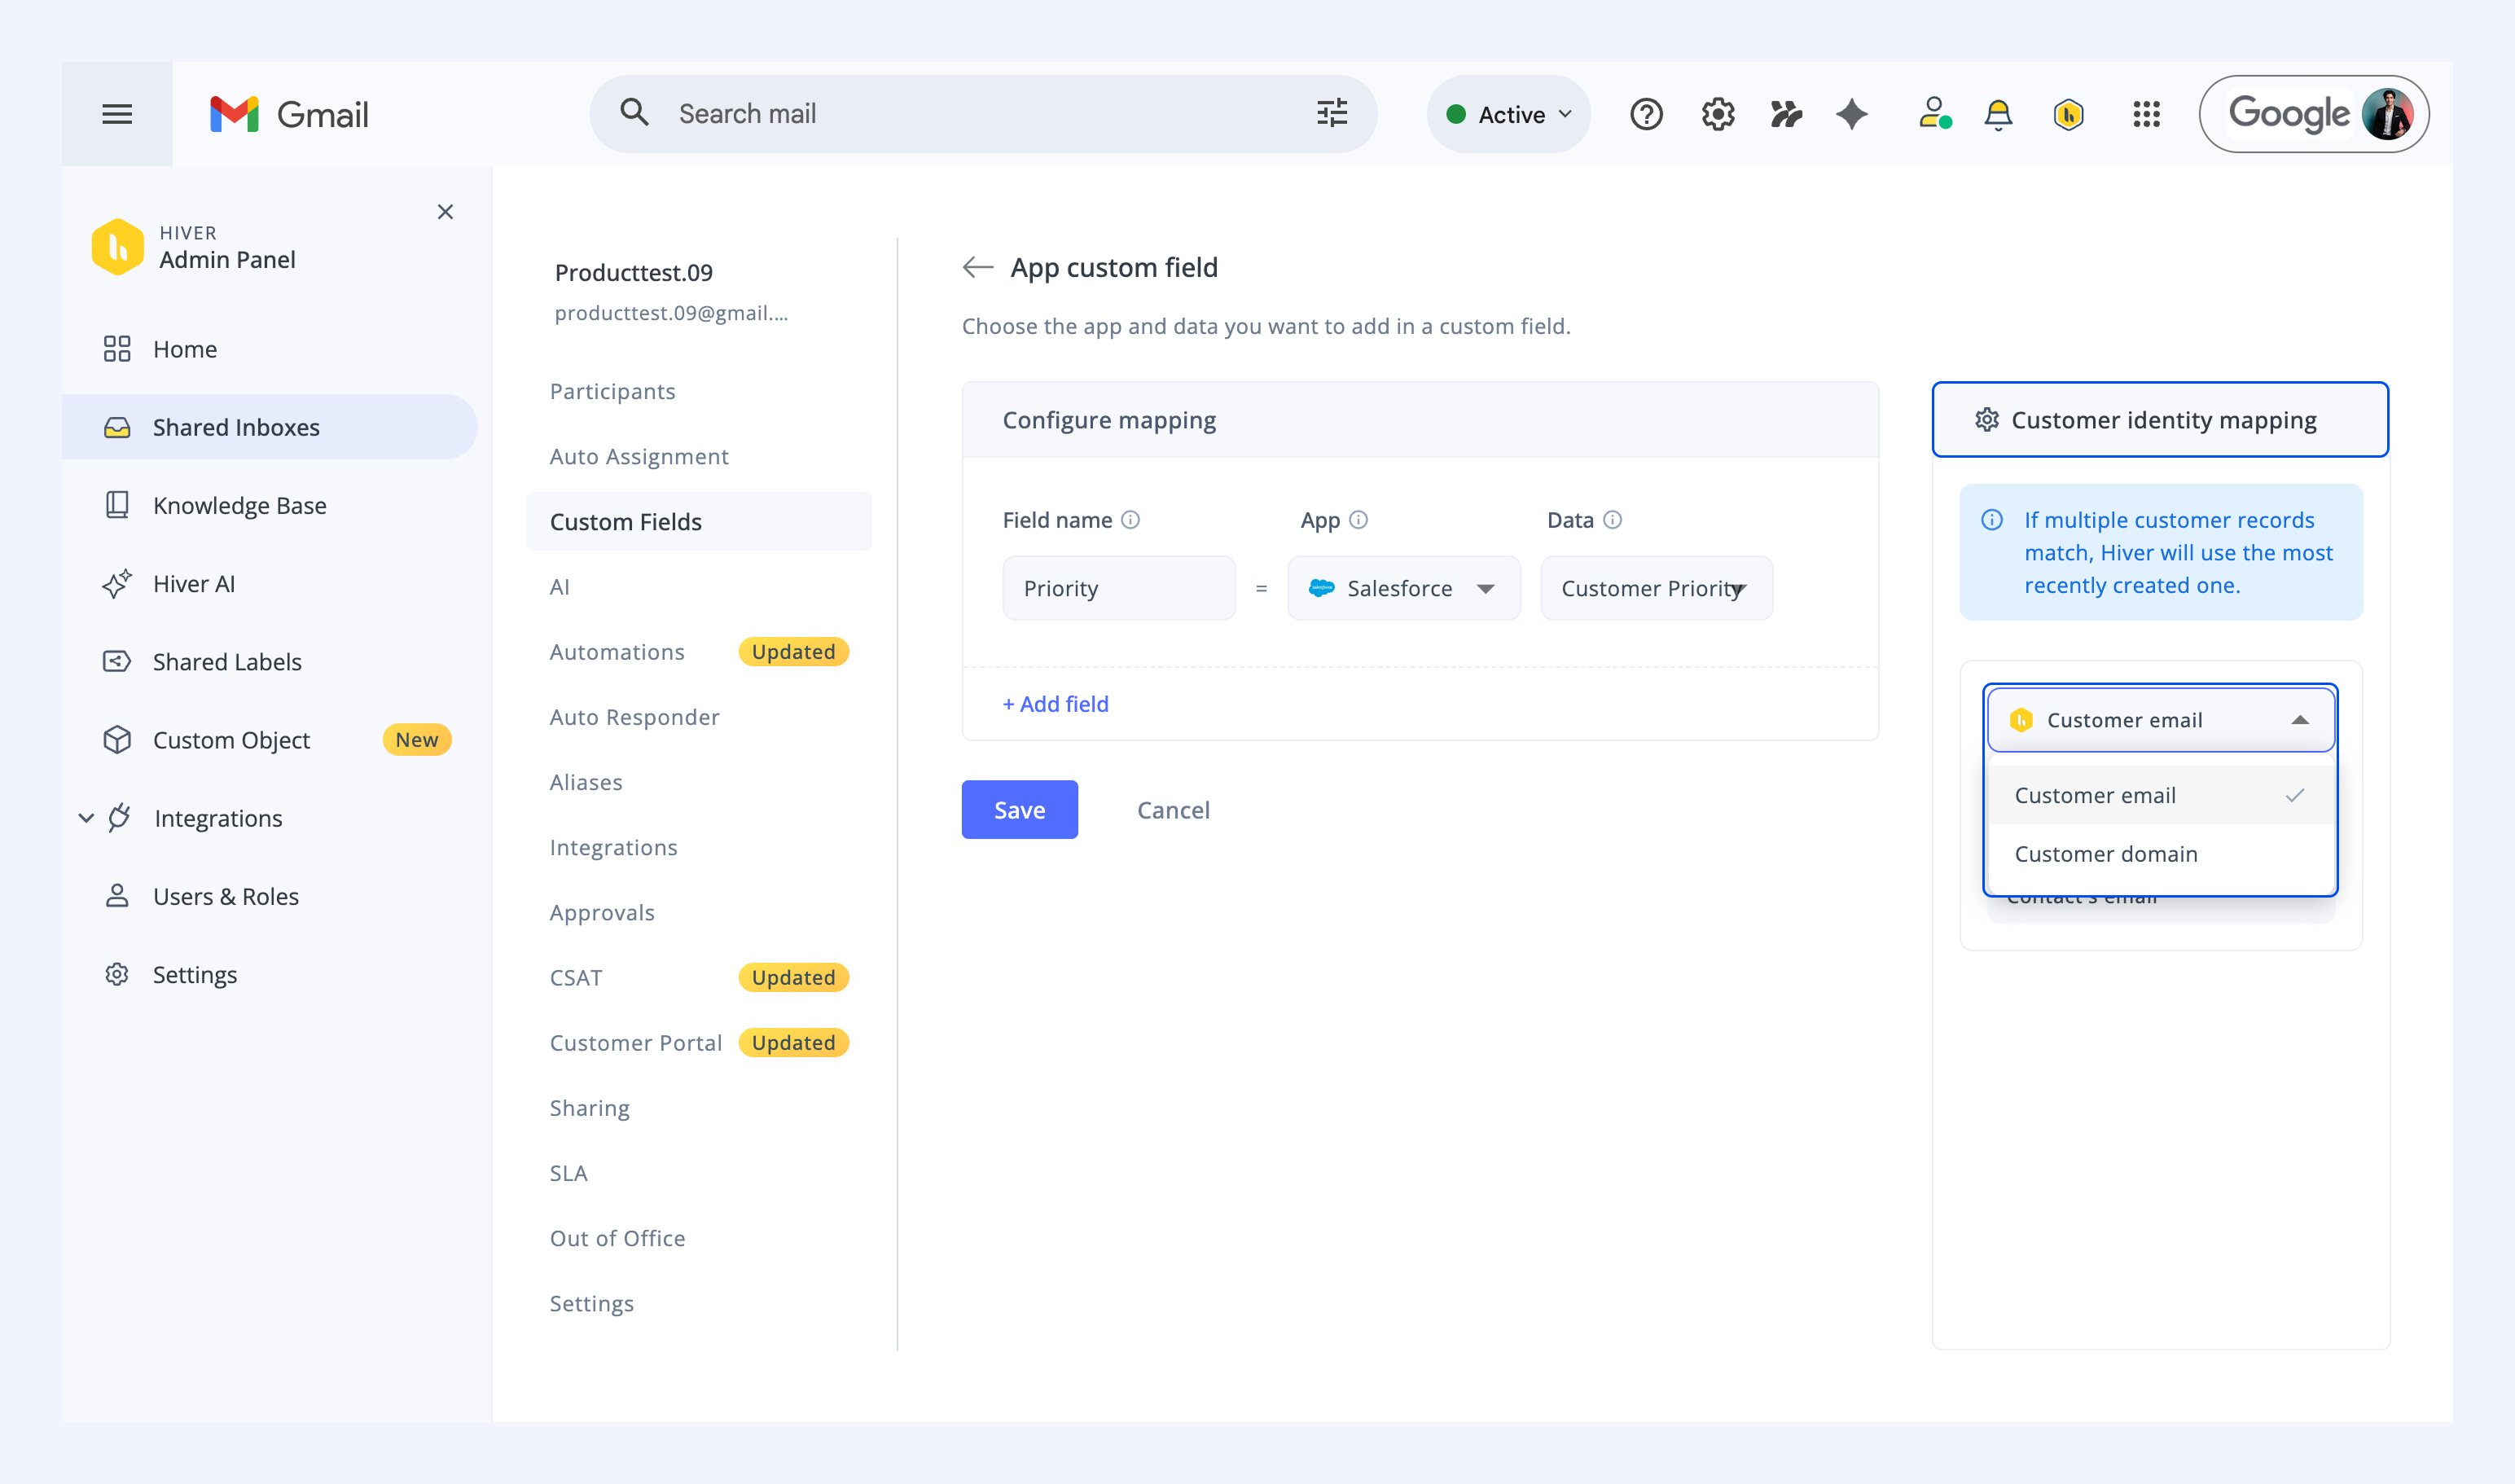
2. Under Configure mapping, enter a Field name. This is the label your team sees in the Hiver right panel.
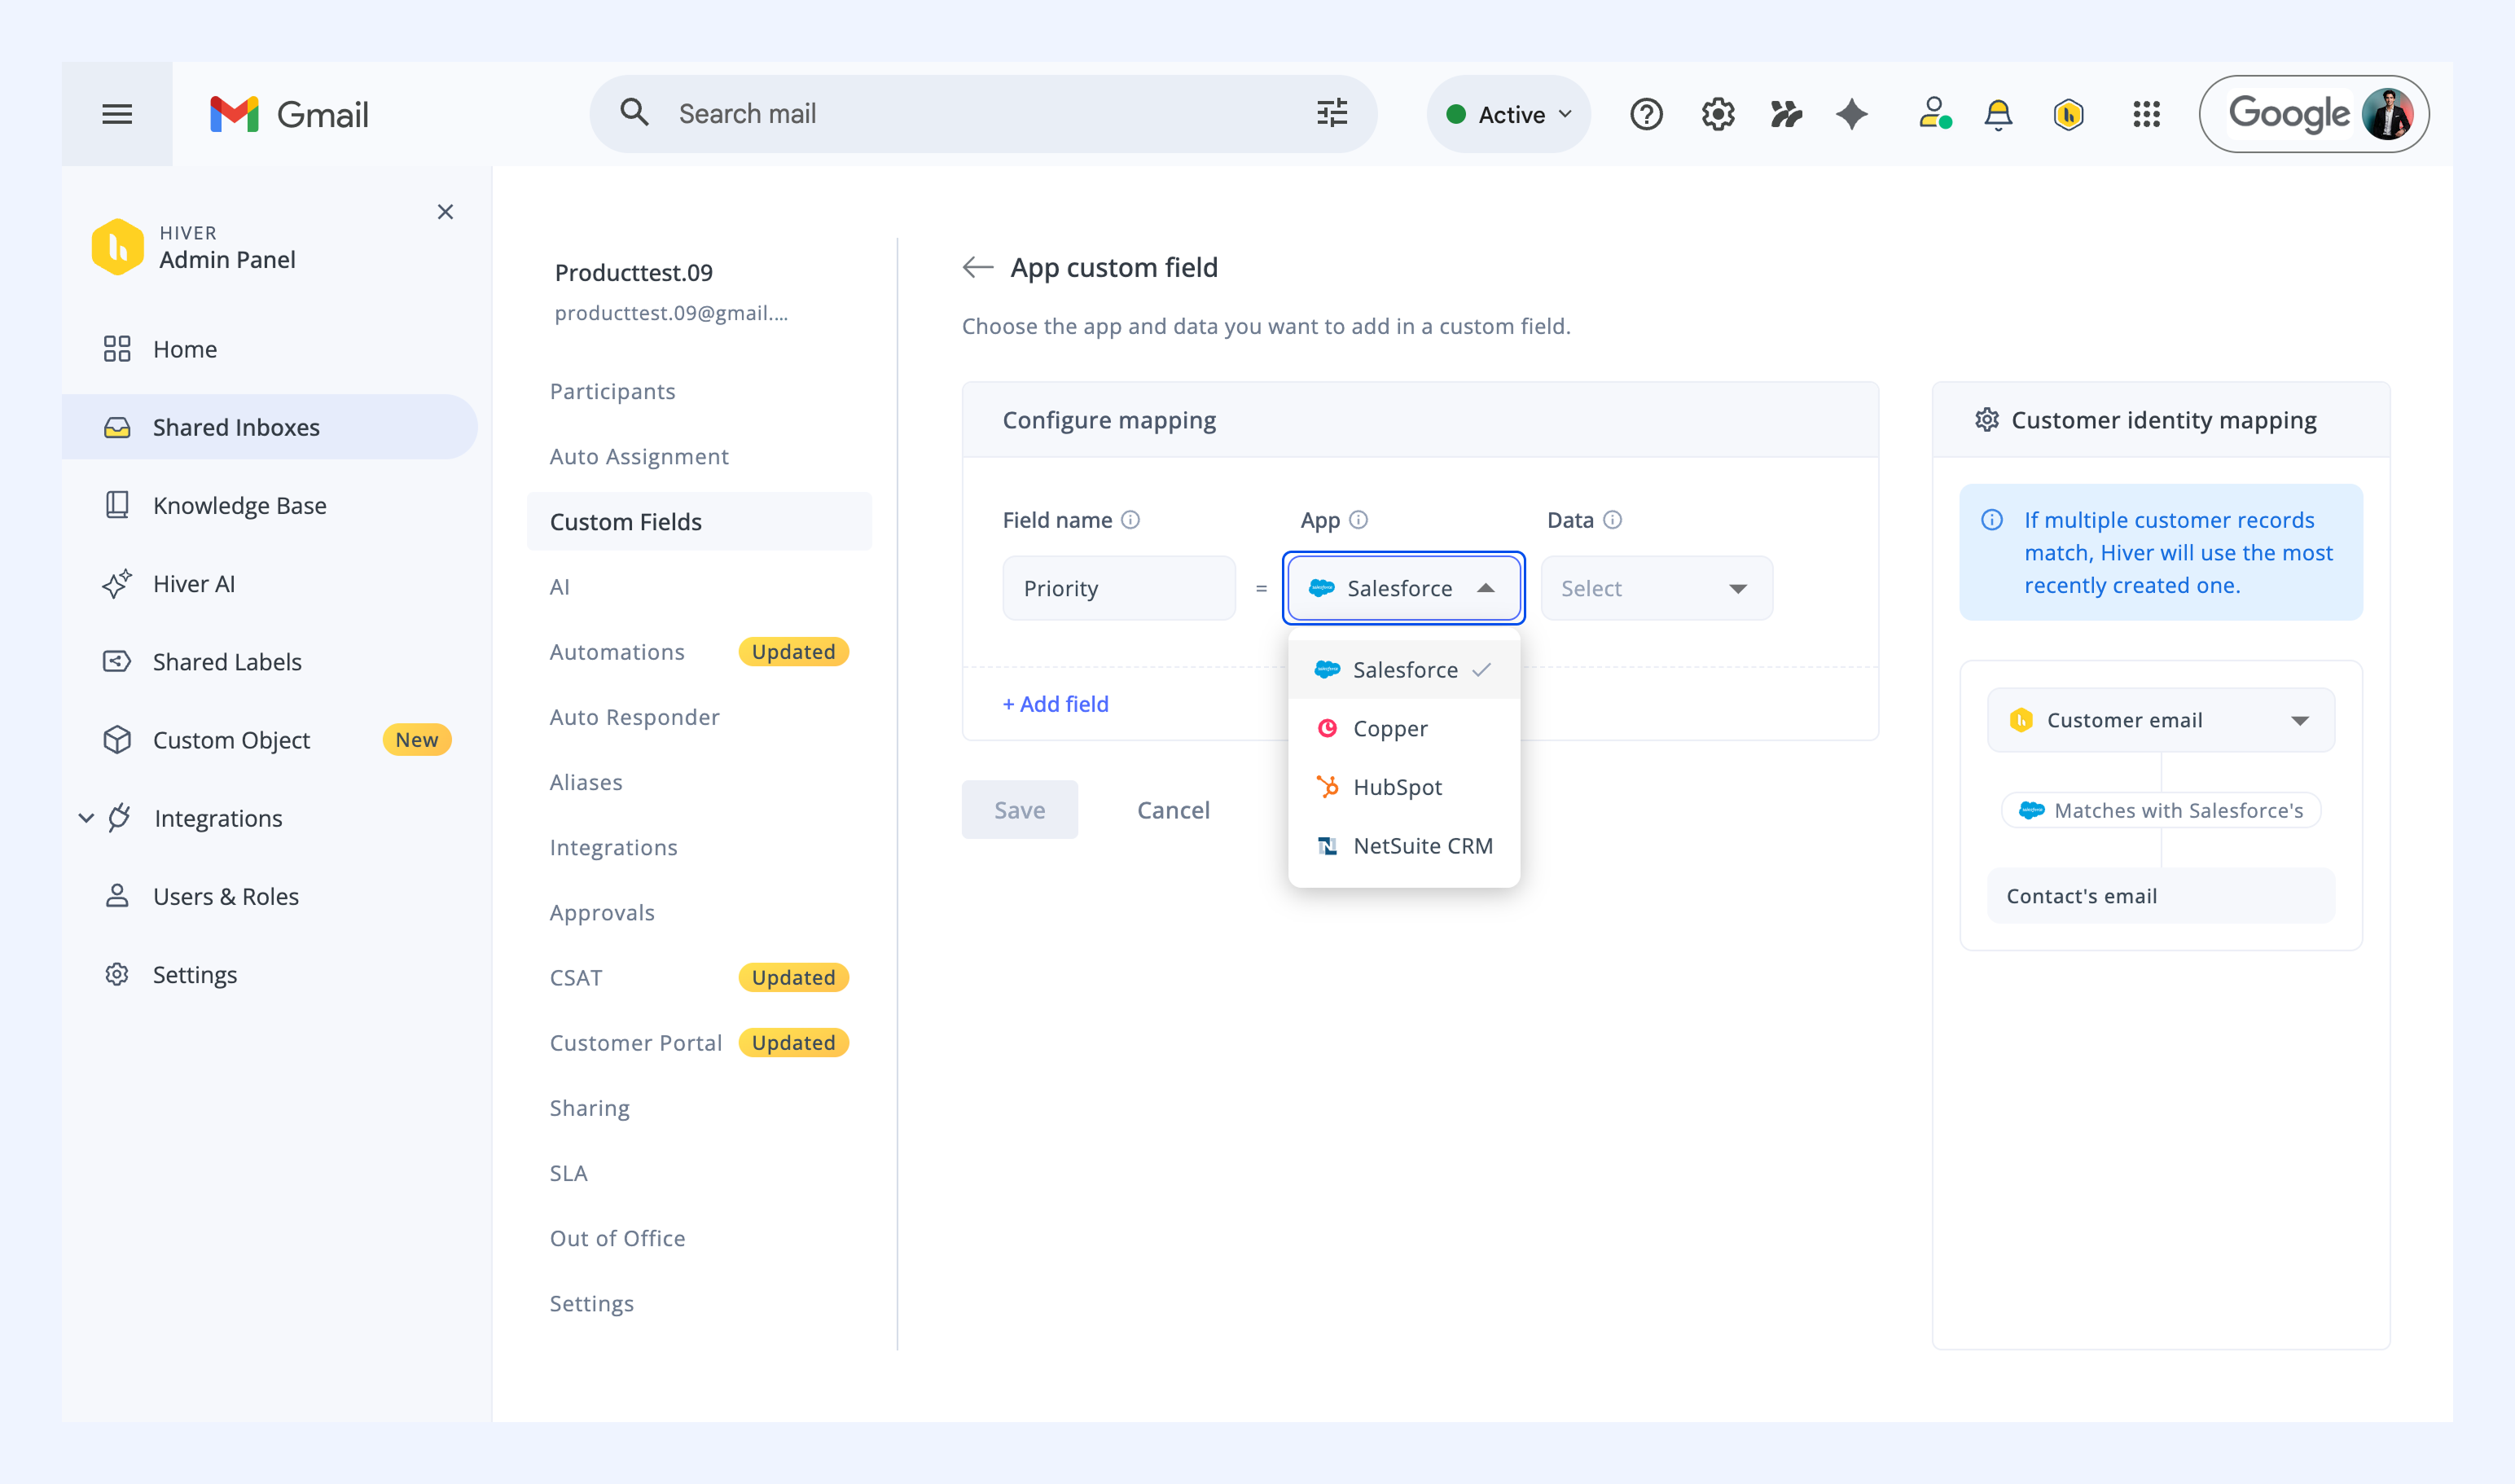
3. Select the App to pull data from: Salesforce, Copper, HubSpot, or NetSuite CRM.
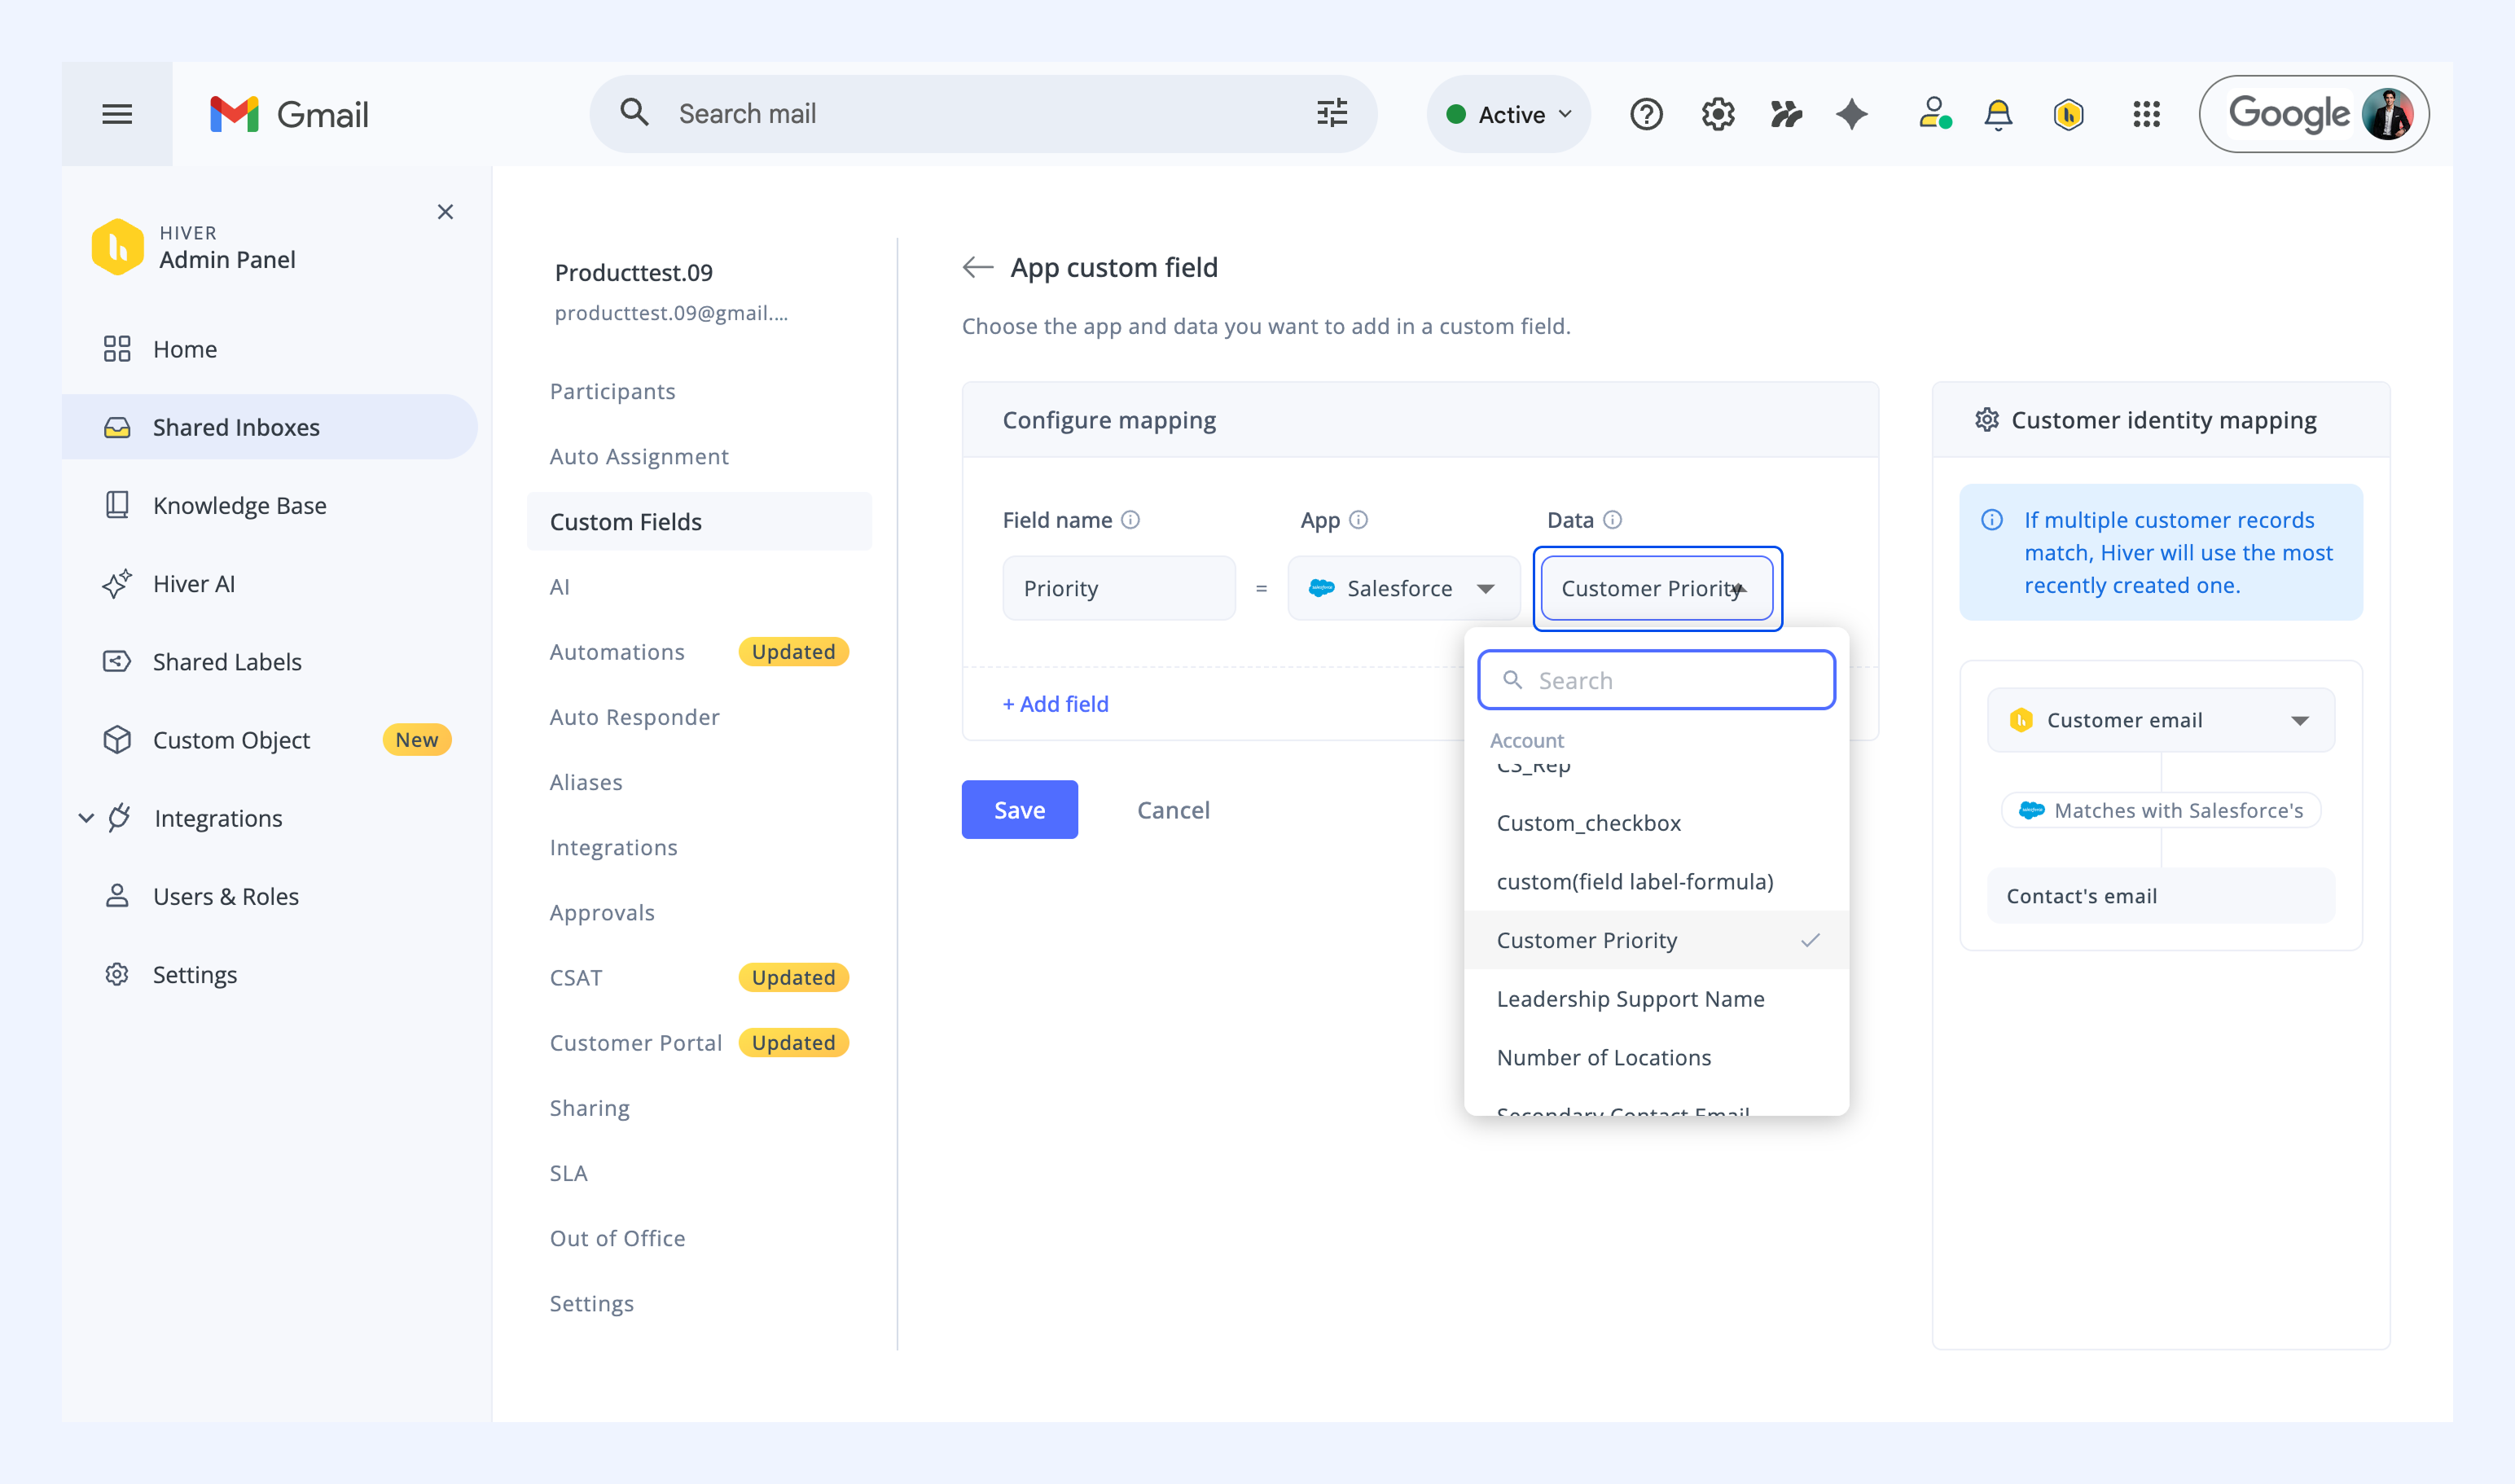
4. Under Data, pick the detail you want to show in the field.
5. Optionally, you can customize Customer identity mapping to define how Hiver should identify the right record in your connected app. You can pick Customer email or Customer domain and map it to the corresponding field from your app. Hiver will then match the customer using the defined mapping and pull the right pull details
Note: If multiple customer records match, Hiver shows the most recently created one.
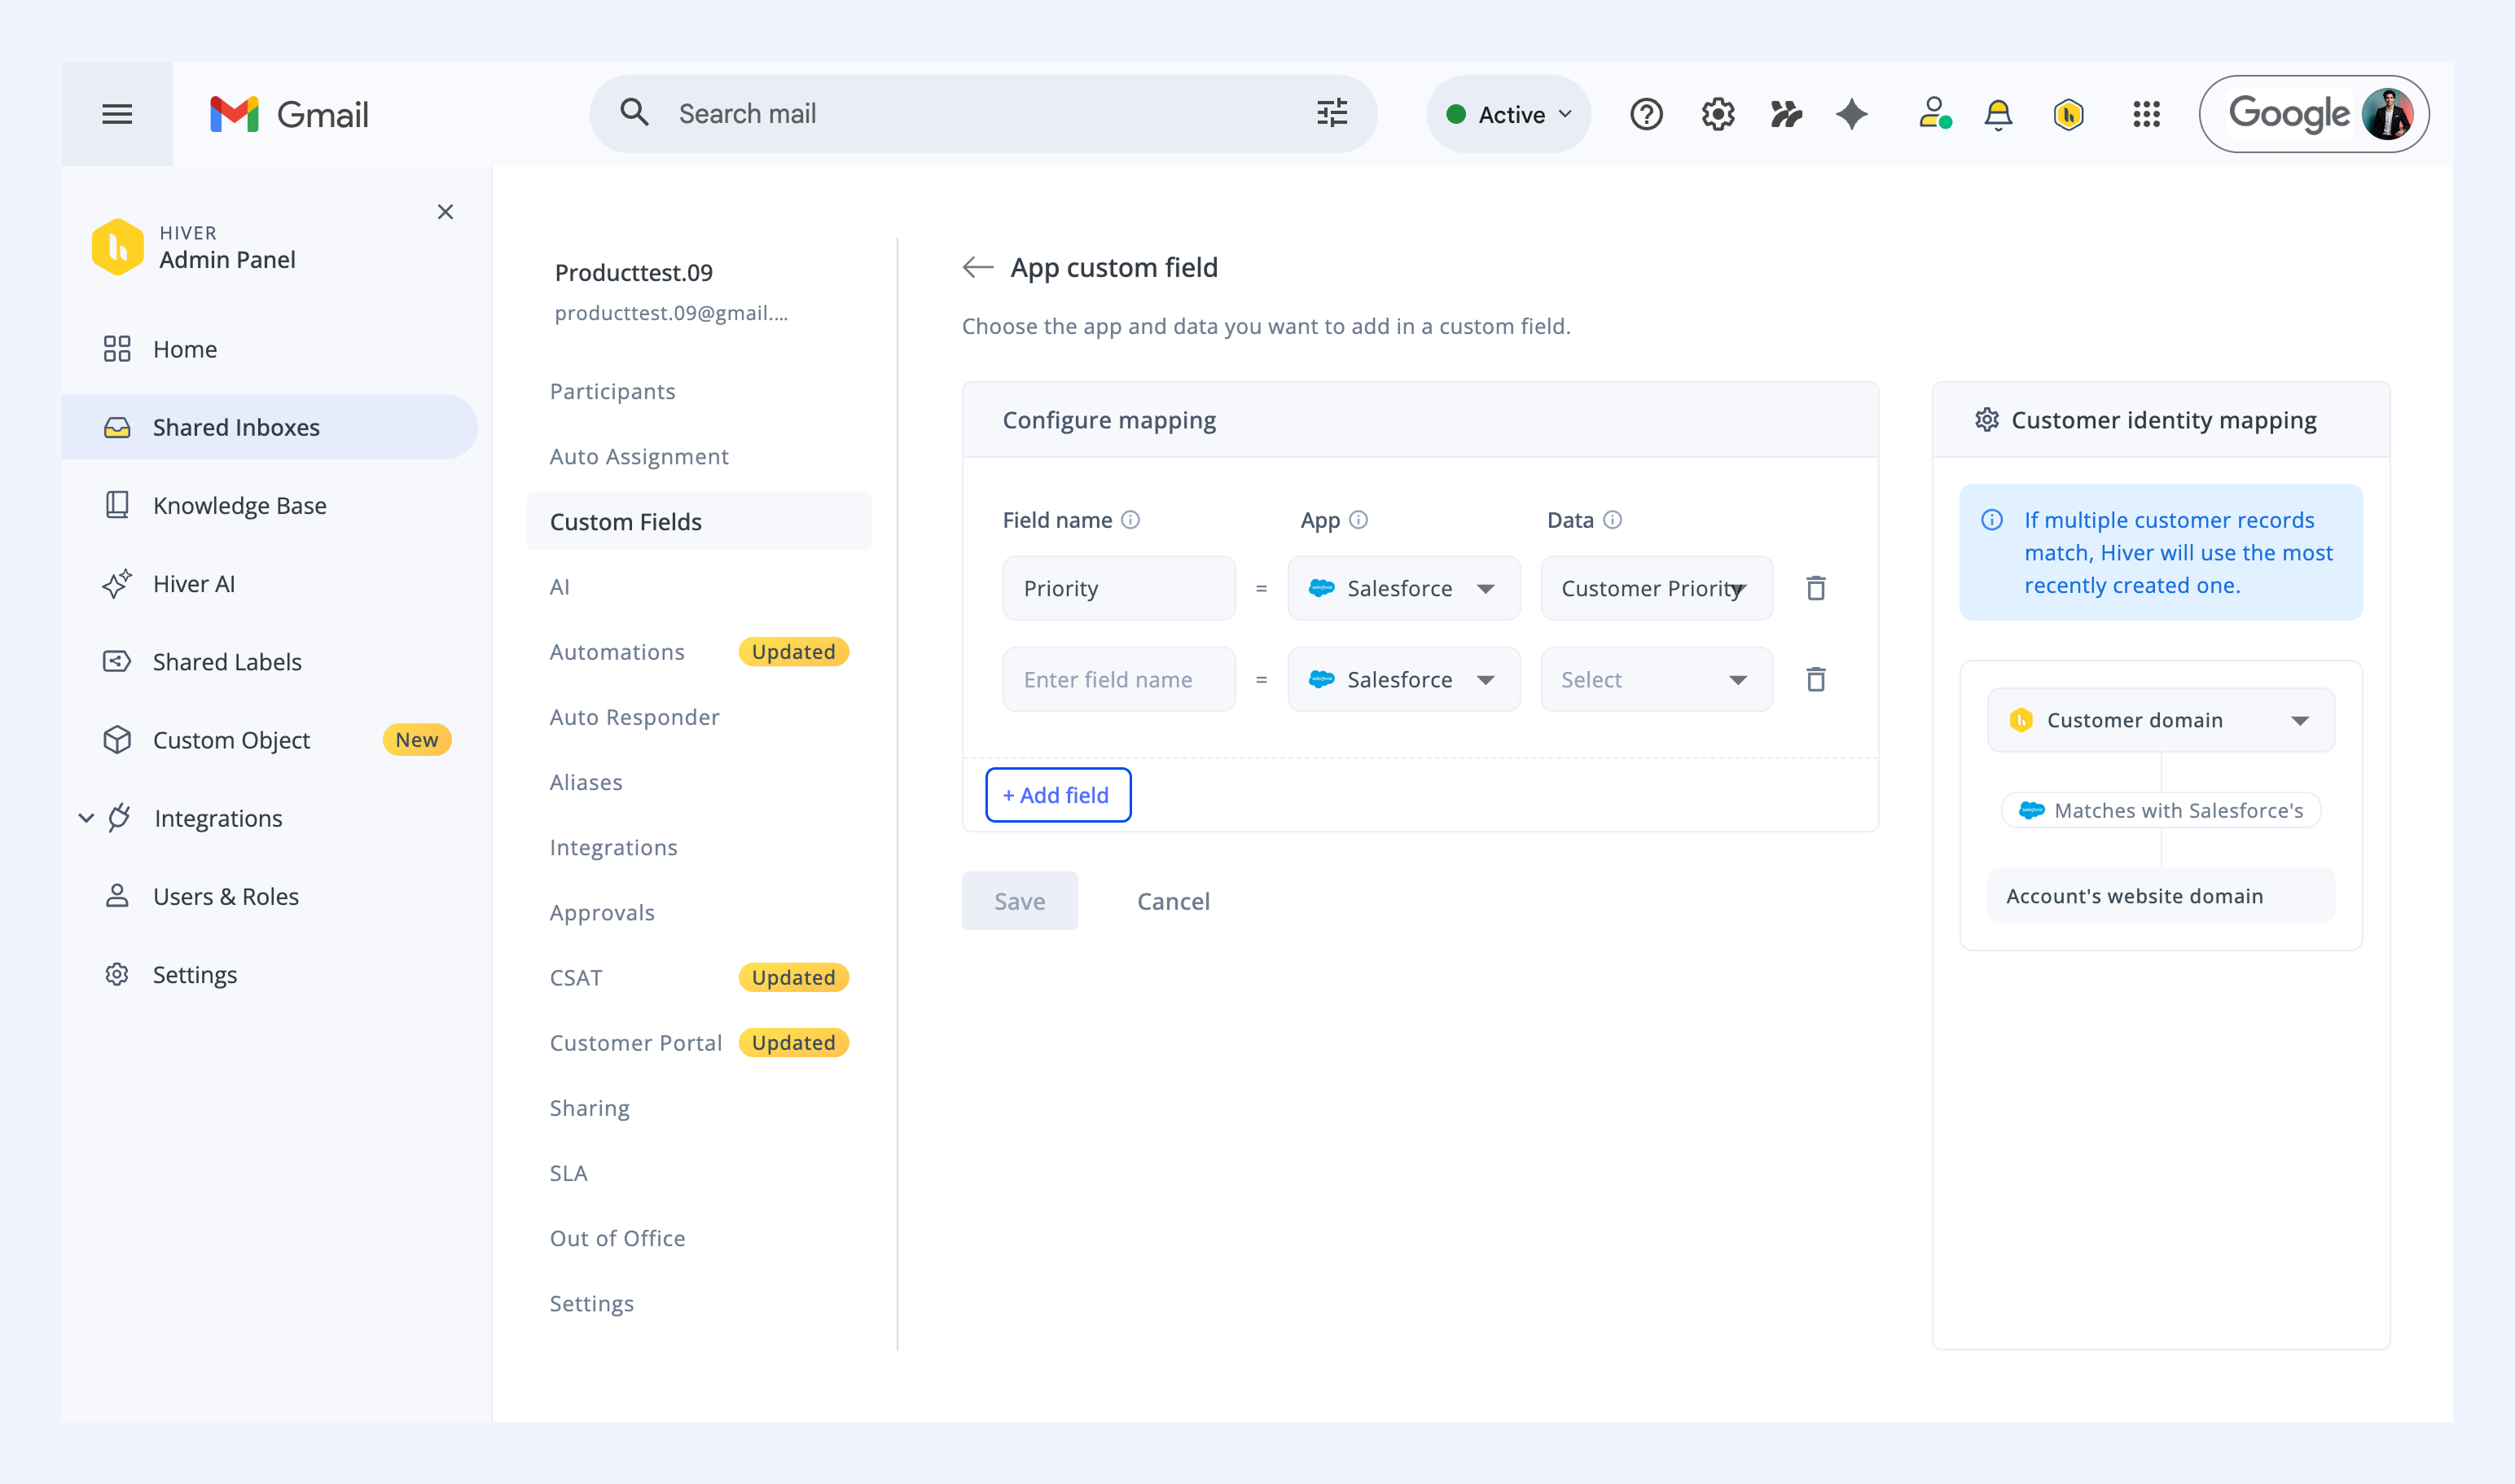
6. To pull another data point from the same app, click + Add field and repeat the mapping.
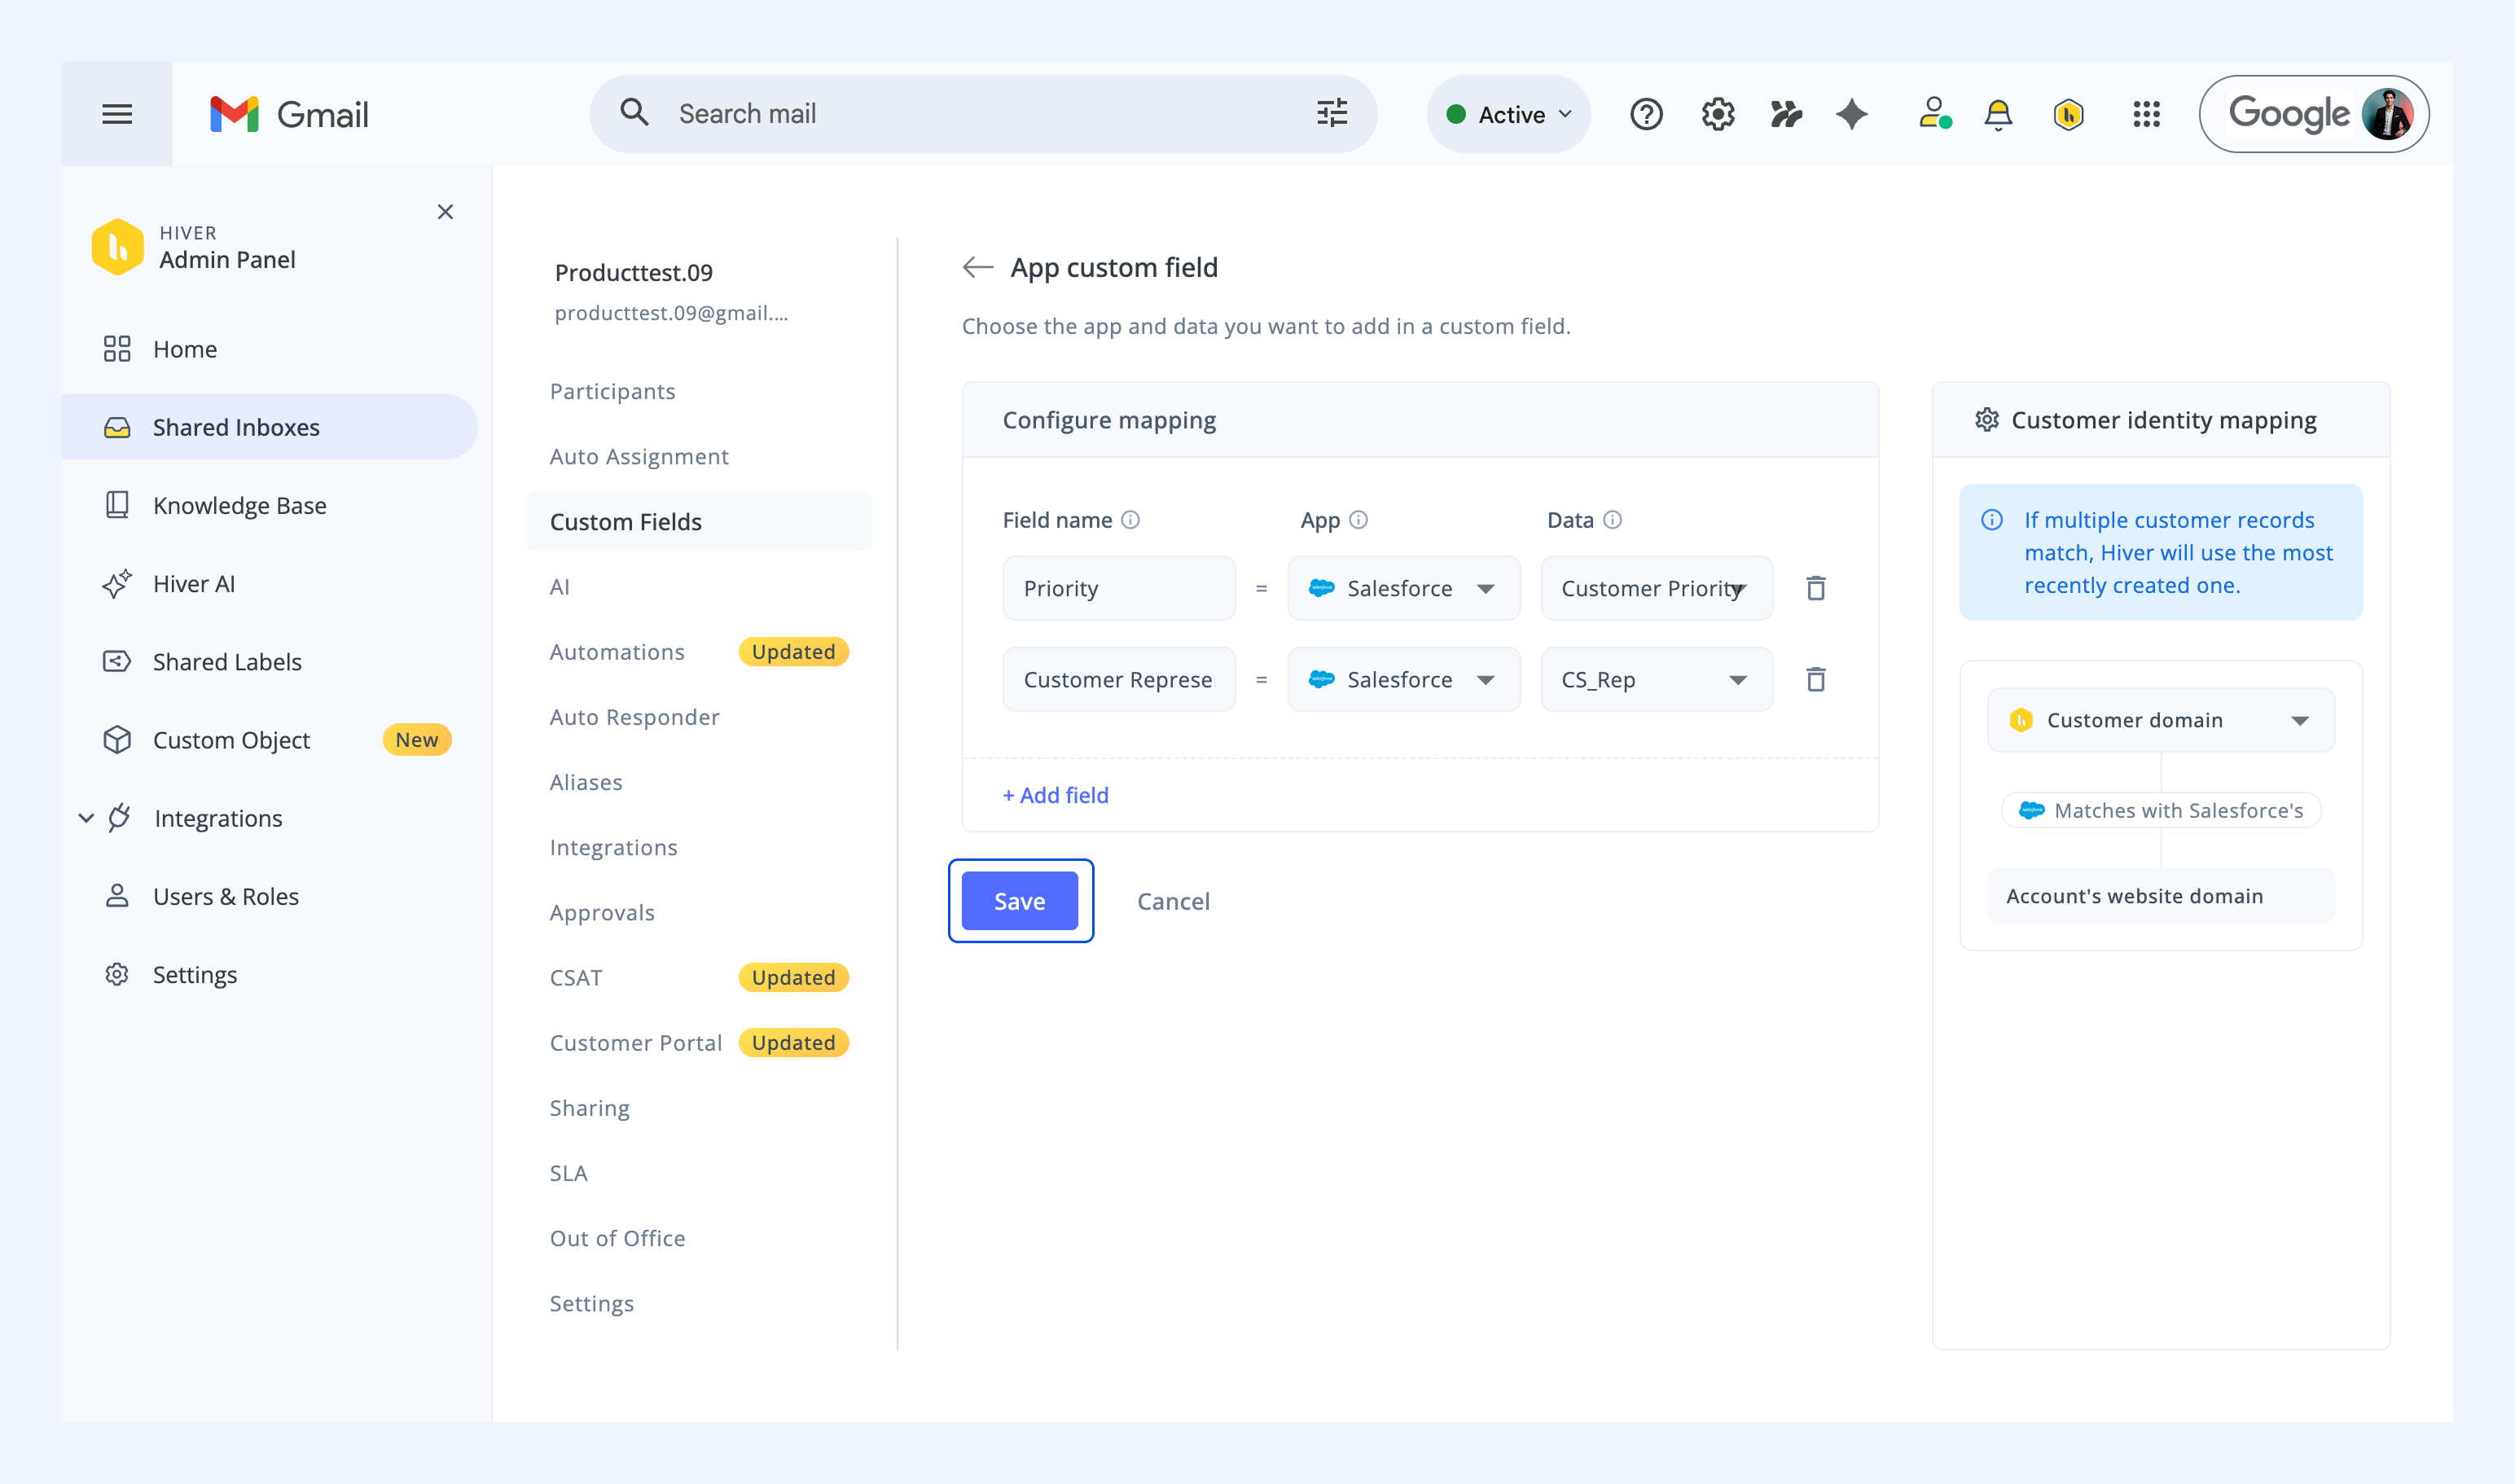
7. Click Save to create your Custom Field.
Filter your conversations by Custom Fields
You can use Custom Fields to filter and organize conversations, and quickly find essential interactions.
Here’s how:
1. From the left-side Hiver panel, select the filter icon at the top right corner.
2. Select the desired Custom Field criteria. Each Custom Field type offers specific filtering options:
- Text fields: Filter using contains, does not contain, starts with, or ends with
- Number fields: Filter using is less than, is greater than, is equal to, or is between
- Date fields: Filter using options like ‘is before,’ ‘is after,’ ‘is on,’ or ‘is between’
- Dropdown fields: Filter using the dropdown values
- Is empty condition (New): Filter for empty date, number, and text-type Custom Fields
- App custom fields: Filter using the values Hiver pulls in from your connected app.
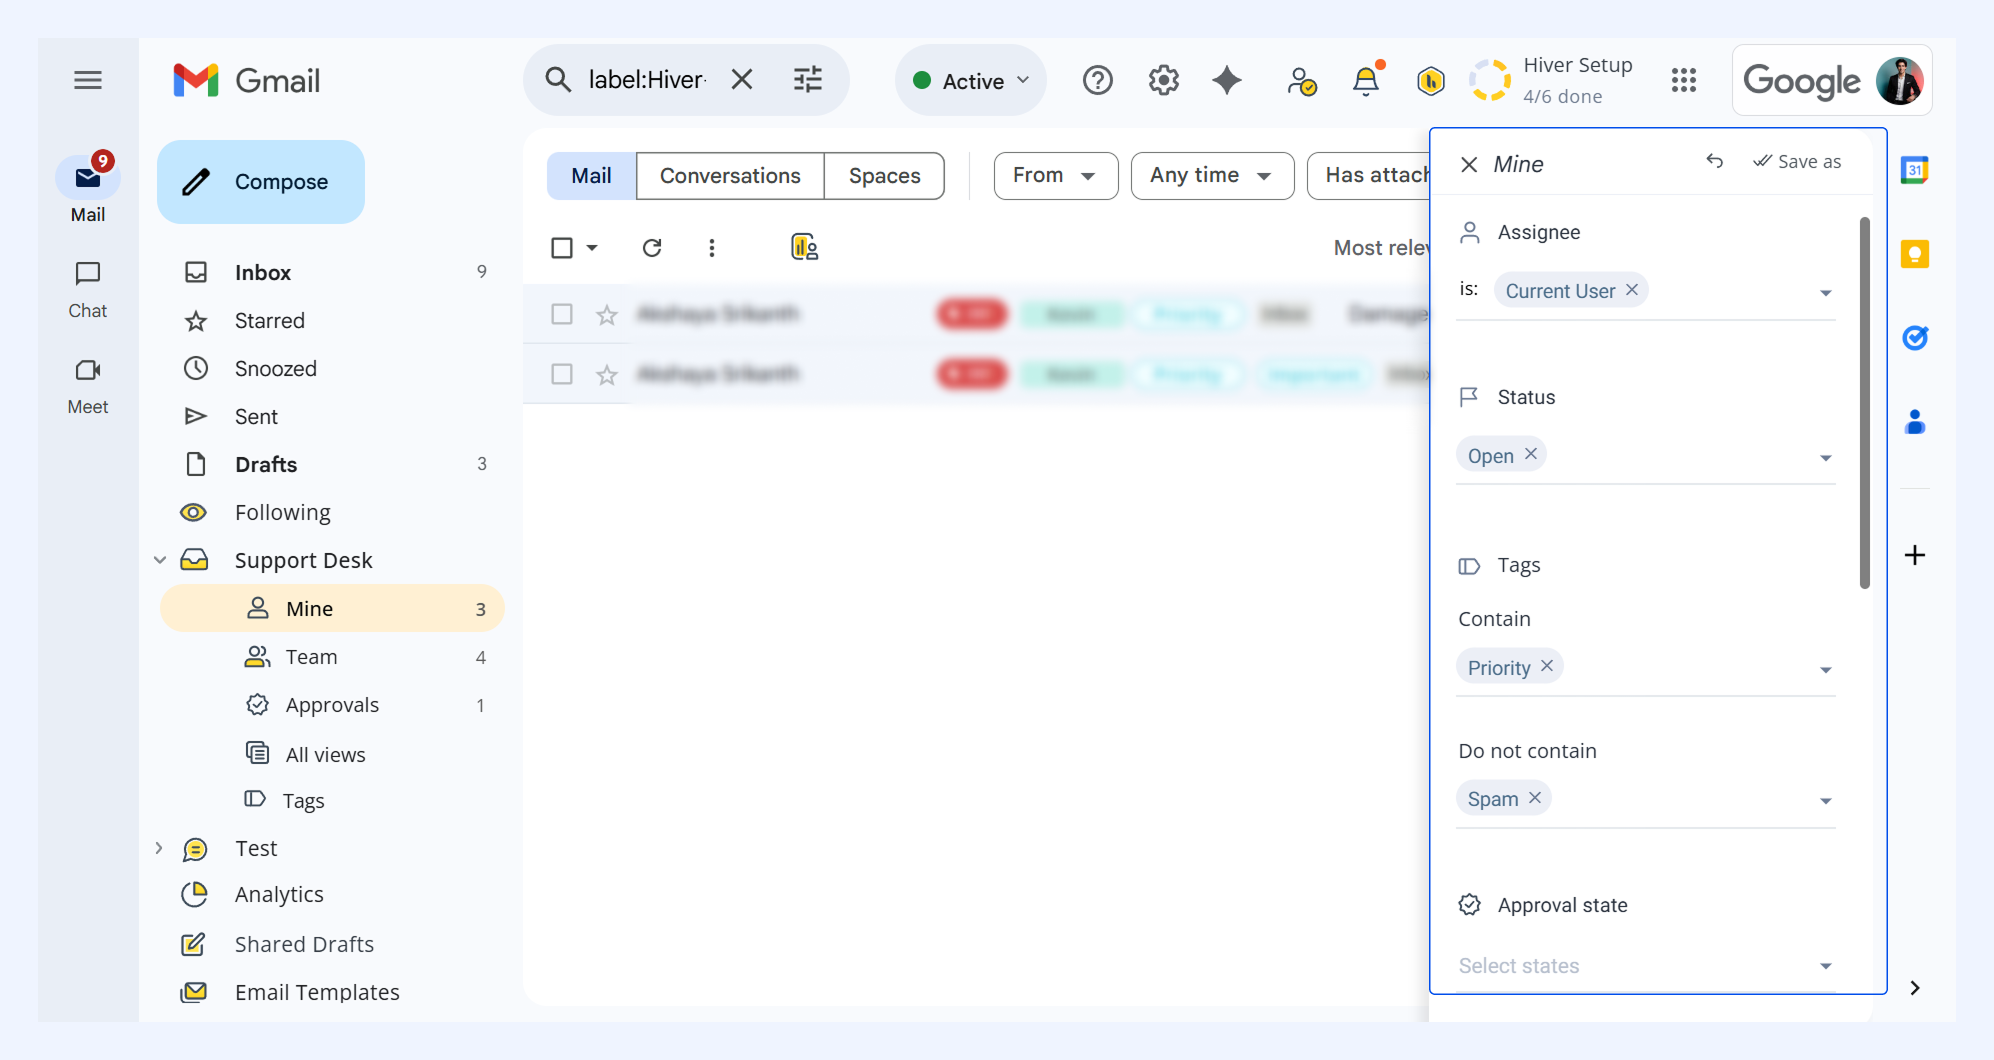
3. Save filters you use frequently by clicking the Save as button. This creates a new email view accessible from the 'All views' option in the left panel.
Note: Custom Fields filter options are not available on 'Assigned to me' and 'Following' views.
Managing your Custom Fields
Once you've created Custom Fields, you can adapt these fields as your team's needs change.
Go to Admin panel → Shared Inbox → Relevant Inbox → Custom Fields.
Editing Custom Fields
- Find the field to make changes and select the Edit icon beside it.
- Update the name, description, or default value and select Save field.
Disabling Custom Fields
- Go to the Custom Fieldlist screen.
- Use the toggle switch to disable the field.
Note: Disabled fields will not appear in new conversations. In existing conversations where values were previously added, they will appear in a disabled state.
Extracting insights from Custom Fields
To get insights from your Custom Field data, navigate to Analytics from Gmail's left panel. Select the Shared Inbox for which you want to generate.
Grouping conversations by Custom Fields
View and analyze your conversations based on the Custom Field you've created:
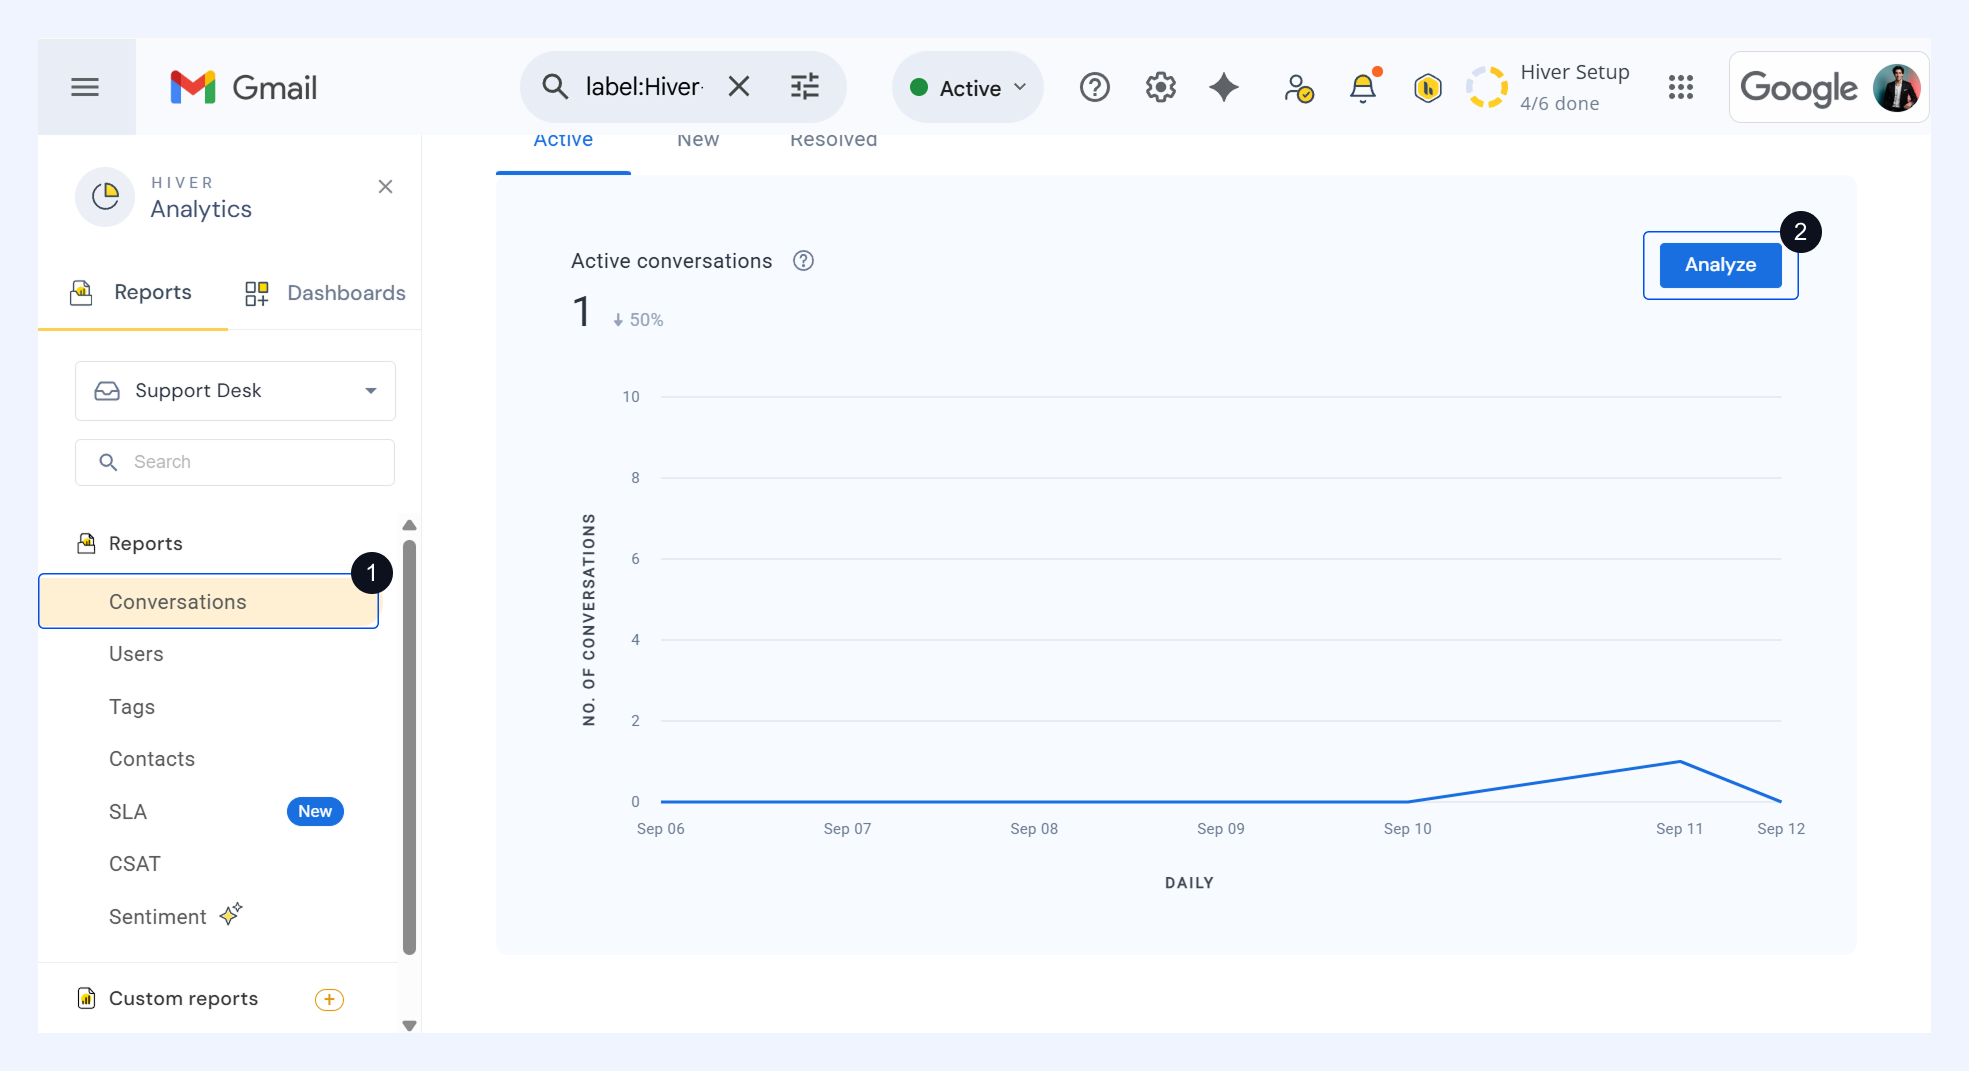
1. Select conversations from the left side panel and click Analyze.
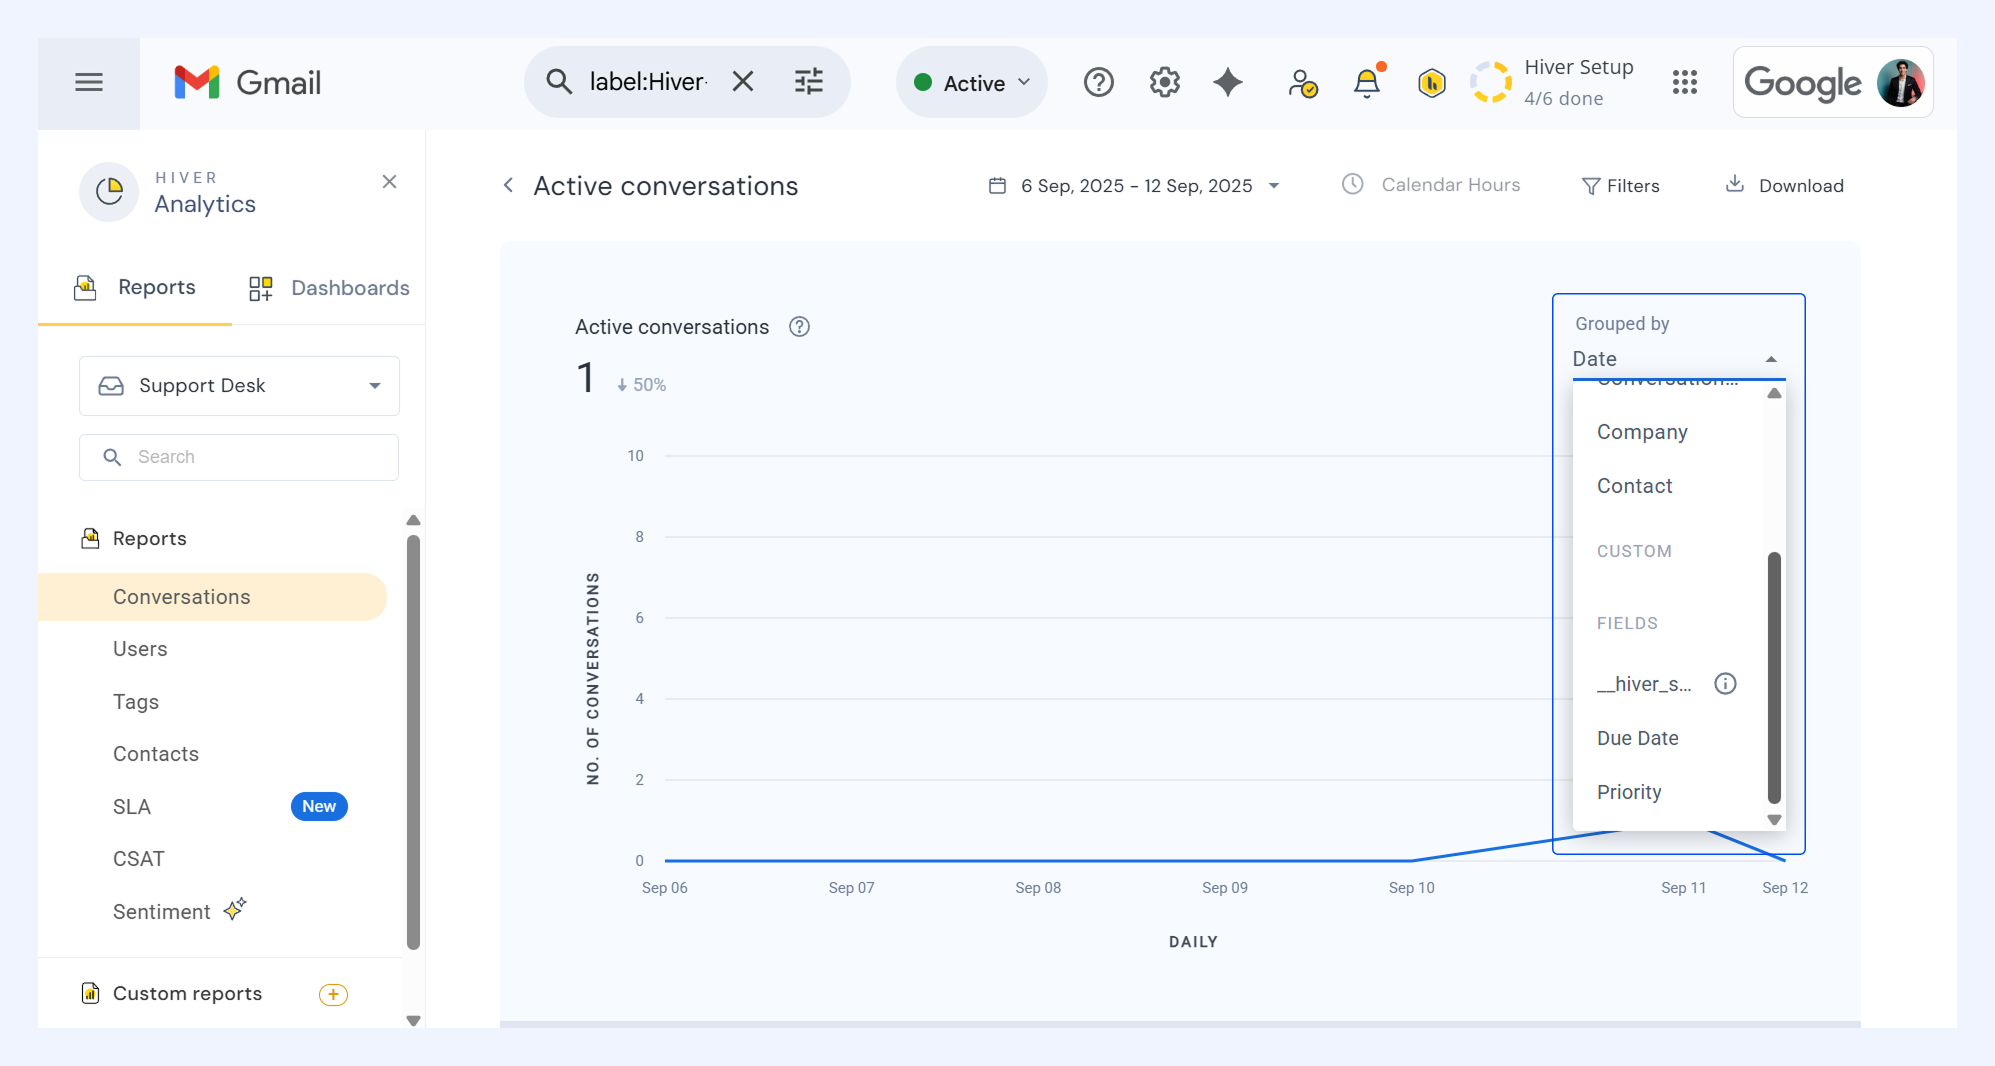
2. Click the Grouped by dropdown and choose a custom field. For example, filter conversations based on a Custom Field like ‘Priority’ to view active conversations marked as ‘High,’ ‘Medium,’ or ‘Low.’
Creating custom reports with Custom Field data
You can use the data you’ve collected to build customized reports and track the metrics that matter most to your team.
1. On the left panel, click the (+) option to create a custom report.
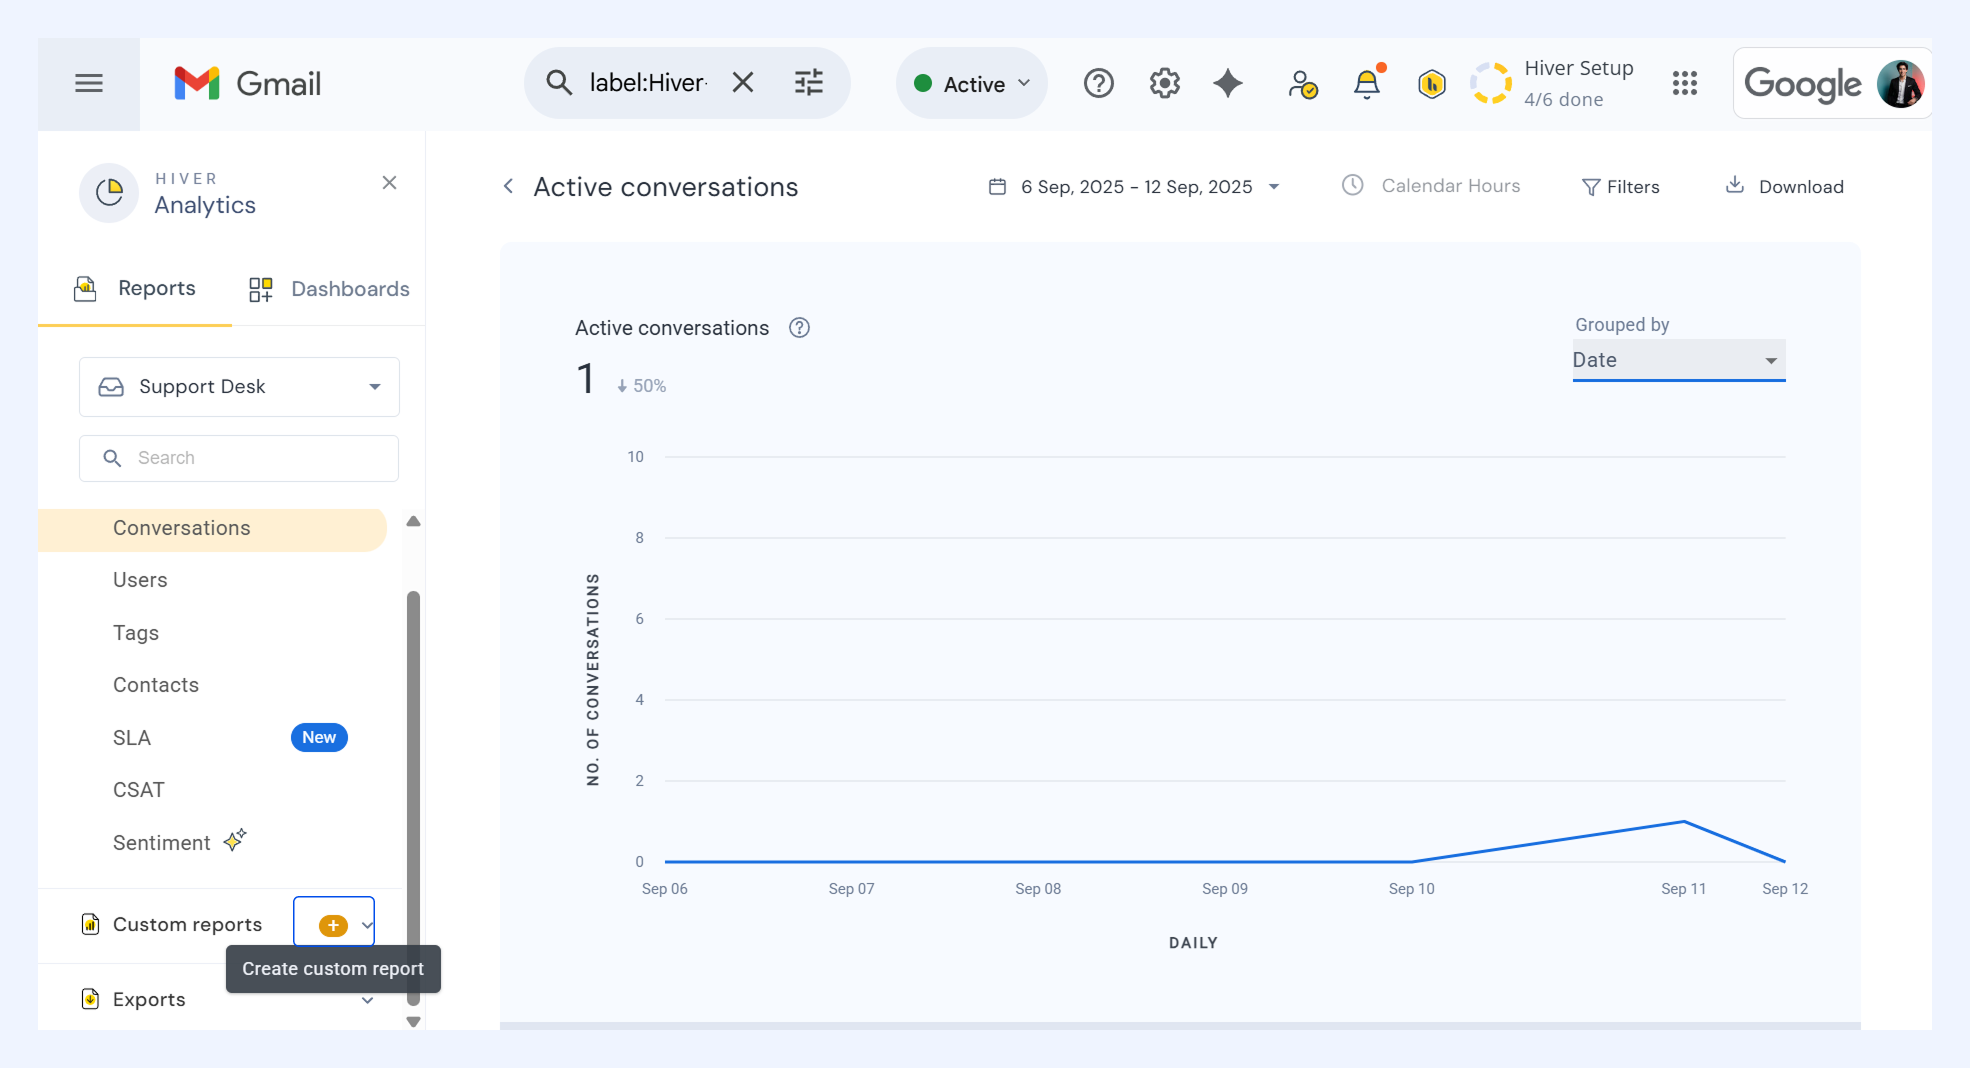
2. On the right panel that appears, choose metrics you want to report on, along with the date range and filters.
3. Select your Custom Fields and choose specific filters.
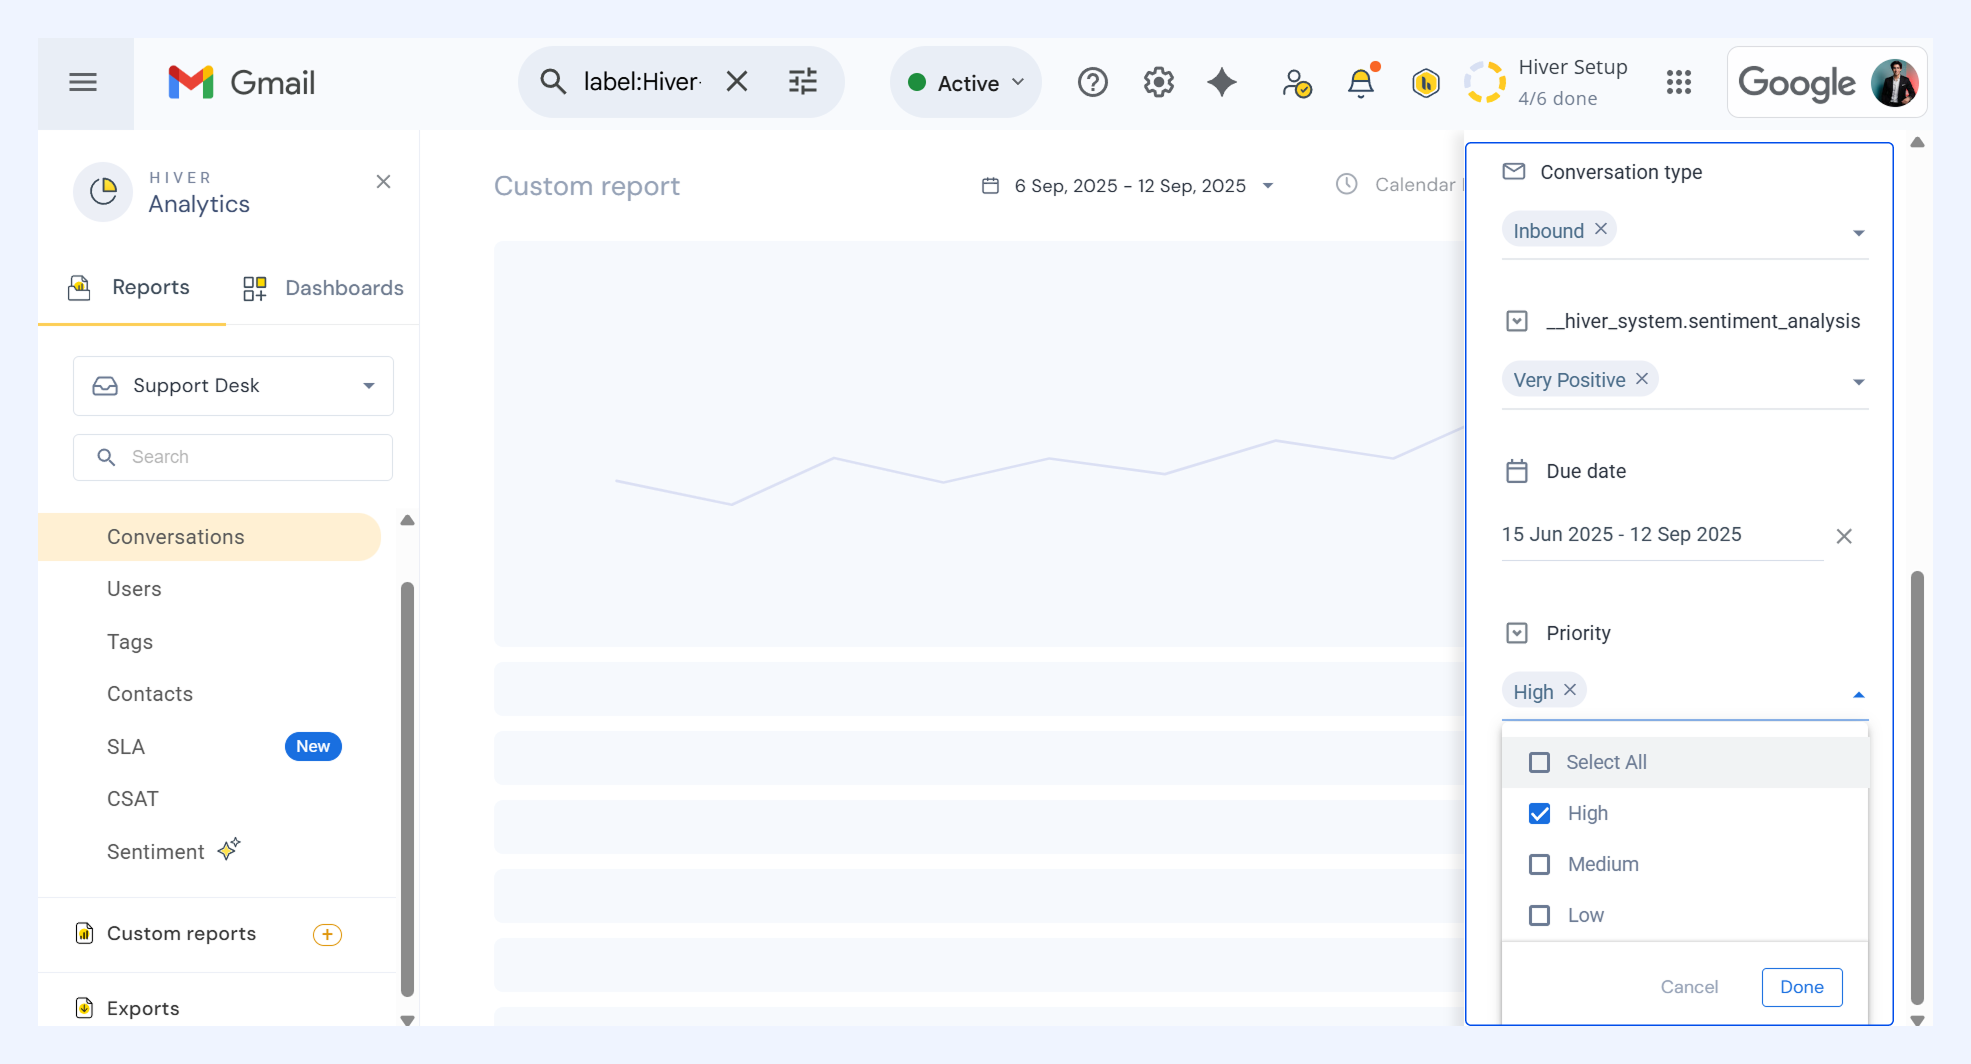
4. Preview the report and select Save as custom report.
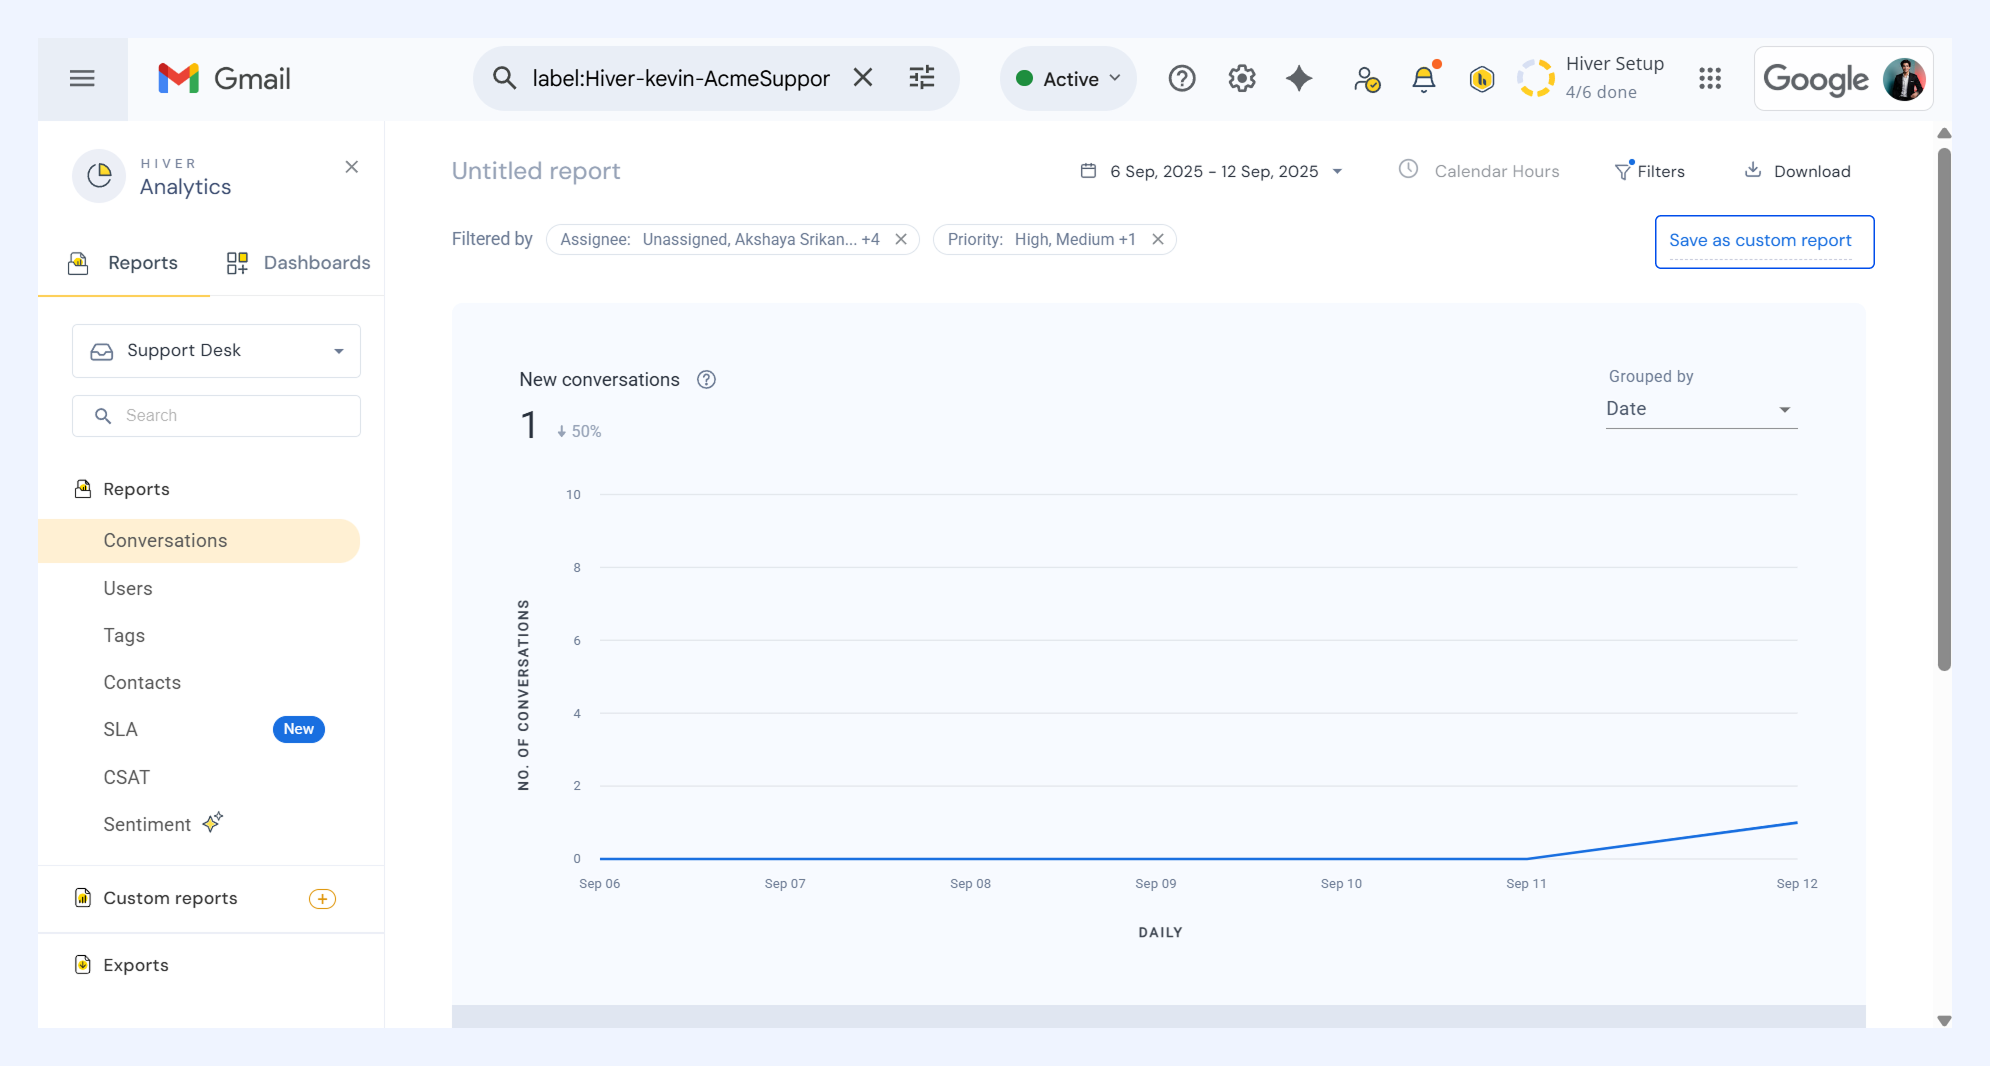
Export your Custom Fields data
Download your Custom Field data for deeper analysis or sharing with stakeholders:
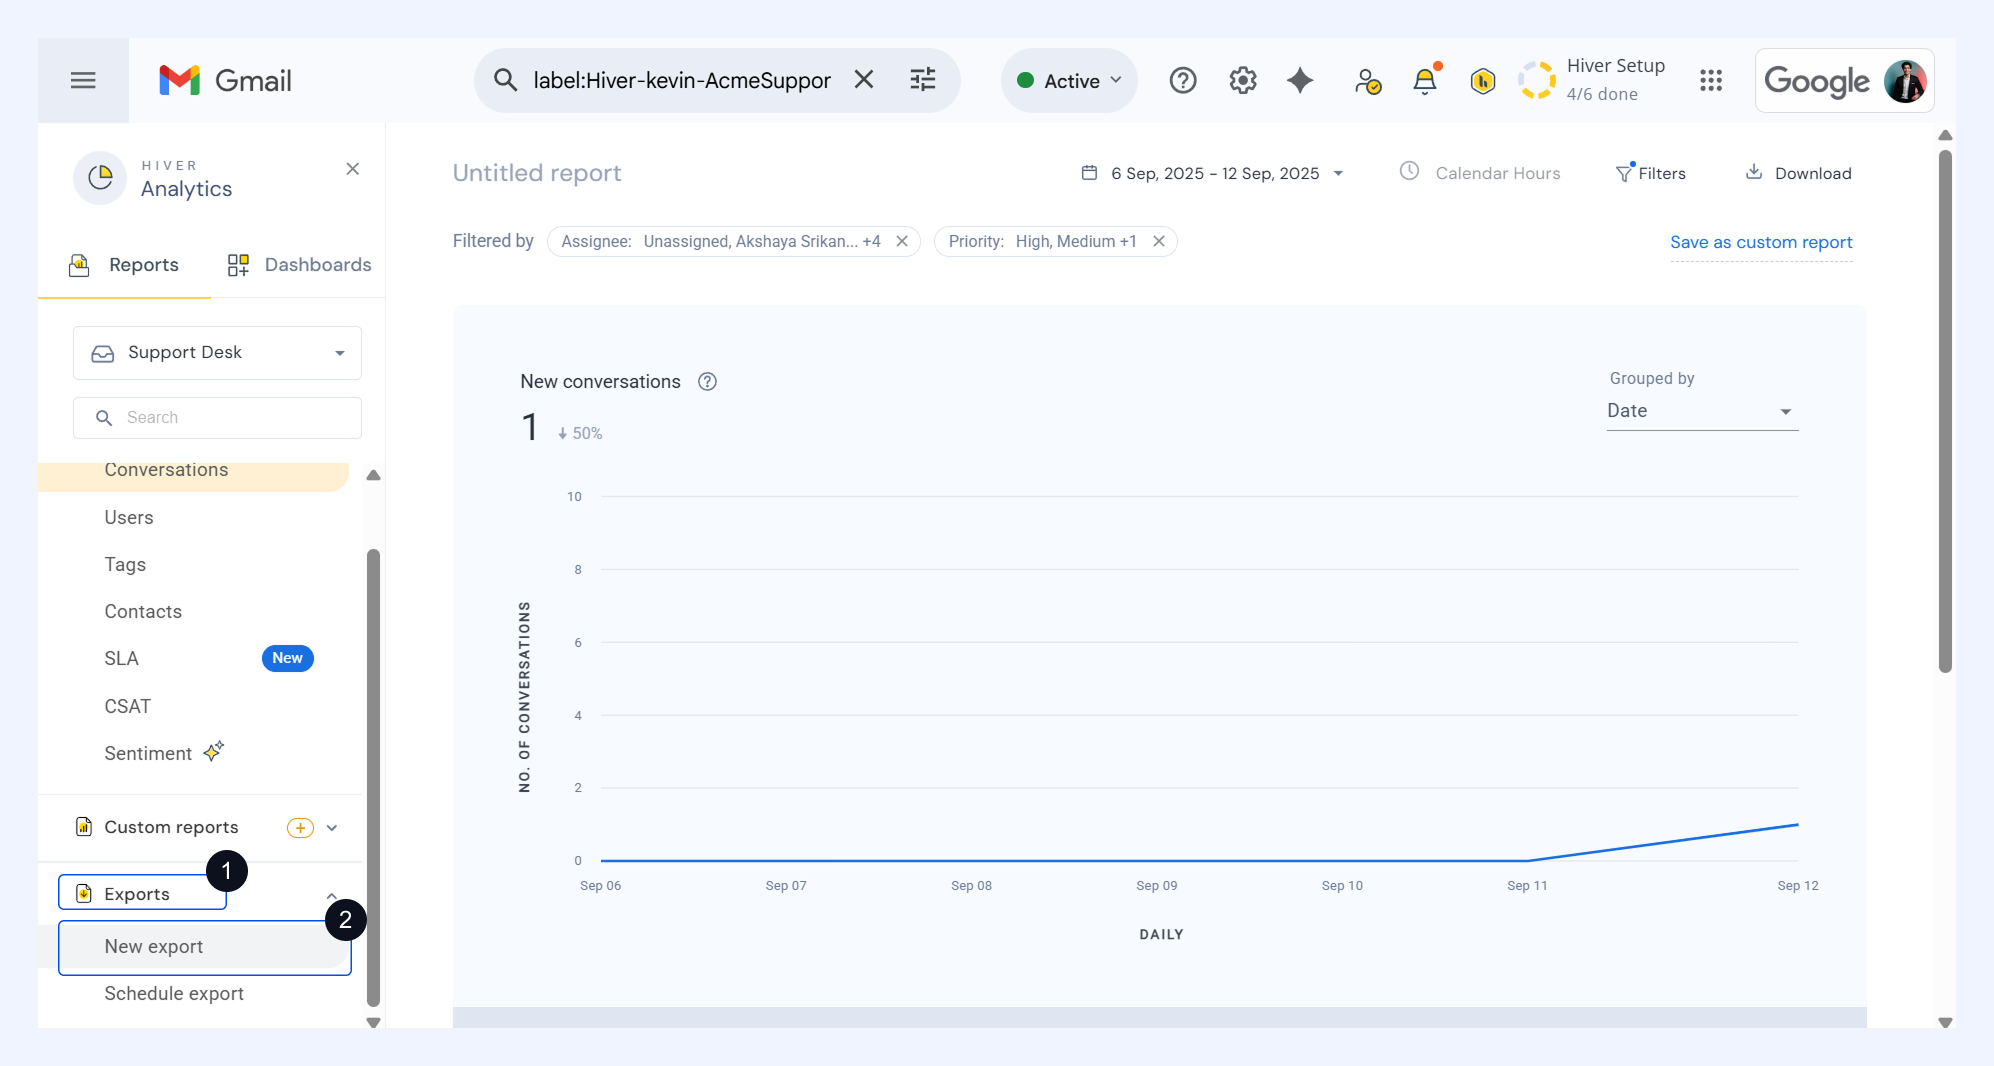
1. Click on Exports and select New export.
2. Choose metrics you want to report on, along with the date range and filters.
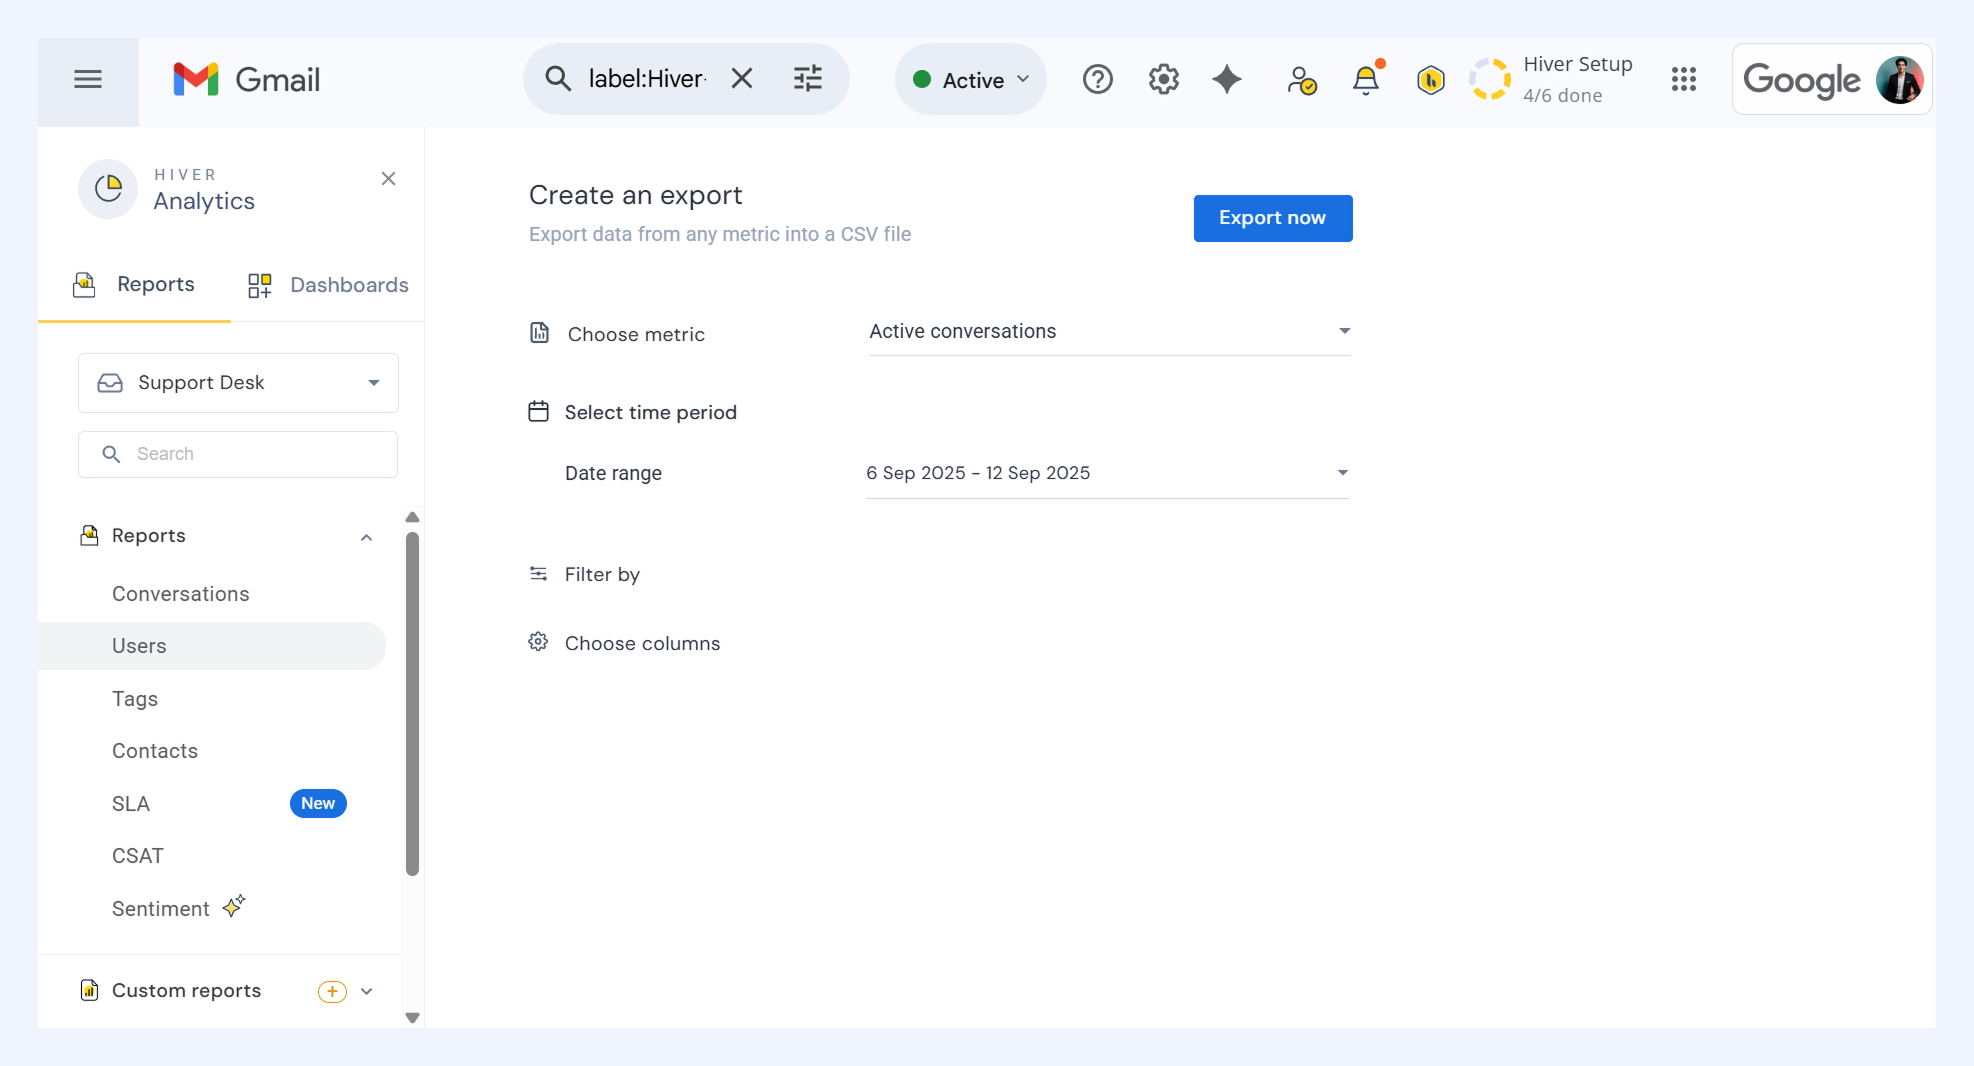
3. From the Choose columns section, select the Custom Fields to export.
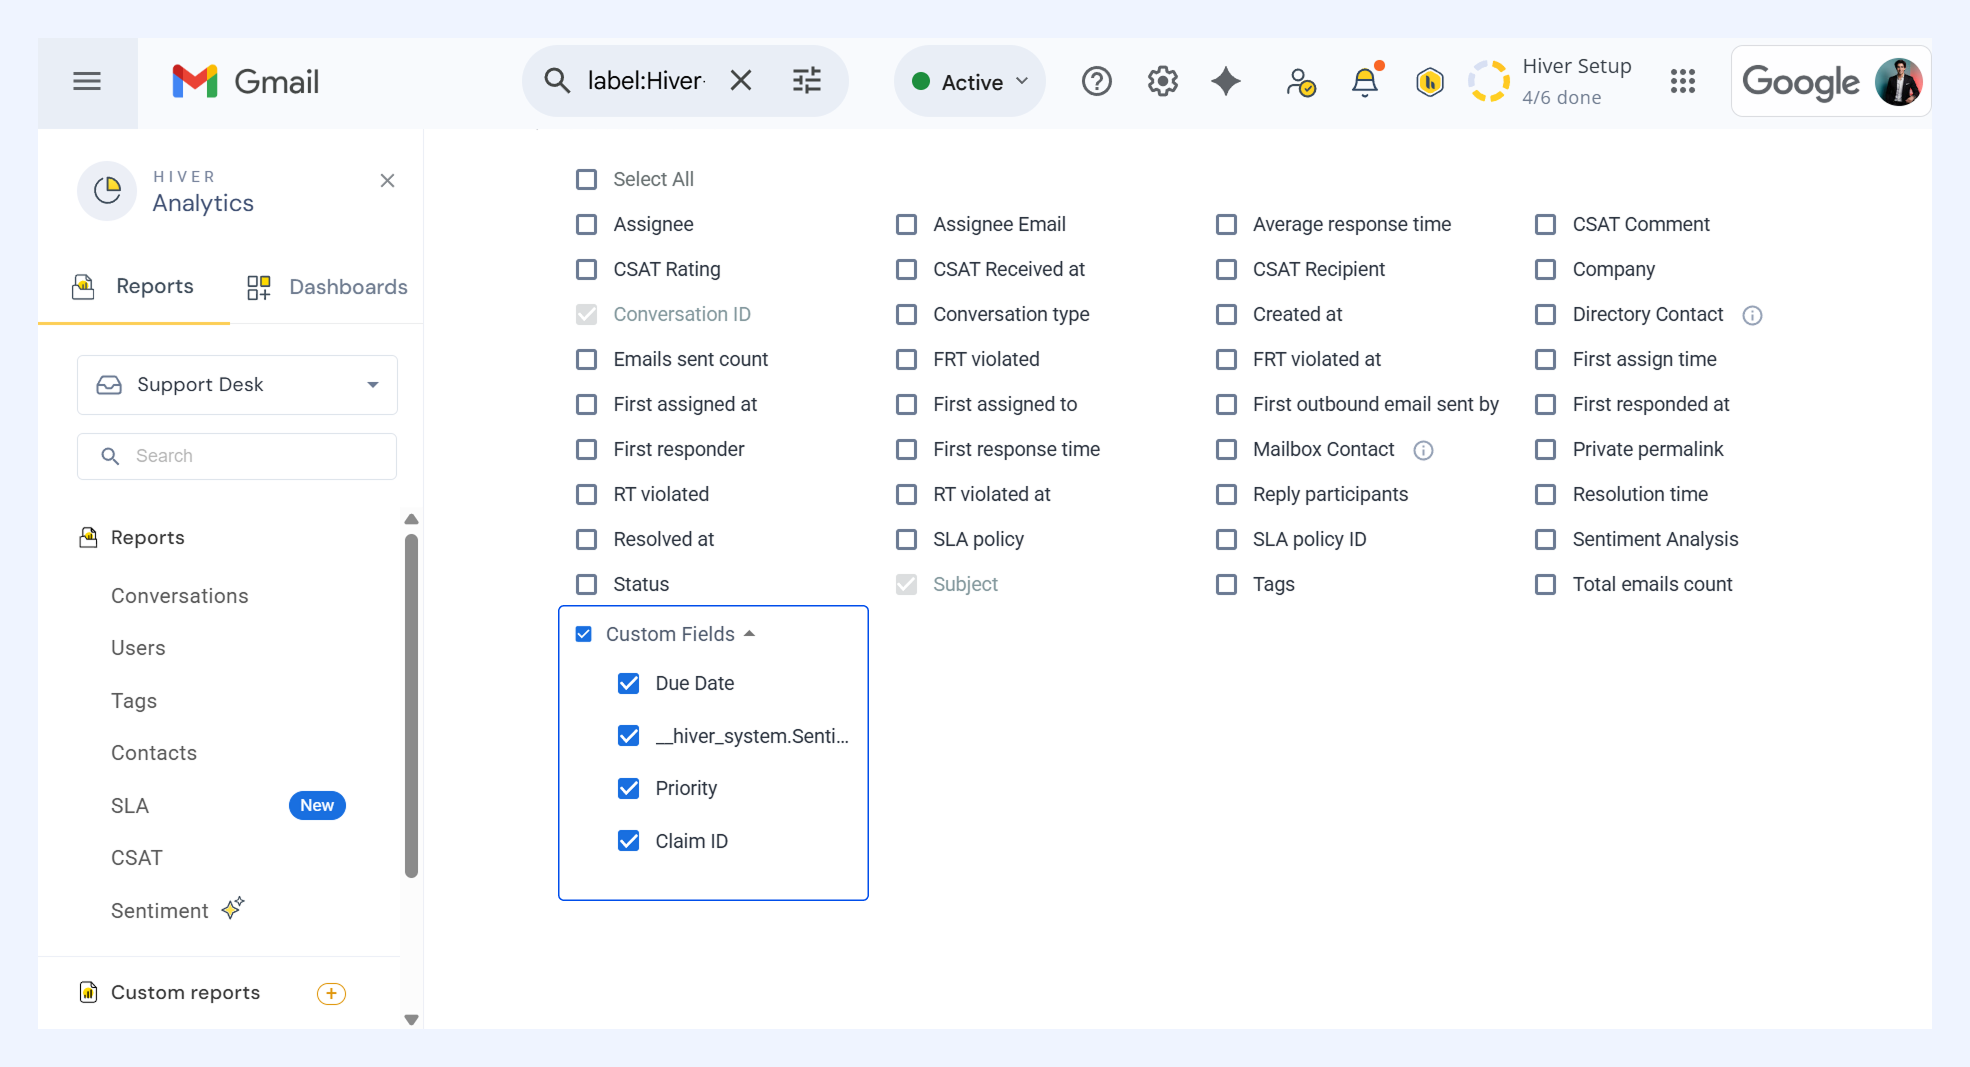
4. Click on Export now to download a CSV file of your data.
Setting up Automations using Custom Fields
You can create rule-based automation workflows in your Shared Inbox using Custom Fields. Automations streamline processes and reduce repetitive tasks by automatically taking action when specific criteria are met.
To get started, go to Hiver settings → Admin Panel → Shared Inboxes → select an inbox → Automations → Create Automation.
Use Custom Fields as triggers
A trigger is the starting point for an automation flow that tells Hiver when to begin running an automation. You can use any updates to your Custom Fields as the trigger for starting an automation.
In your automation rule, select your Custom Field as the trigger.
For instance, to create an automation rule for a field like Priority: Choose ‘Priority is updated’ as the trigger. This will initiate the automation whenever the Priority field for a conversation changes.
.png)
Use Custom Fields as conditions
The IF Condition determines whether the automation rule should proceed after the trigger occurs.
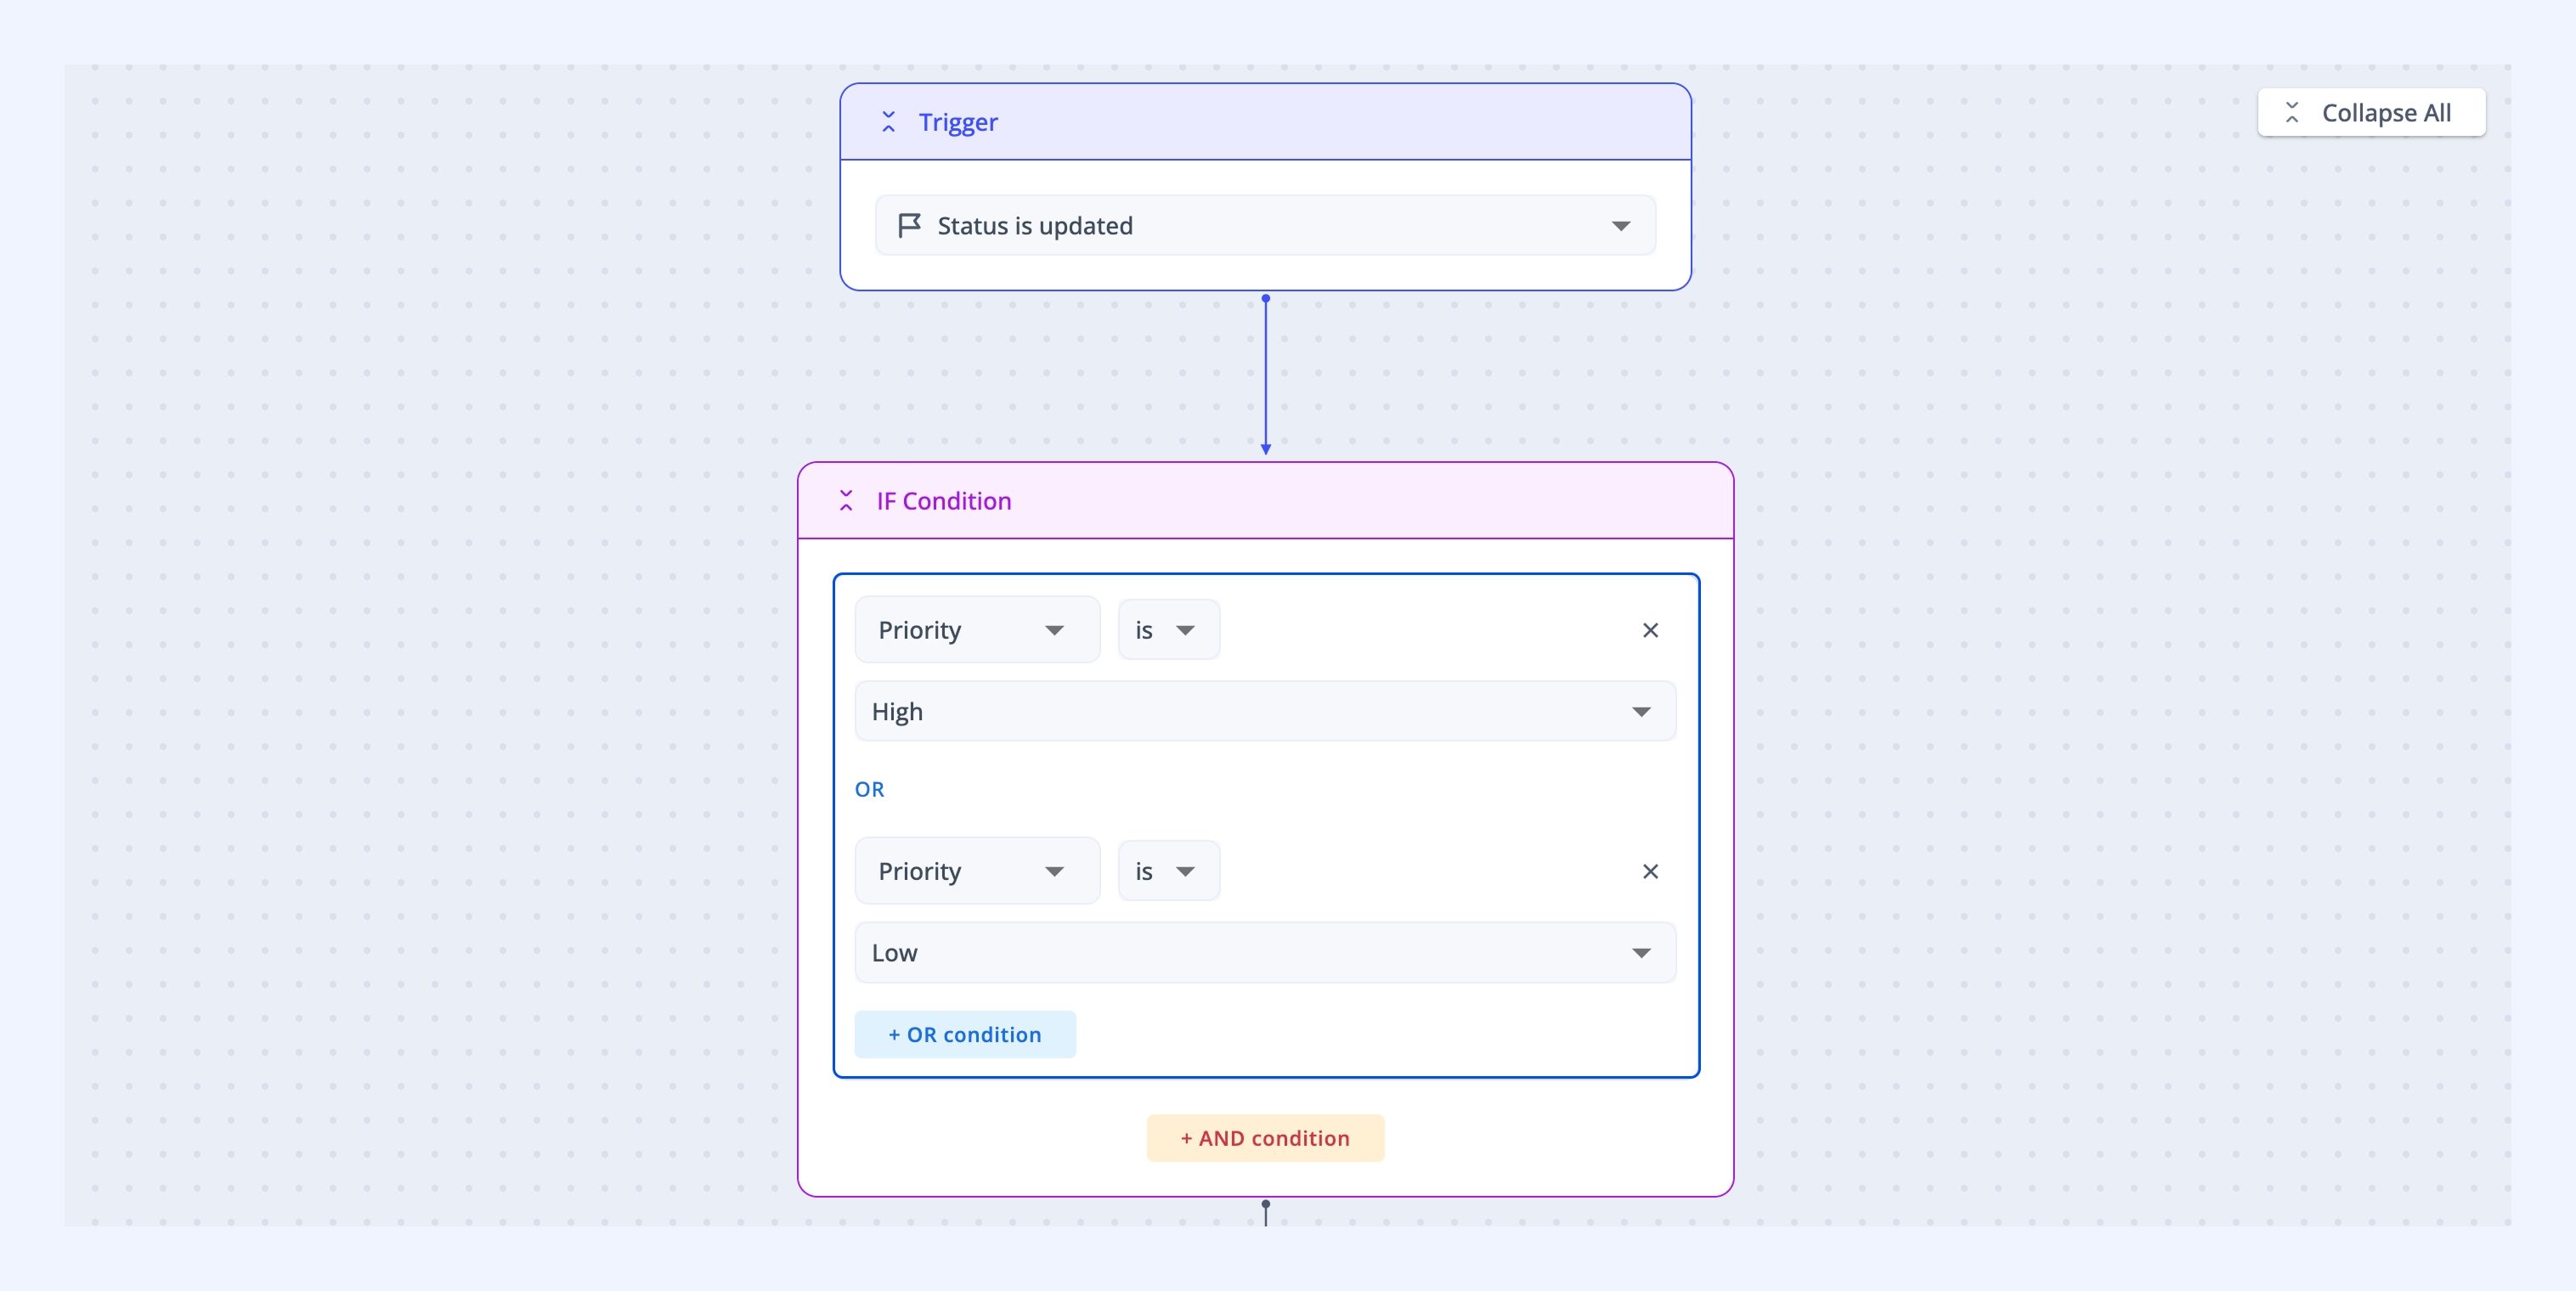
For the same Priority example: Set the condition to ‘Priority is High’. This ensures that the automation only runs when the updated priority is set to High.
You can add multiple conditions using AND or OR logic:
- AND: All conditions must be true. Example: Priority is High AND Status is Open.
- OR: At least one condition must be true. Example: Priority is High OR Priority is Medium.
Use Custom Fields in actions
An action is what happens when both the trigger and conditions are met. Choose an action to trigger Hiver to perform specific actions in your workflow automatically.
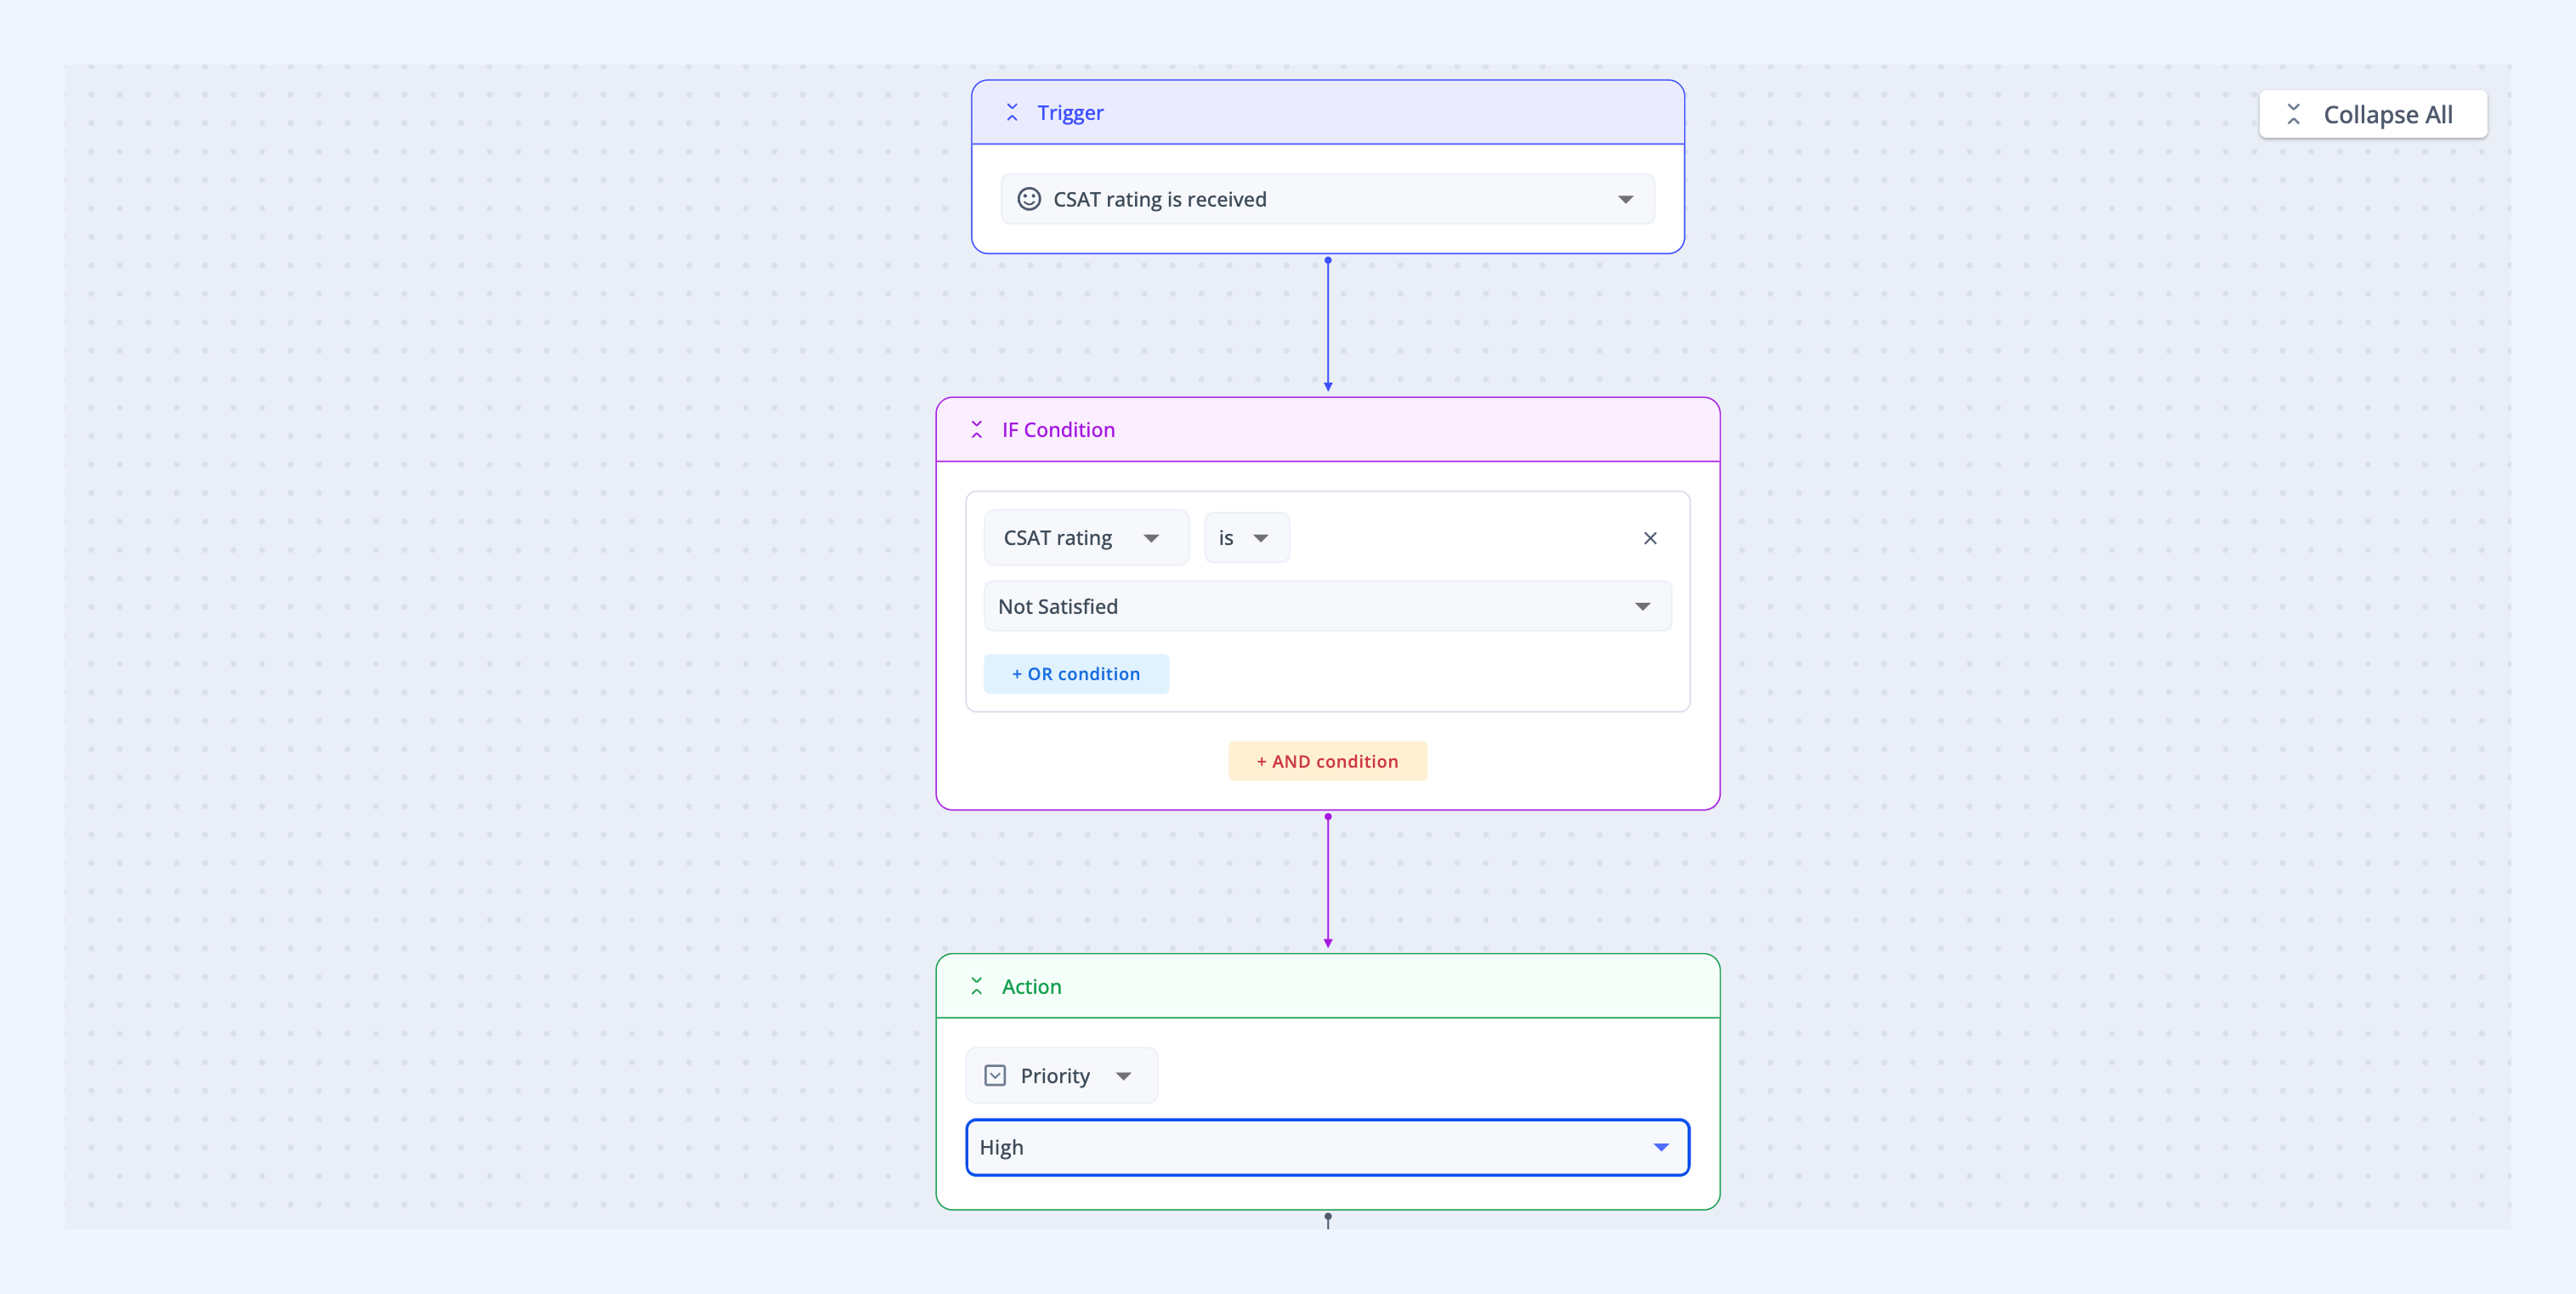
Actions can include:
- Assigning the conversation to a specific team member.
- Adding a note to the conversation.
- Sending an automated reply.
- Updating the custom field.
- And more.
Once you’ve added your actions, click the Save and enable button to activate the automation rule.